Checkpoints
Create the VM instances
/ 100
Network Tiers - Optimizing Network Spend
GSP219

Overview
In this lab, you create one VM in the Premium network service tier (default) and one VM in the Standard network service tier. Then you compare the latency and network paths for each VM instance.
With Network Service Tiers, Google Cloud enables you to optimize your cloud network for performance by choosing the Premium Tier or for cost with the new Standard Tier.
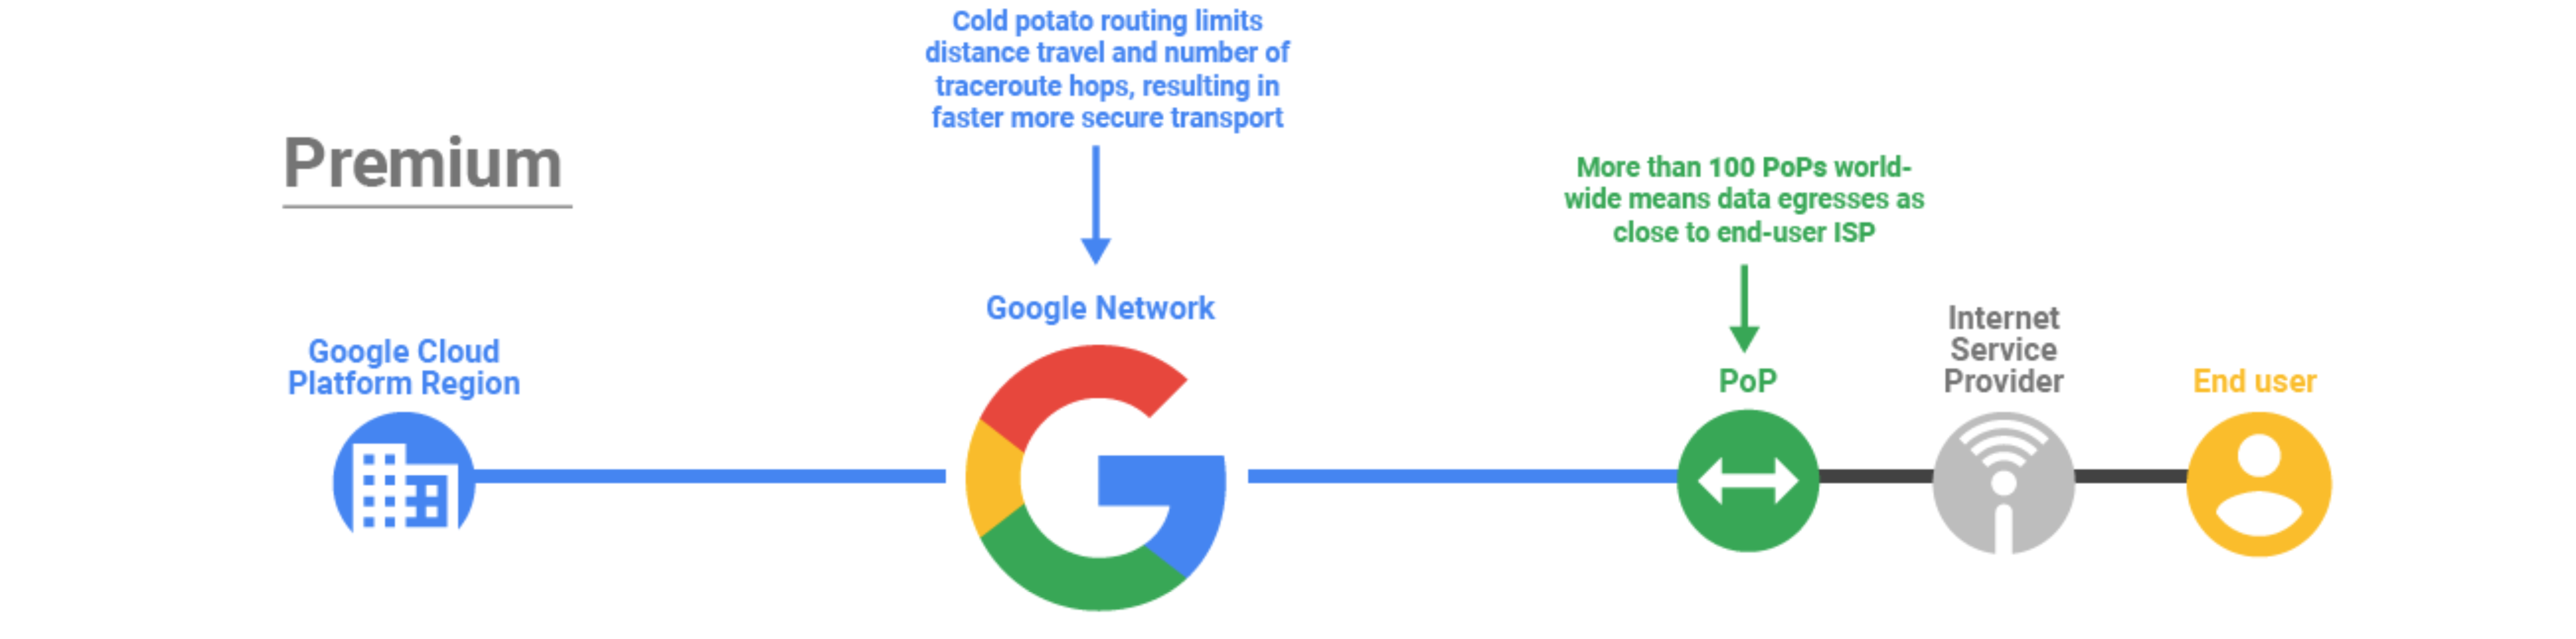
Premium Tier
Premium Tier delivers traffic over Google’s well-provisioned, low latency, highly reliable global network. This network consists of an extensive global private fiber network with over 100 points of presence (POPs) across the globe.
Standard Tier
Standard Tier is a new lower-cost offering. This tier provides network quality that is comparable to other public cloud providers (but lower than Premium Tier) and regional network services such as Regional Load Balancing with one VIP per region.
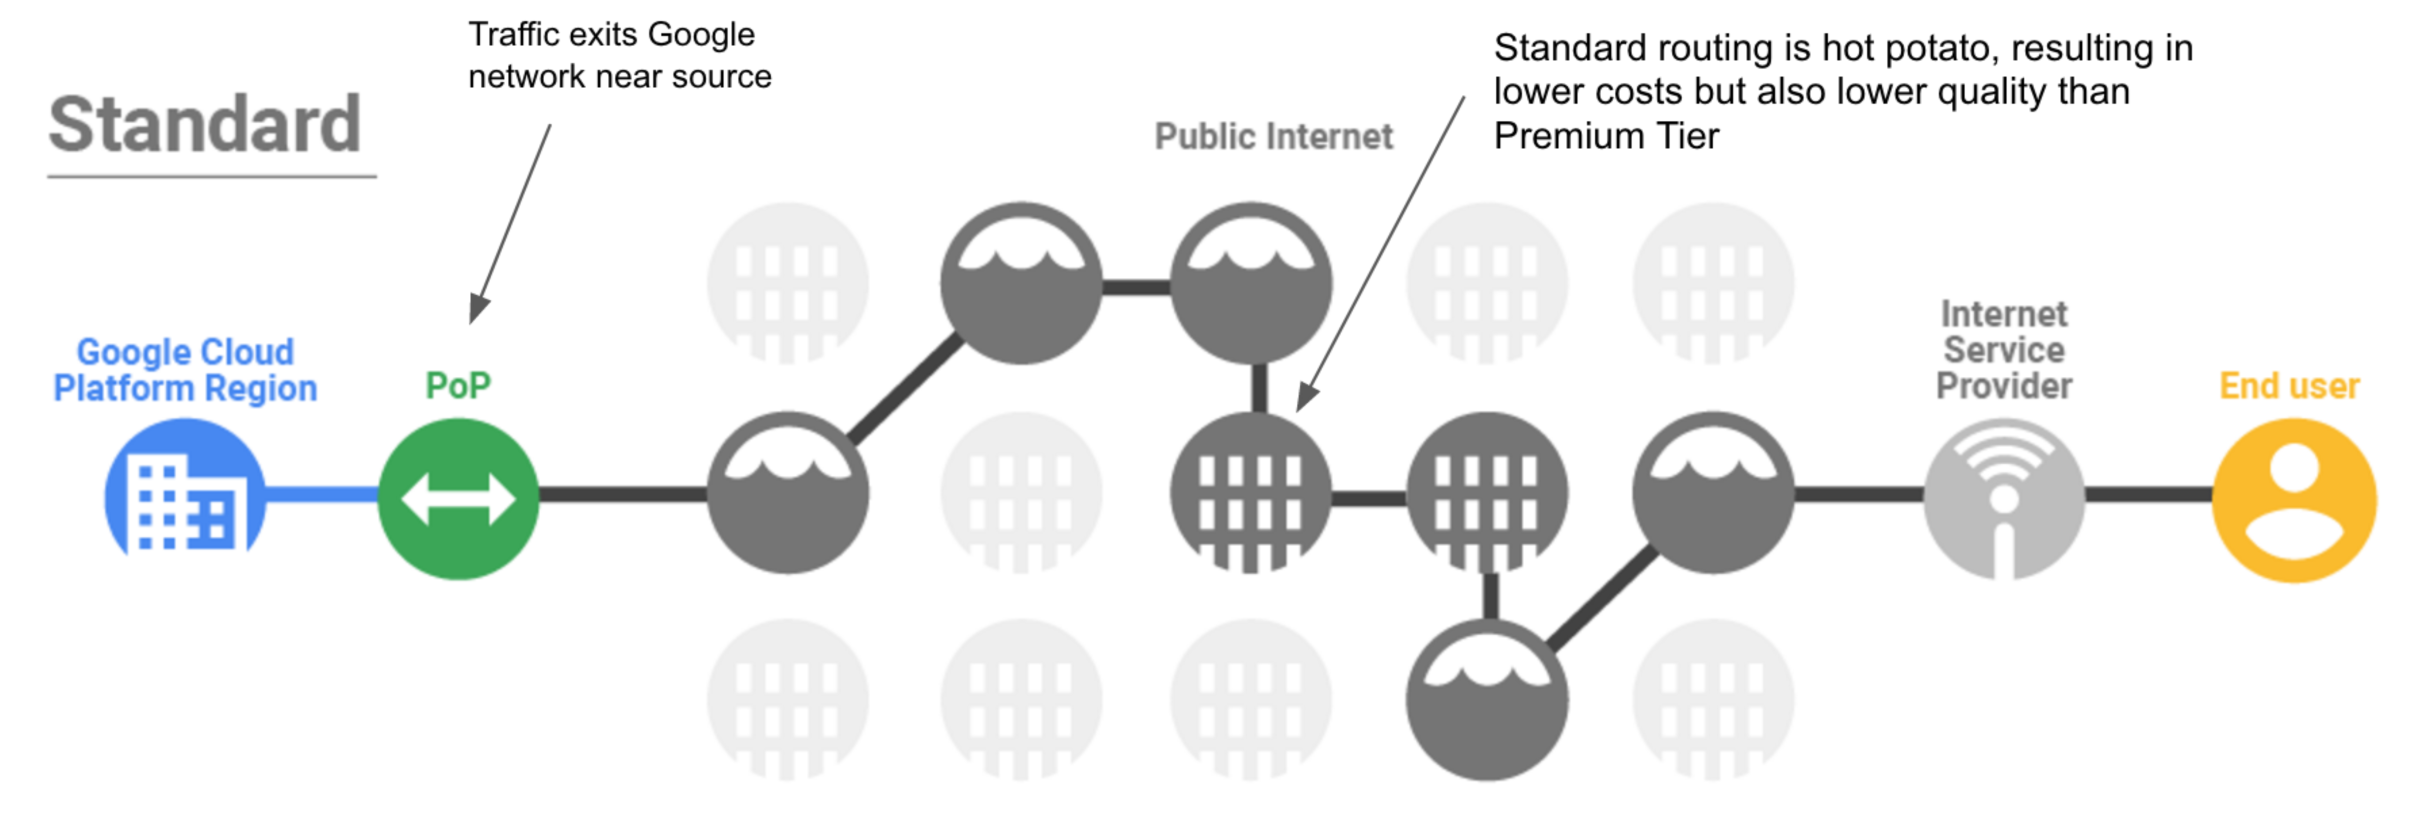
Standard tier is priced lower than Premium because your traffic between Google Cloud and your end-user (Internet) is delivered over transit (ISP) networks instead of Google’s network.
Objectives
In this lab, you learn how to perform the following tasks:
- Create a VM using the Premium network service tier
- Create a VM using the Standard network service tier
- Explore the latency and network paths for VMs on different network service tiers
Setup
Before you click the Start Lab button
Read these instructions. Labs are timed and you cannot pause them. The timer, which starts when you click Start Lab, shows how long Google Cloud resources will be made available to you.
This hands-on lab lets you do the lab activities yourself in a real cloud environment, not in a simulation or demo environment. It does so by giving you new, temporary credentials that you use to sign in and access Google Cloud for the duration of the lab.
To complete this lab, you need:
- Access to a standard internet browser (Chrome browser recommended).
- Time to complete the lab---remember, once you start, you cannot pause a lab.
How to start your lab and sign in to the Google Cloud console
-
Click the Start Lab button. If you need to pay for the lab, a pop-up opens for you to select your payment method. On the left is the Lab Details panel with the following:
- The Open Google Cloud console button
- Time remaining
- The temporary credentials that you must use for this lab
- Other information, if needed, to step through this lab
-
Click Open Google Cloud console (or right-click and select Open Link in Incognito Window if you are running the Chrome browser).
The lab spins up resources, and then opens another tab that shows the Sign in page.
Tip: Arrange the tabs in separate windows, side-by-side.
Note: If you see the Choose an account dialog, click Use Another Account. -
If necessary, copy the Username below and paste it into the Sign in dialog.
{{{user_0.username | "Username"}}} You can also find the Username in the Lab Details panel.
-
Click Next.
-
Copy the Password below and paste it into the Welcome dialog.
{{{user_0.password | "Password"}}} You can also find the Password in the Lab Details panel.
-
Click Next.
Important: You must use the credentials the lab provides you. Do not use your Google Cloud account credentials. Note: Using your own Google Cloud account for this lab may incur extra charges. -
Click through the subsequent pages:
- Accept the terms and conditions.
- Do not add recovery options or two-factor authentication (because this is a temporary account).
- Do not sign up for free trials.
After a few moments, the Google Cloud console opens in this tab.

Task 1. Create the VM instances
You can configure the network tier for your VM instances at the project-level or at the resource-level. In this lab, you create two VM instances and define their network service tier during the instance creation.
Create the Premium tier VM
Create a VM instance using the Premium service tier, which is the default.
-
In the Console, navigate to Navigation menu (
) > Compute Engine > VM instances.
-
Click Create Instance.
-
Set the following property values, leave all other values at their defaults:
Property Value (type value or select option as specified) Name vm-premium Region Zone Series E2 Machine type 1 vCPU (e2-medium) -
Click NETWORKING, DISKS, SECURITY, MANAGEMENT, SOLE-TENANCY at the bottom of the dialog.
-
Expand Networking > Network interfaces (default).
-
Verify that Network Service Tier is set to Premium.
- Click Done, and then click Create.
Create the Standard tier VM
Create a VM instance of the same machine type and in the same zone but use the Standard service tier.
-
Click Create Instance.
-
Set the following values, leave all other values at their defaults:
Property Value (type value or select option as specified) Name vm-standard Region Zone Series E2 Machine type 1 vCPU (e2-medium) -
Click NETWORKING, DISKS, SECURITY, MANAGEMENT, SOLE-TENANCY.
-
Expand Networking > Network interfaces (default).
-
Set the Network Service Tier to Standard.
-
Click Done, and then click Create.
- Wait for both instances to be created, which will be indicated by a green check mark next to each instance's name.
- Note the External IP Addresses of vm-premium and vm-standard. They will be referred to as
[premium-IP]and[standard-IP], respectively.
Click Check my progress to verify the objective.
Task 2. Explore the latency and network paths
Explore some of the network performance differences between the Premium and Standard tier.
Explore the latency for both VM instance
First, explore the latency from a third party service in Europe to your VM instances in
In this lab, you use Ping to demonstrate the latency a user in Europe might experience when accessing your server in
- Open a new tab and go to Ping.
- Enter the
[premium-IP]in the IP address or host name: field. - Type the security code and click Go. Then wait for the 4 consecutive pings to complete.
The output should look like this:
- Enter the
[standard-IP]in the IP address or host name: field. - Type the security code and click Go. Then wait for the 4 consecutive pings to complete.
The output should look like this:
In the example output, the average latency of the Standard tier VM is 127.986 milliseconds. Therefore, the Premium tier VM has a 5% lower latency than the Standard tier VM.
This is a very basic test. Passing real application traffic is always the best indicator of latency and performance. Feel free to examine this Google Cloud blog on Network Service Tiers to learn more about performance differences between network tiers.
Explore the networks paths for both VM instances
Explore the network paths between a third party service in Europe and your VM instances in
In this lab, you use Traceroute to visualize a network path that traffic from a user in Europe might take when accessing your server in
- Open a new tab and go to Traceroute.
- Enter the
[premium-IP]in the IP address or host name: field. - Type the security code and click Go. Then wait for the 4 consecutive pings to complete.
The output should look like this:
In the example output, the traffic destined for the Premium tier VM reached Google Cloud's network after the 5th hop. The IP address on hop 4 is listed in Bavaria, Germany which is the same state as the origin server and an Edge Point of Presence (PoPs). Therefore, the Premium network tier traffic entered the Google Cloud network very close to the user, as expected.
- Enter the
[standard-IP]in the IP address or host name: field. - Type the security code and click Go. Then wait for the 4 consecutive pings to complete.
The output should look like this:
In the example output, the traffic destined for the Standard tier VM reached Google Cloud's network after the 12th hop. The IP address on hop 11 is listed in Chicago, USA, which has an Edge Point of Presence (PoPs) and is close to Iowa, USA (
Congratulations!
In this lab you created one VM in the Premium network service tier (default) and one VM in the Standard network service tier. Then you used a 3rd party service to visualize the differences in latency and network paths for each VM instance. The Premium tier VM had a lower latency and its traffic entered Google Cloud's network sooner than the Standard tier VM.
With Network Service Tiers, Google Cloud offers the flexibility to configure your resources for performance or cost by introducing the Standard Tier of networking. To learn more about the pricing differences between both network tiers, refer to the pricing documentation.
Finish your quest
This self-paced lab is part of the Networking in the Google Cloud and Optimizing Your GCP Costs quests. A quest is a series of related labs that form a learning path. Completing a quest earns you a badge to recognize your achievement. You can make your badge or badges public and link to them in your online resume or social media account. Enroll in any quest that contains this lab and get immediate completion credit. Refer to the Google Cloud Skills Boost catalog for all available quests.
Take your next lab
Continue your Quest with VPC Flow Logs - Analyzing Network Traffic, or check out these suggestions:
Next steps / Learn more
For information on the Network Tiers, see Network Service Tiers.
Manual Last Updated October 26, 2023
Lab Last Tested October 31, 2023
Copyright 2024 Google LLC All rights reserved. Google and the Google logo are trademarks of Google LLC. All other company and product names may be trademarks of the respective companies with which they are associated.