Checkpoint
Retrieve dataset files
/ 20
Launch Cloud Dataprep
/ 30
Run Job with Parameters/Overrides
/ 50
Automating your BigQuery Data Pipeline with Cloud Dataprep
- GSP826
- Overview
- Setup and requirements
- Task 1. Retrieve dataset files
- Task 2. Open Google Cloud Dataprep
- Task 3. Create Datasets
- Task 4. Create Dataset with custom SQL
- Task 5. Parameterizing with custom SQL Datasets
- Task 6. Working with advanced data types
- Task 7. Targeted/partial deduplication
- Task 8. Run job with parameters/overrides
- Congratulations!
This lab was developed with our partner, Alteryx. Your personal information may be shared with Trifacta, the lab sponsor, if you have opted-in to receive product updates, announcements, and offers in your Account Profile.
GSP826

Overview
Cloud Dataprep is Google's self-service data preparation tool built in collaboration with Alteryx. In this lab you will learn some more advanced Dataprep techniques.
Use case scenario:
Google Patents Public Data, provided by IFI CLAIMS Patent Services, is a worldwide bibliographic and US full-text dataset of patent publications. Patent information accessibility is critical for examining new patents, informing public policy decisions, managing corporate investment in intellectual property, and promoting future scientific innovation.
When new patent applications are reviewed, researchers often build on previous publications and cite them in their works. In this lab, you will examine how Dataprep can be used on complicated data structures in BigQuery. Using the data, you will build out a leaderboard for inventors who were most frequently cited for a particular month of patents publications.
Objectives
In this lab, you will learn how to:
- Import data from BigQuery to Dataprep
- Create datasets from custom SQL
- Create objects and nested data structures
- Override parameters when running jobs
Setup and requirements
It is recommended that you take the Working with Google Cloud Dataprep and Preparing and Aggregating Data for Visualizations Using Dataprep labs before attempting this lab.
Before you click the Start Lab button
Read these instructions. Labs are timed and you cannot pause them. The timer, which starts when you click Start Lab, shows how long Google Cloud resources will be made available to you.
This hands-on lab lets you do the lab activities yourself in a real cloud environment, not in a simulation or demo environment. It does so by giving you new, temporary credentials that you use to sign in and access Google Cloud for the duration of the lab.
To complete this lab, you need:
- Access to a standard internet browser (Chrome browser recommended).
- Time to complete the lab---remember, once you start, you cannot pause a lab.
How to start your lab and sign in to the Google Cloud console
-
Click the Start Lab button. If you need to pay for the lab, a pop-up opens for you to select your payment method. On the left is the Lab Details panel with the following:
- The Open Google Cloud console button
- Time remaining
- The temporary credentials that you must use for this lab
- Other information, if needed, to step through this lab
-
Click Open Google Cloud console (or right-click and select Open Link in Incognito Window if you are running the Chrome browser).
The lab spins up resources, and then opens another tab that shows the Sign in page.
Tip: Arrange the tabs in separate windows, side-by-side.
Note: If you see the Choose an account dialog, click Use Another Account. -
If necessary, copy the Username below and paste it into the Sign in dialog.
{{{user_0.username | "Username"}}} You can also find the Username in the Lab Details panel.
-
Click Next.
-
Copy the Password below and paste it into the Welcome dialog.
{{{user_0.password | "Password"}}} You can also find the Password in the Lab Details panel.
-
Click Next.
Important: You must use the credentials the lab provides you. Do not use your Google Cloud account credentials. Note: Using your own Google Cloud account for this lab may incur extra charges. -
Click through the subsequent pages:
- Accept the terms and conditions.
- Do not add recovery options or two-factor authentication (because this is a temporary account).
- Do not sign up for free trials.
After a few moments, the Google Cloud console opens in this tab.

Task 1. Retrieve dataset files
For this use case, you will be using 3 tables from the Google public patent dataset.
-
Publications- a table of all patent publications. The full data is 1.8TB, but you will only be using a subset of the data for this exercise. -
Inventors- a table of inventors with unique identifiers. -
Patent_inventor- a table that links patents to the inventor IDs.
- Run the following commands in Cloud Shell to re-enable the Dataflow API and copy the dataset file into BigQuery:
Click Check my progress to verify the objective.
Task 2. Open Google Cloud Dataprep
- Open Cloud Shell and run the following command:
You should see a message saying the service identity was created.
-
In the Cloud Console go to the Navigation menu, and under Analytics, select Dataprep.
-
To get into Cloud Dataprep, check that you agree to Google Dataprep Terms of Service, and then click Accept.
-
Click the checkbox and then click Agree and Continue when prompted to share account information with Alteryx.
-
Click Allow to give Alteryx access to your project.
-
Select your lab credentials to sign in and click Allow.

-
Check the box and click Accept to agree to Alteryx Terms of Service.
-
If prompted to use the default location for the storage bucket, click Continue.
-
For new users, a tutorial will launch, asking you to select datasets. Quit out of this screen by clicking Cancel or exiting out.
-
Click on the Dataprep icon on the top left corner to go to the home screen.
Click Check my progress to verify the objective.
Task 3. Create Datasets
For this exercise, you will be using public tables from BigQuery.
-
Navigate to the Flows page on the left hand side.
-
Click Create > Blank Flow.
-
Name it
Qwiklabs Patents. -
Add Datasets to the flow.
-
Choose Import Datasets to load a new source.
-
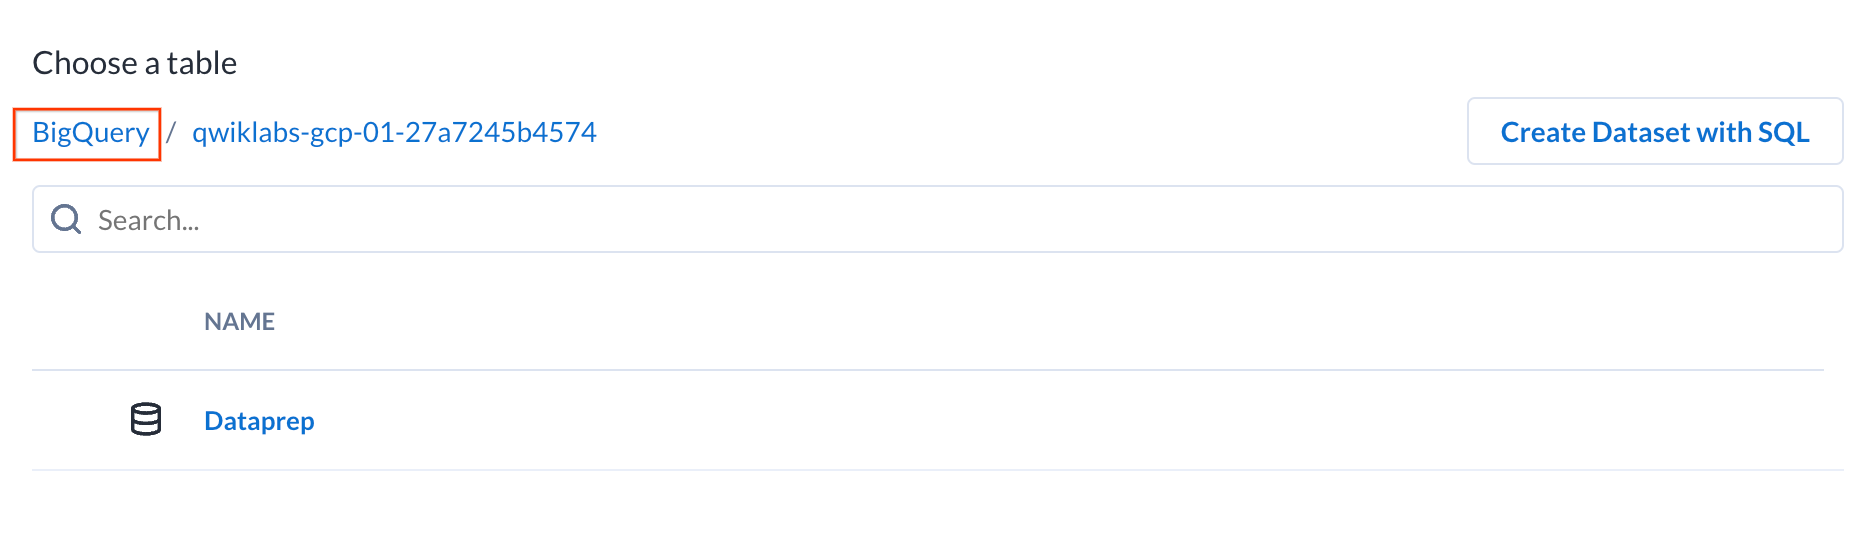
On the left hand side, choose BigQuery.
-
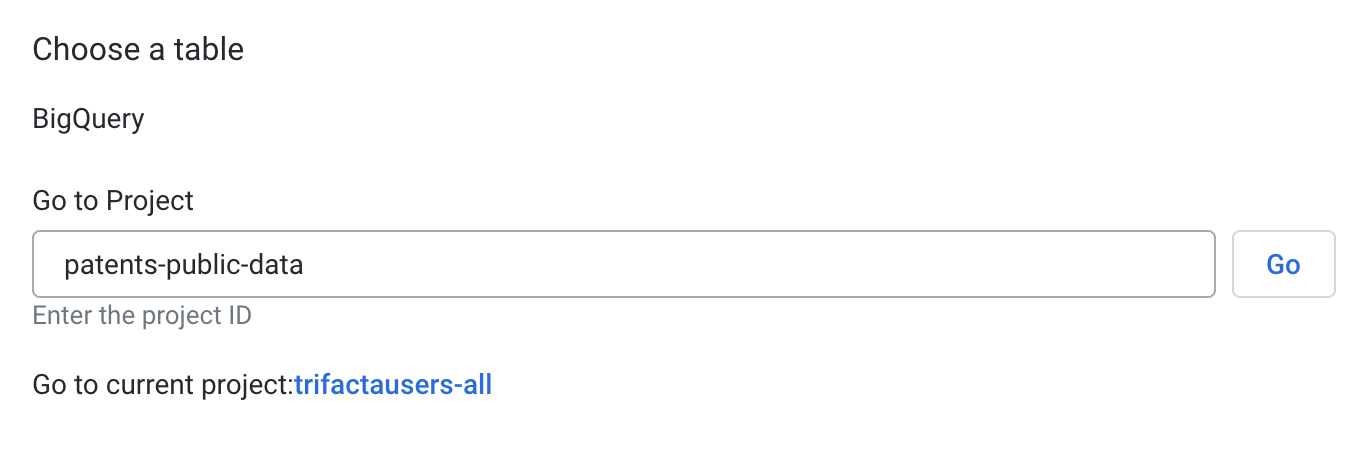
By default, you will be presented with the tables within your current project. Click on BigQuery in the breadcrumbs to change the project.
- In the textbox, input
patents-public-dataand click Go.
-
You will now see the publicly available dataset for patents. Click on the
patentsviewschema. -
Search for
inventorin the search bar. Preview the inventor table by clicking on the eye icon to the right of the table name.
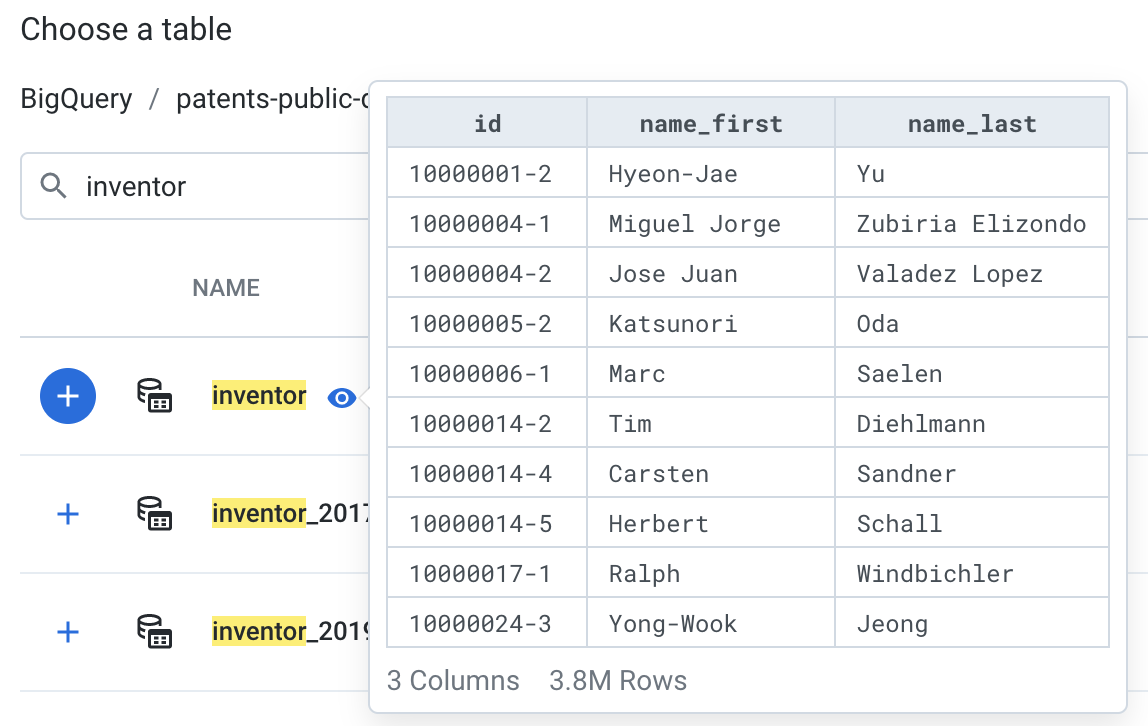
The inventor table contains the identifier, first and last name for all inventors listed in the patents system.
-
Click on the Create Dataset with SQL at the top right of the browser panel.
-
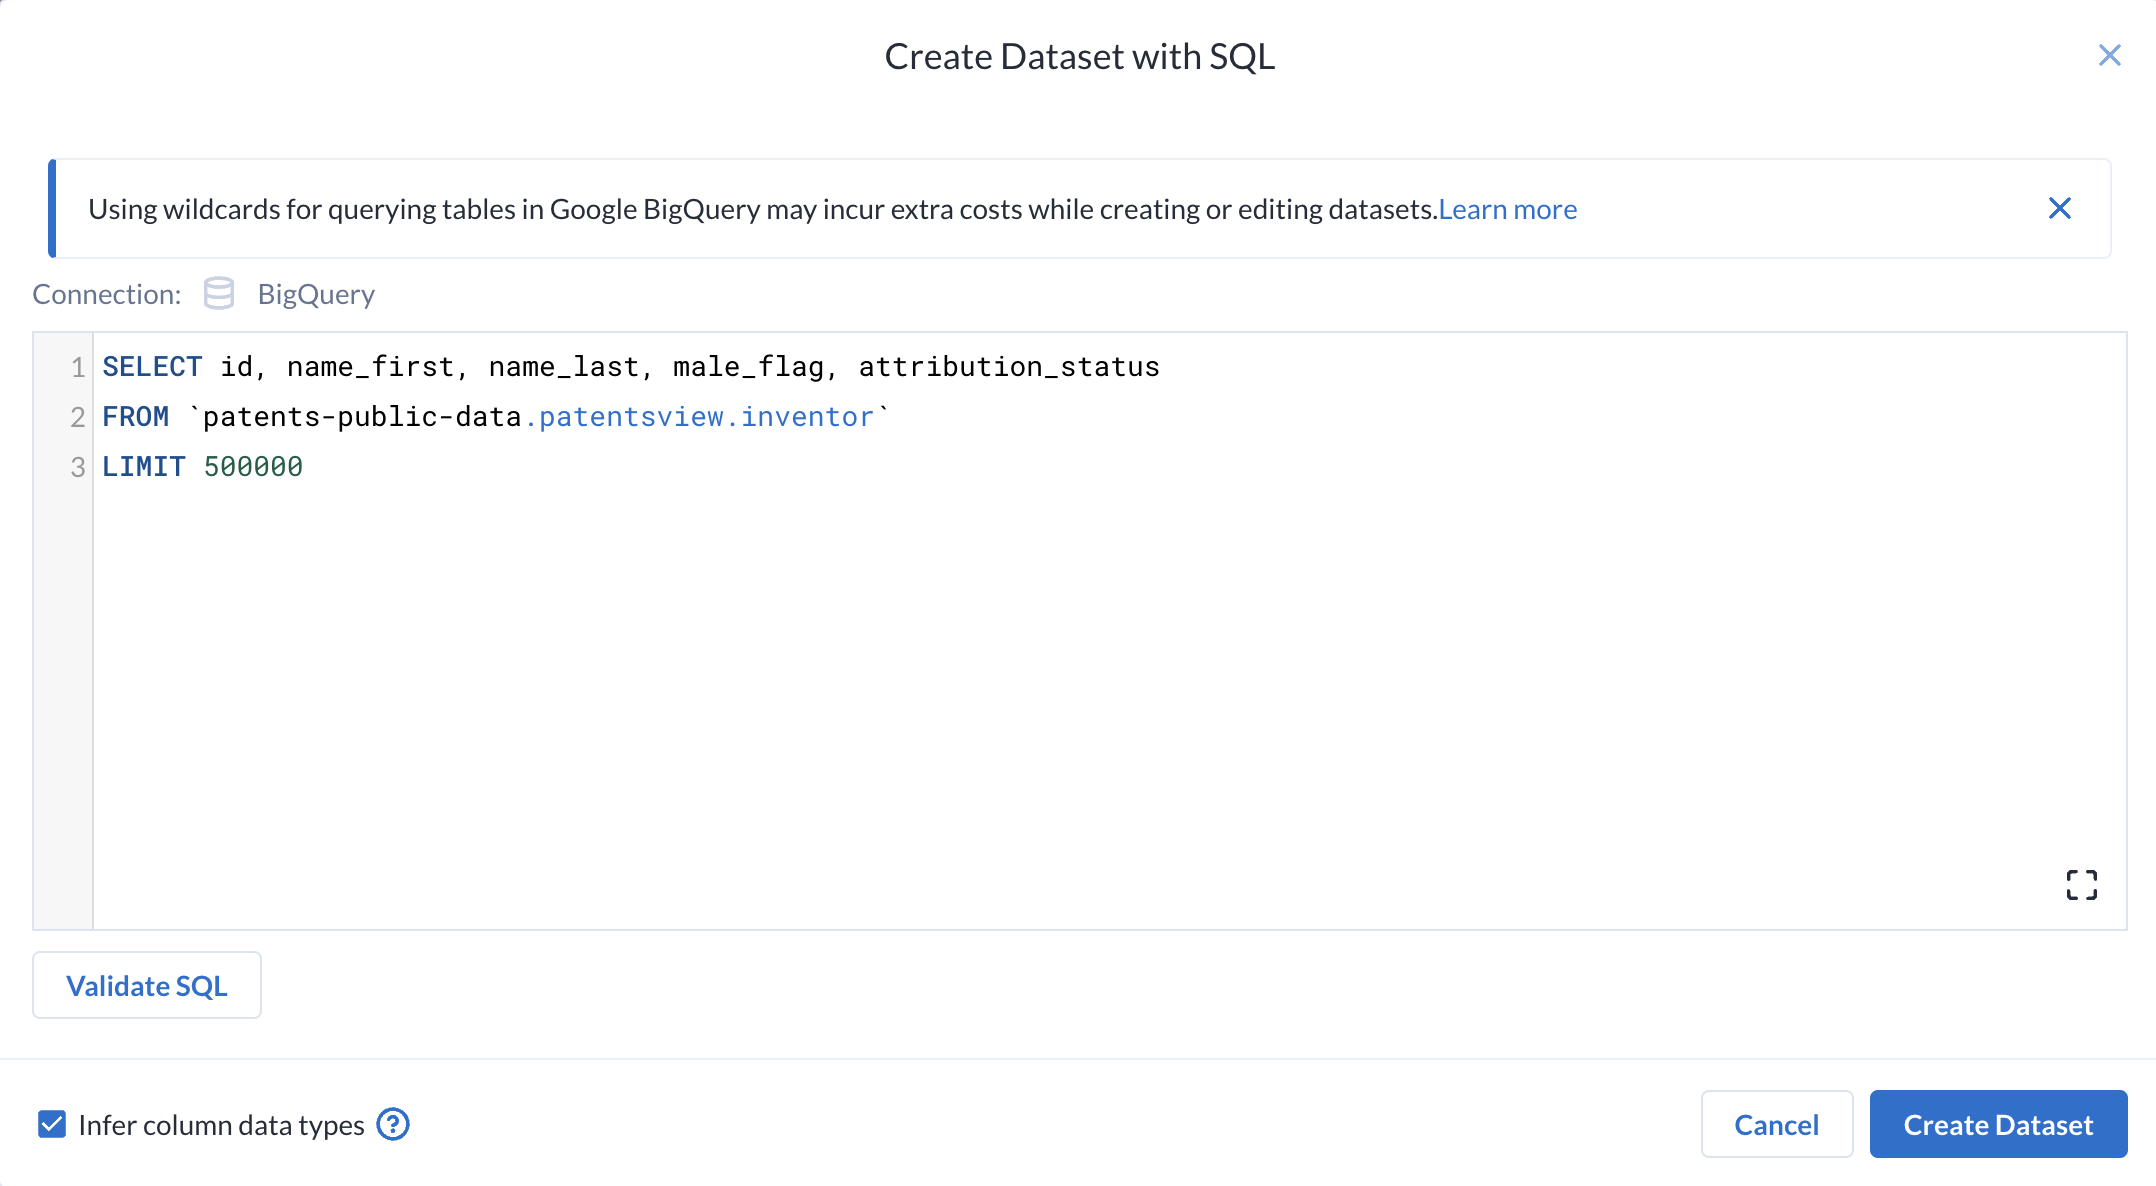
A dialog opens where you can input a custom SQL query to fine tune what you import. Custom SQL is a powerful tool that allows you to input almost any SQL statement to create custom datasets.
You can use this to pre-filter your data, as the processing will be handled by BigQuery, where these filtering operations will perform much faster.
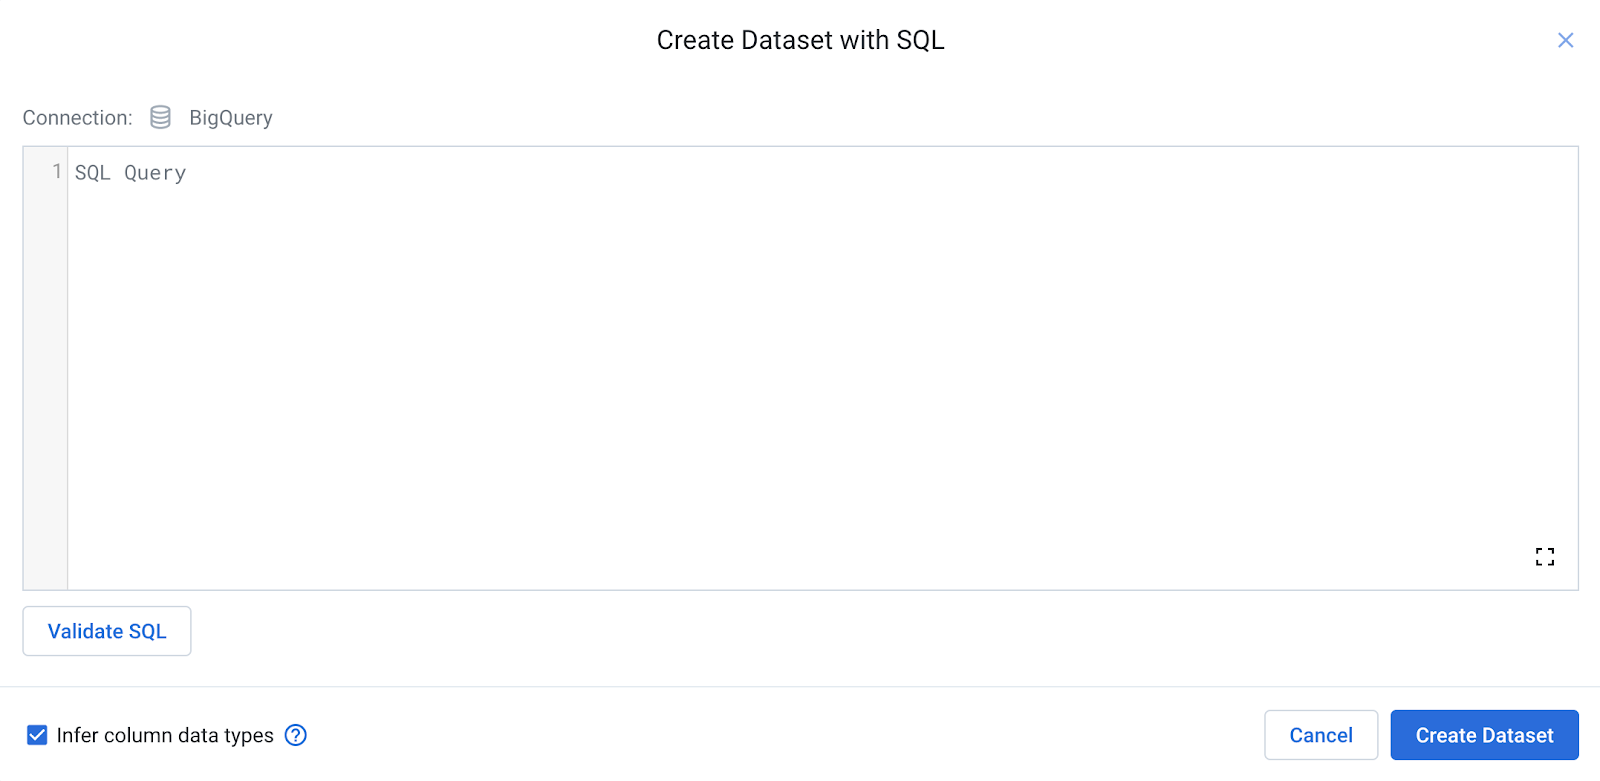
- In the dialogue, enter the following query:
- Click Validate SQL to validate your SQL statement. Any syntax issues with the query will be flagged.
-
Click Create Dataset.
-
Edit the name of the data from SQL Dataset to
inventor. -
With the table selected, press the Import & Add to Flow button on the bottom right. The table will be added to the Flow Canvas as a dataset.
Task 4. Create Dataset with custom SQL
Now that you have the inventor information, you have to bring in the patent publication information.
-
Once again, Add Dataset to the flow. Choose Import Dataset, then BigQuery again.
-
This time, choose the Dataprep dataset. There should be a
patents_julytable inside.
This table is a subset of the 1.8TB patents table, which contains only patents that have been published since July 2020. Preview this table.
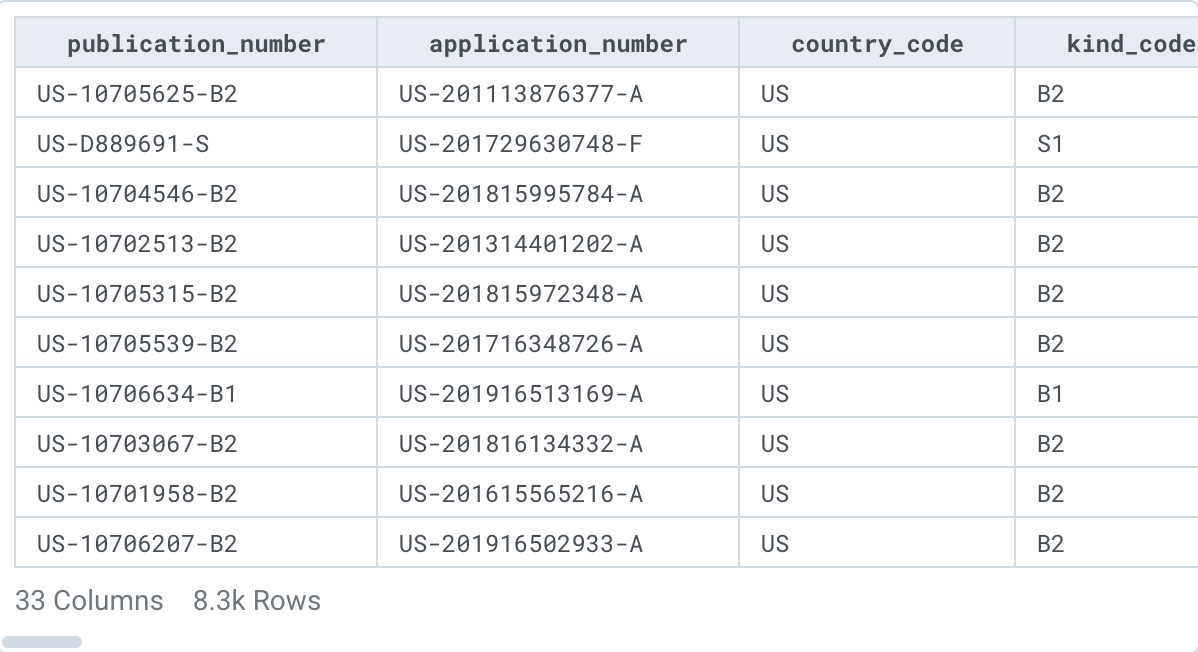
Even though the table is only about 8000 rows, the data in the table is fairly wide and heavily nested. The actual table size is about 1.18 GB. While Dataprep can handle the workload, for the purposes of this exercise, you will cut down the dataset even further to save you time (and money, if you were in a production environment).
- Click on the Create Dataset with SQL at the top right of the browser panel.

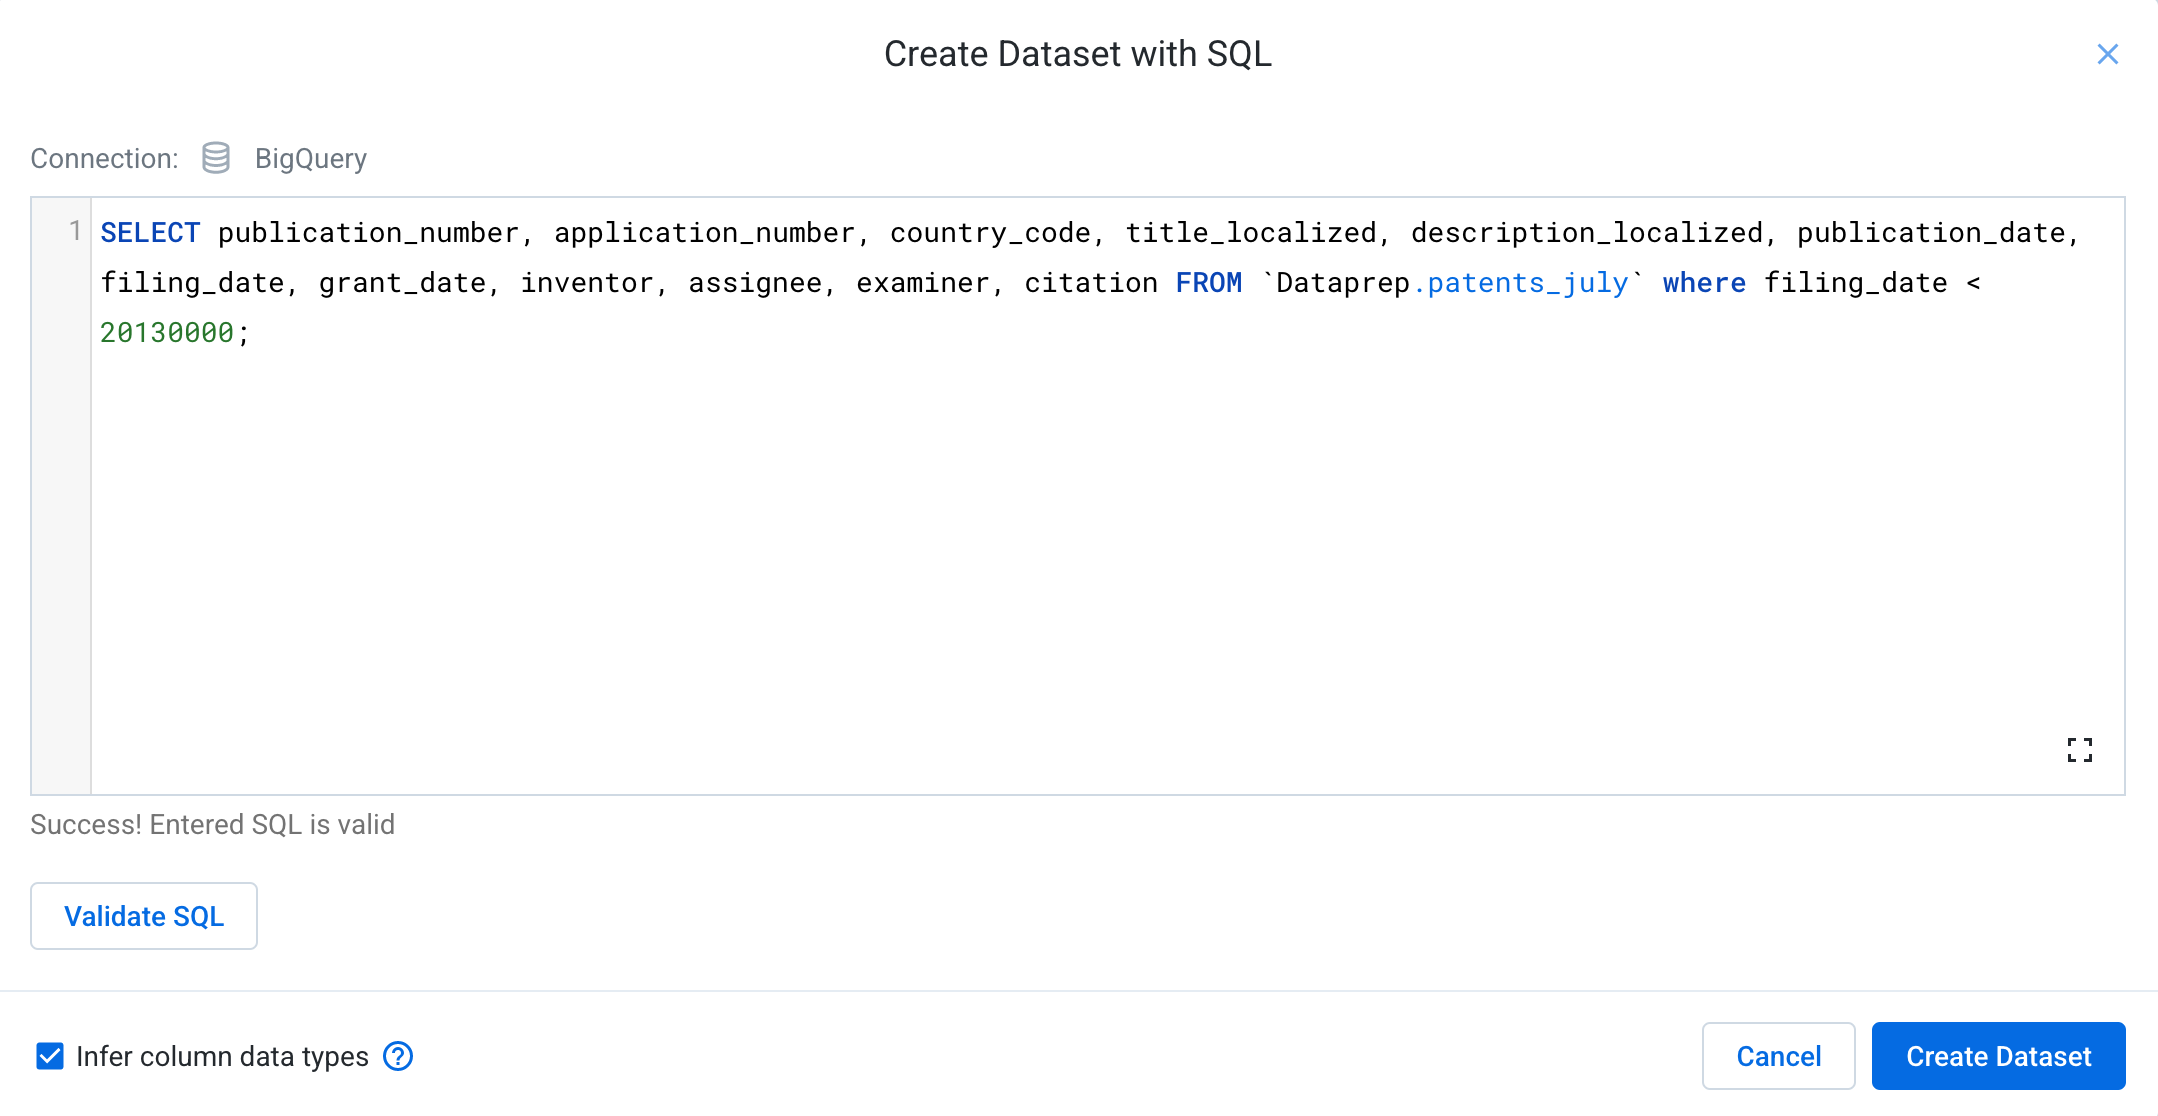
- In the dialog, add the following query:
This query allows you to filter down the entire table to just 12 out of the 33 columns, as well as limiting the number of rows to those that have a filing date before 2016.
- Click Validate SQL to validate your SQL statement. Any syntax issues with the query will be flagged.
-
Click Create Dataset to stage this dataset.
-
Edit the name of the data from SQL Dataset to
Publications_Pre2013. -
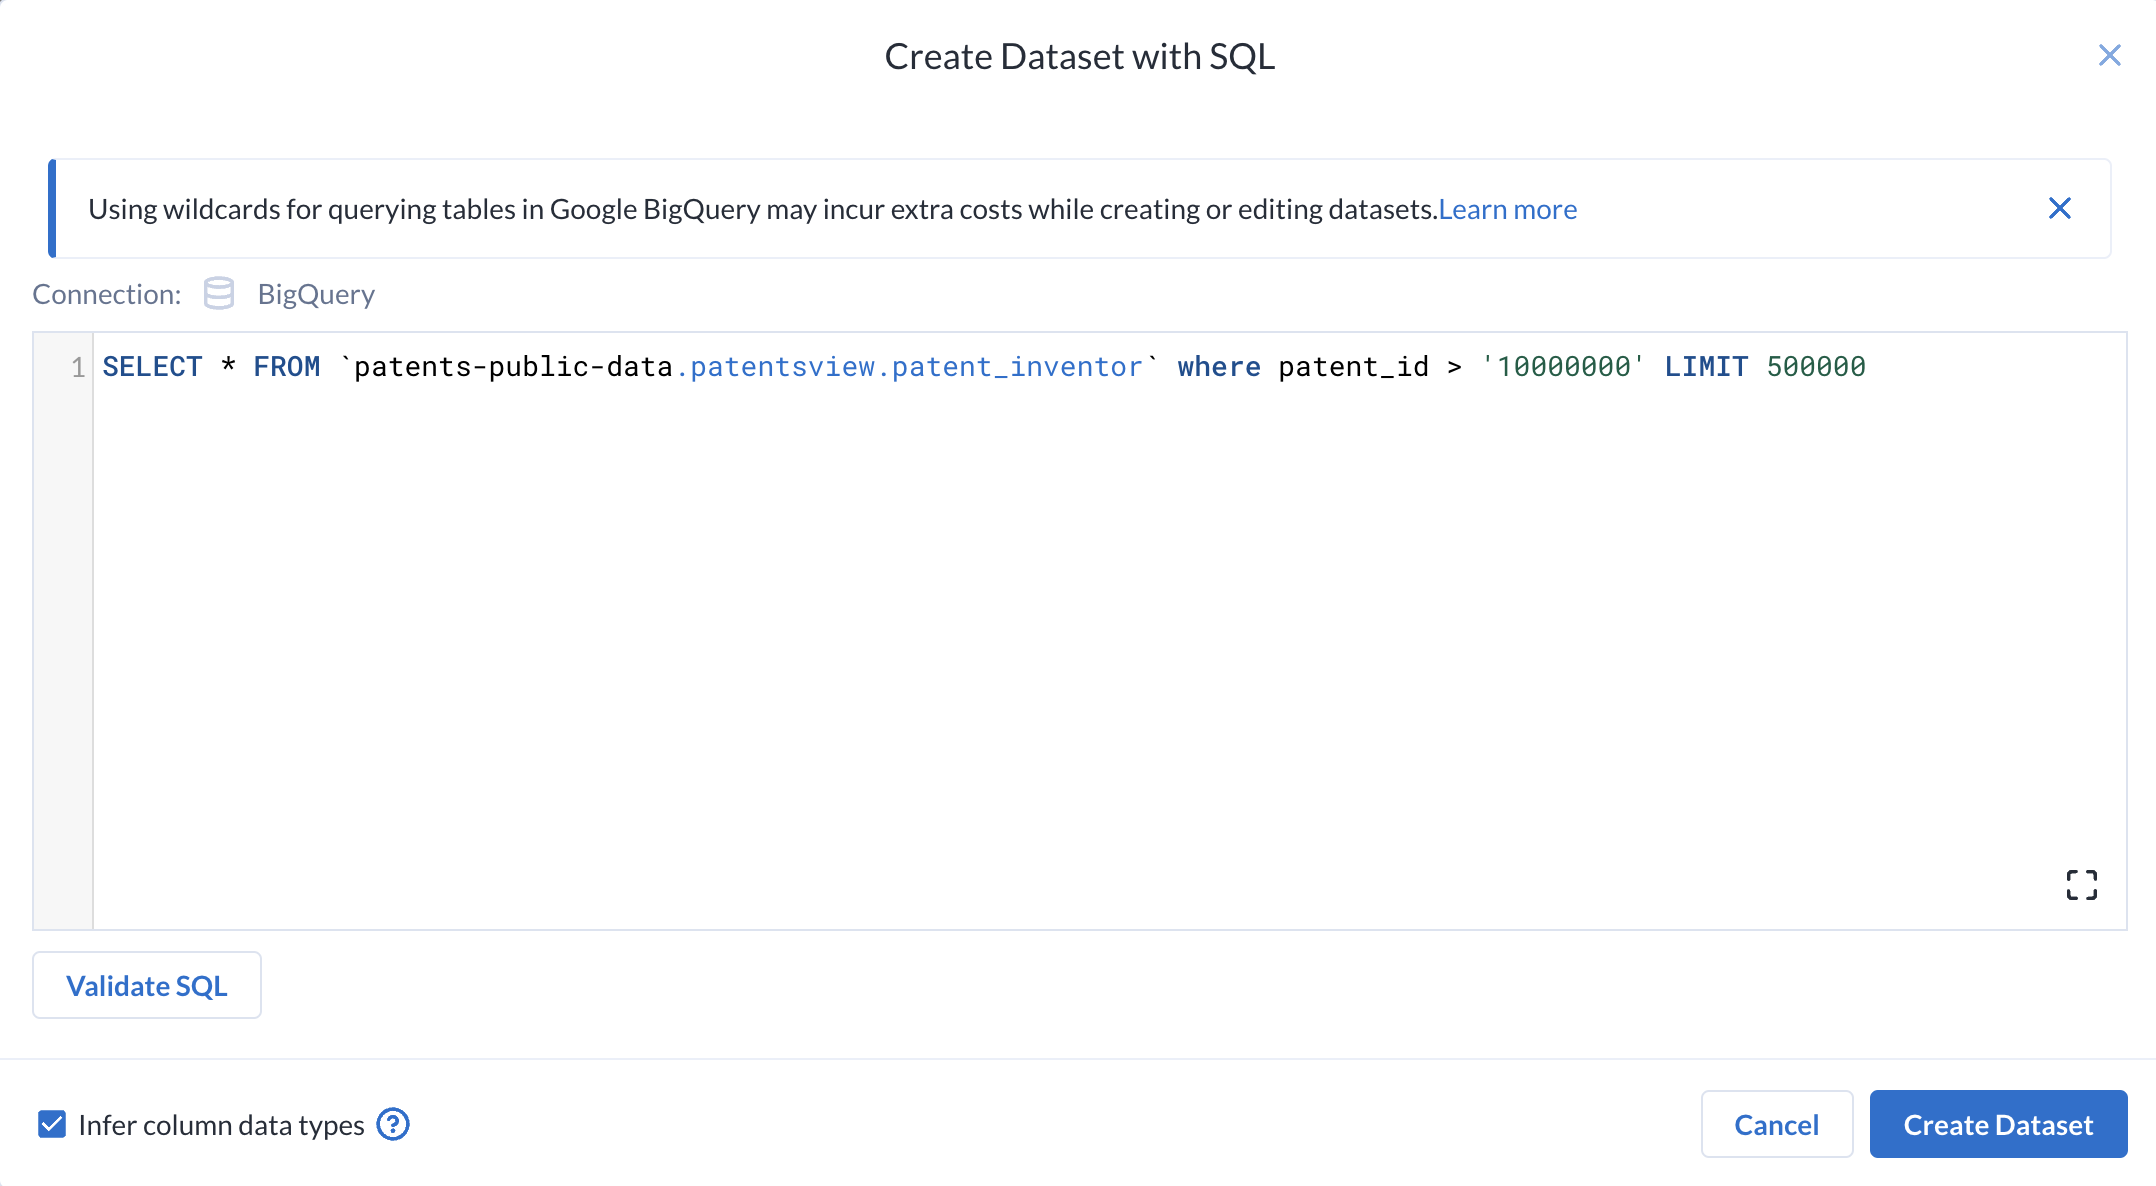
Click Create Dataset with SQL once again. This time, add:
The patent_inventor table links the patent id to the inventor id. The table contains all historical patents. Since you are focusing on relatively recent patents, you will filter this dataset to be more relevant.
-
Create Dataset to stage this table.
-
Name the dataset
patent_inventors. -
Click Import & Add to Flow to add these datasets to your Flow canvas.
Task 5. Parameterizing with custom SQL Datasets
Similar to files taken from Cloud Storage, it is possible to parameterize datasets originating from BigQuery.
-
Before you add a new recipe for the datasets, you'll need to edit previous custom SQL to add a parameter.
-
Right click on the
Publications_Pre2013dataset and select Edit custom SQL.
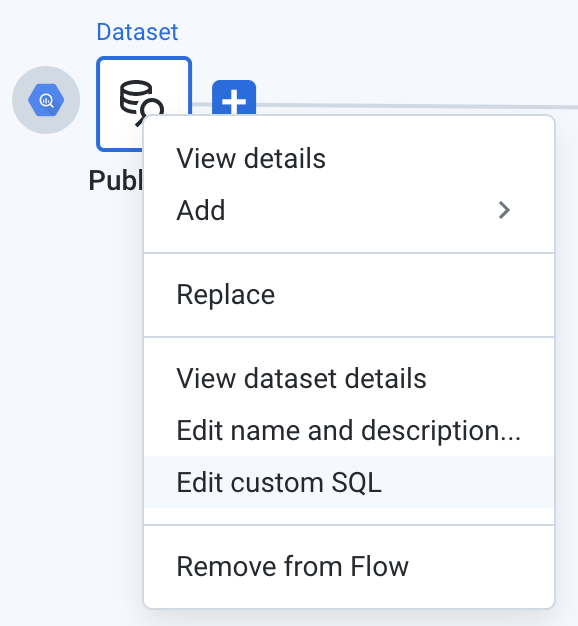
Once again, the SQL editing dialog will open.
-
Highlight the
20130000at the end of the SQL query.
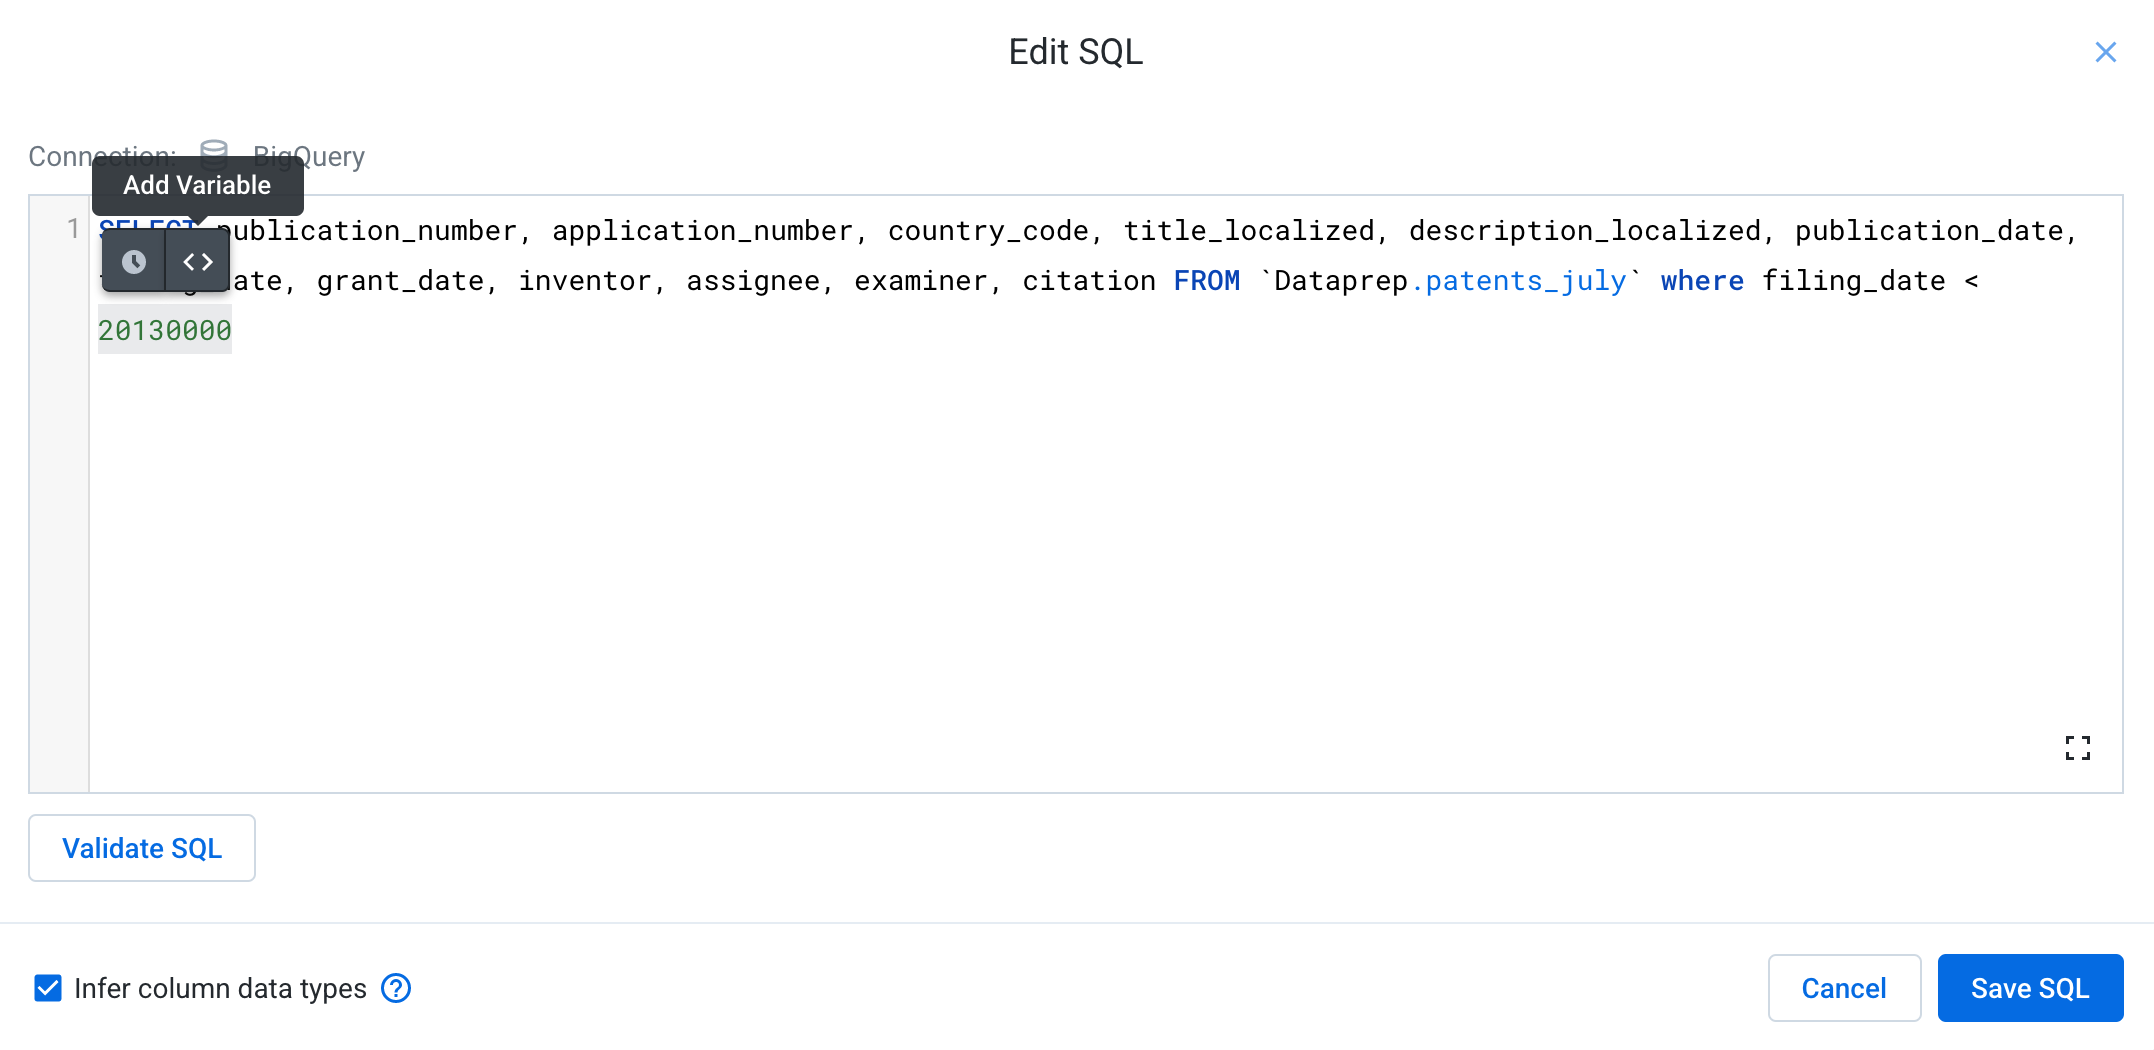
-
Choose Add Variable. Variable parameters are values that can be overridden at execution time.
-
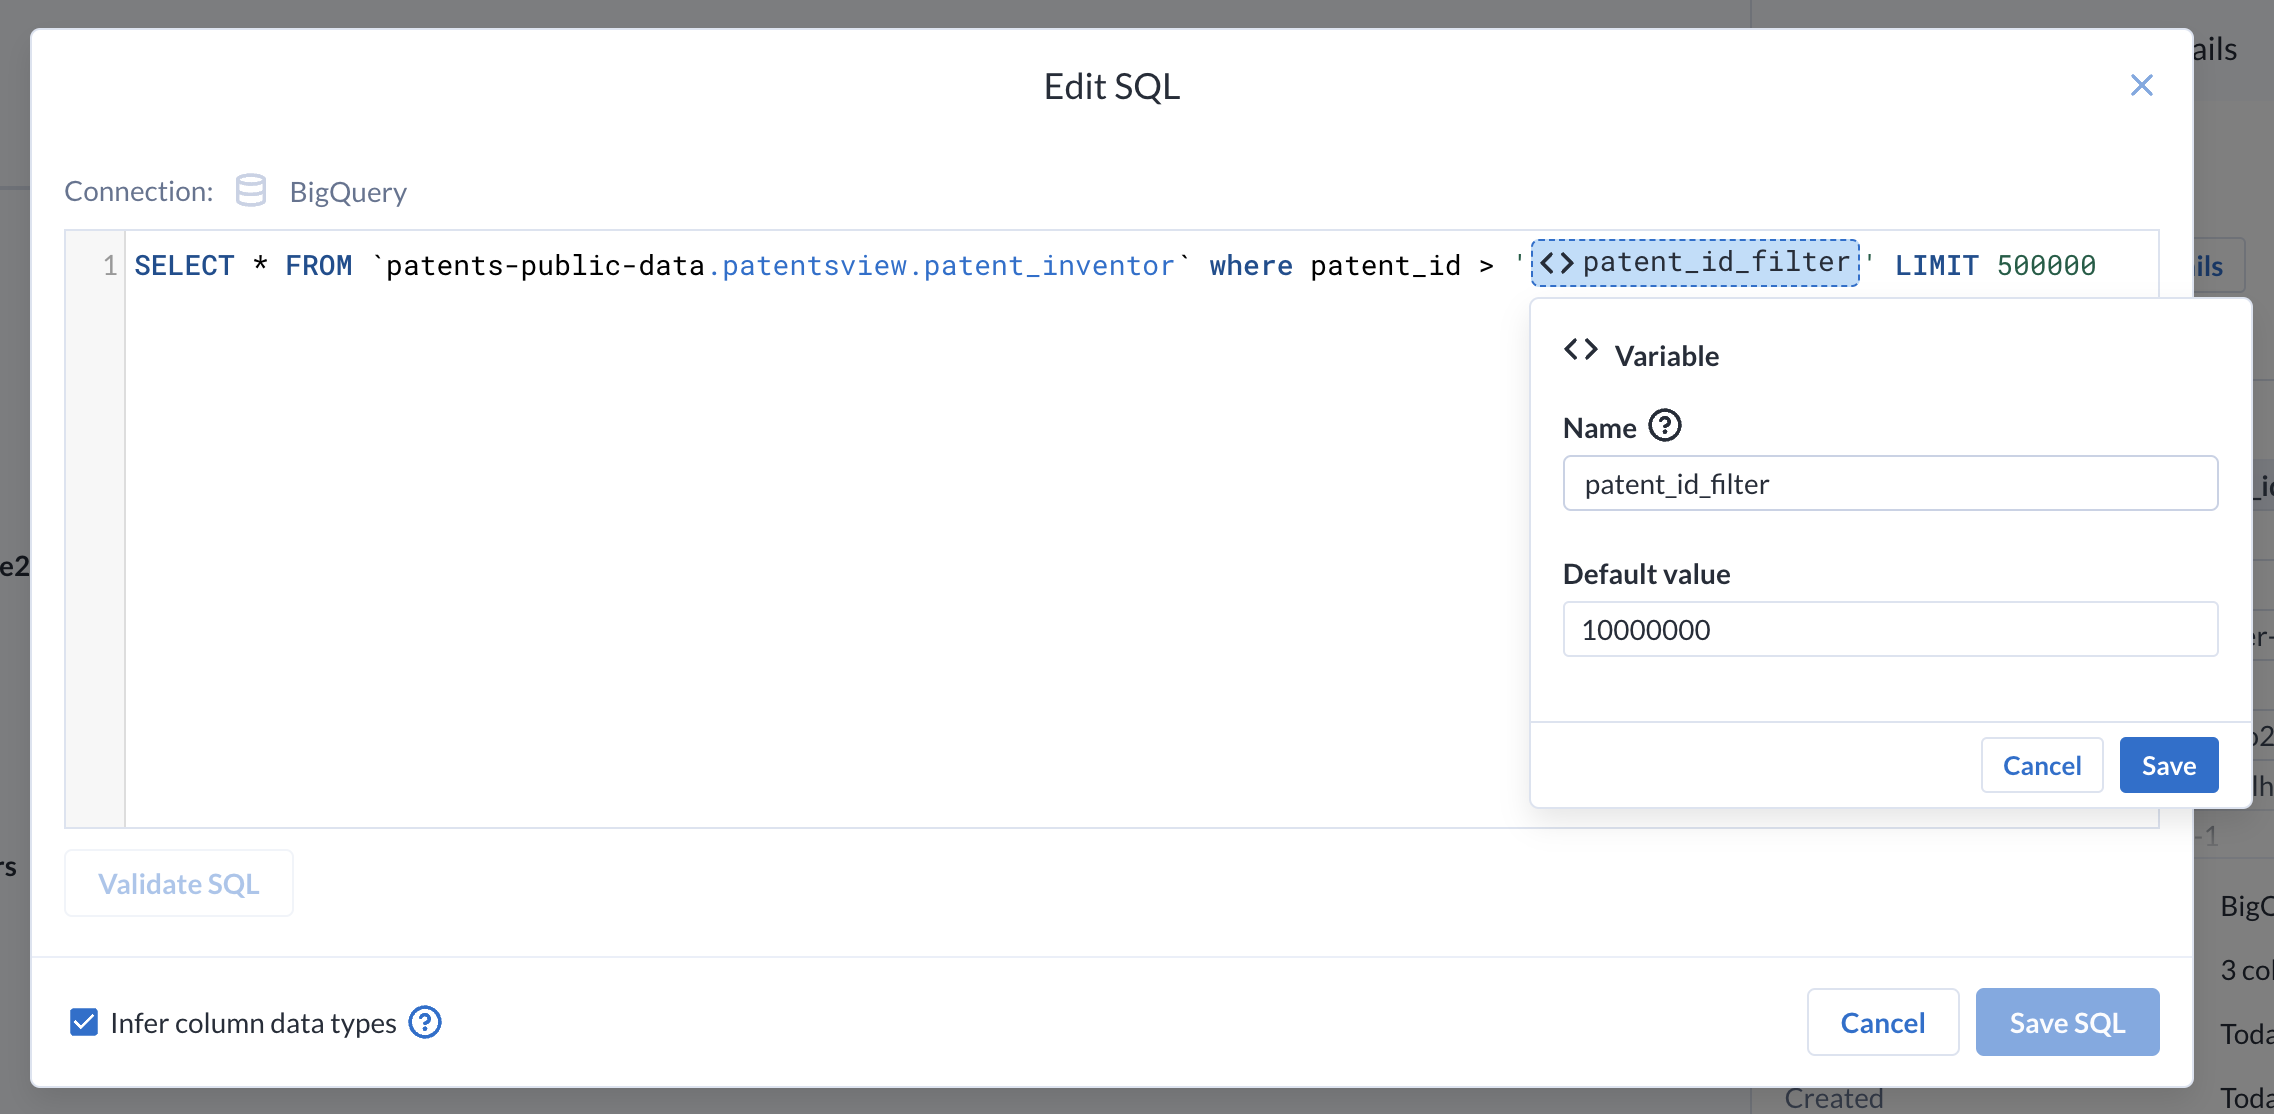
Name this new variable
filter_dateand keep the default value of 20130000. -
Save the variable. Your SQL will now be updated with a variable where the date used to be.

-
Press Save SQL to save the new query. You will revisit the variable later when you run the job.
-
Repeat Steps 1-5 for the
patent_inventorsdataset, adding a parameter calledpatent_id_filterto thepatent_idfilter, replacing 10000000.
-
Now that all datasets have been added, you can Add new Recipe, of the
Publications_Pre2013dataset. -
Click on Edit Recipe.
Task 6. Working with advanced data types
The publications table stores data in nested data structures such as objects and arrays to compact some of the information. Dataprep natively supports these data types. You will now explore some of the basic functionality.
-
Scroll all the way to the right to find the citation column. Citations are used to give credit to previous publications which the author built on. Publications may have any number of citations, so all of the information is nested in this column.
-
By default, Dataprep has inferred this column to be an array/list. If not, then you can manually set the column to an Array type using the data type picker.
- Click on the column header of the citation column.
- For array columns, one of the suggested transformations is to Flatten array values into new rows.
- Add this suggested step to your recipe.
-
Once flattened, the citation column is now typed as an object, as the individual elements were in key-value format. If you mouse over the histogram of the column, you can see that the bars represent individual keys inside of the object.
-
Click on the bar representing
publication_number.
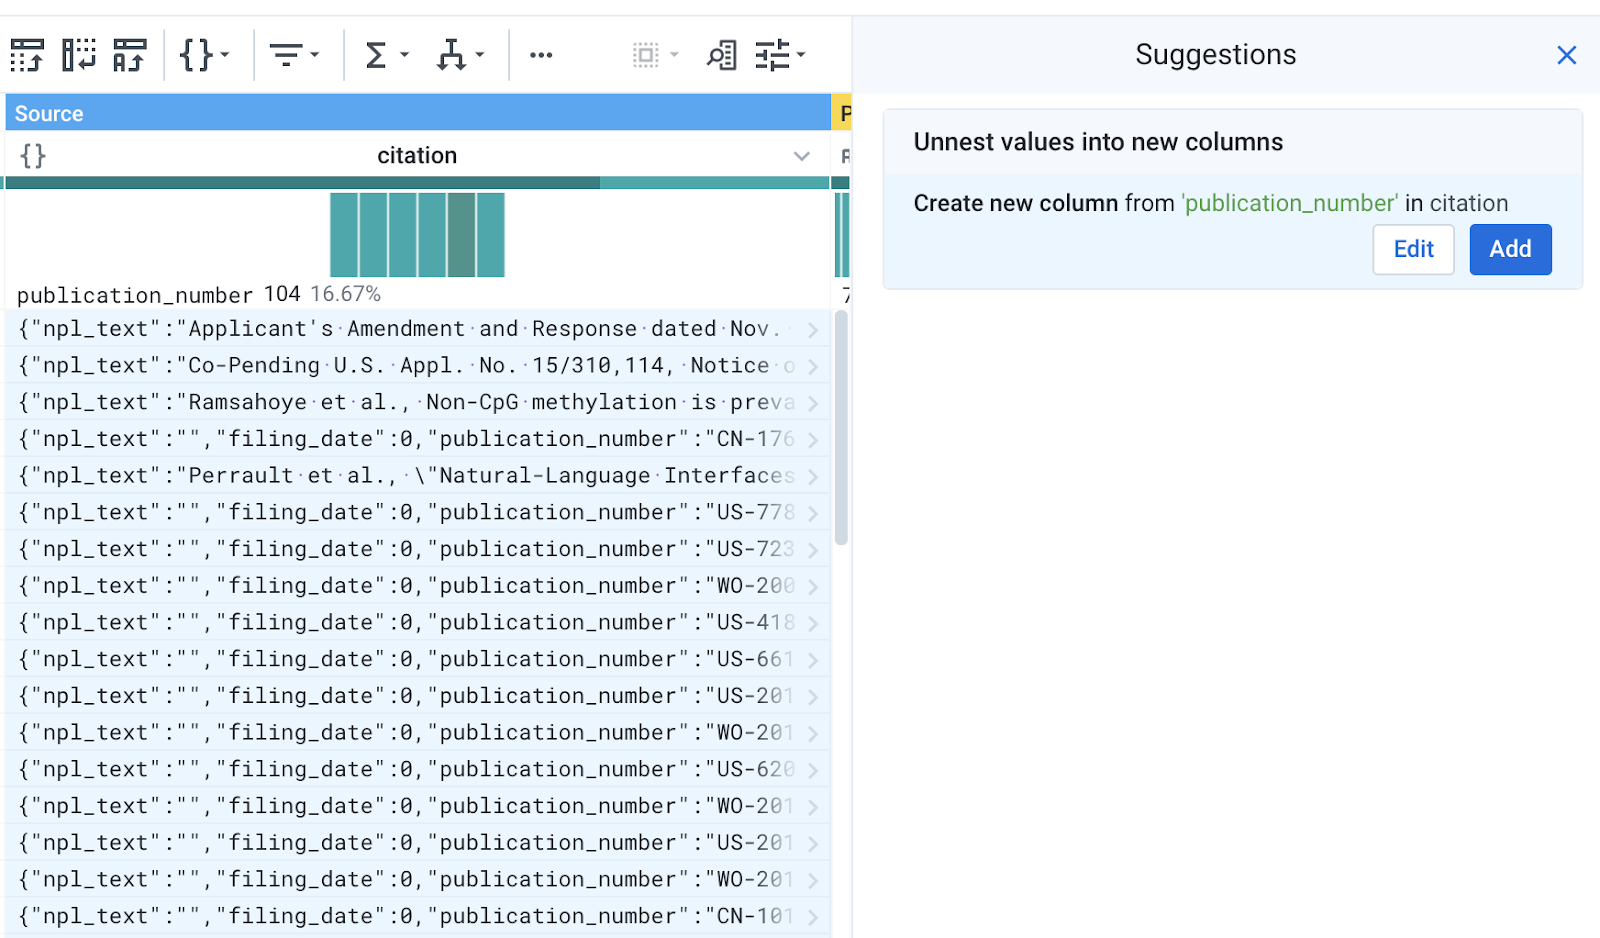
A suggestion will appear to Unnest values into new columns.
-
Examine the preview of the transformation. The unnest transformation takes a nested key-value pair in the object and extracts it to a new column.
-
Hold CTRL or CMD and click on the bar representing "category". The suggestion should update to unnest both columns.
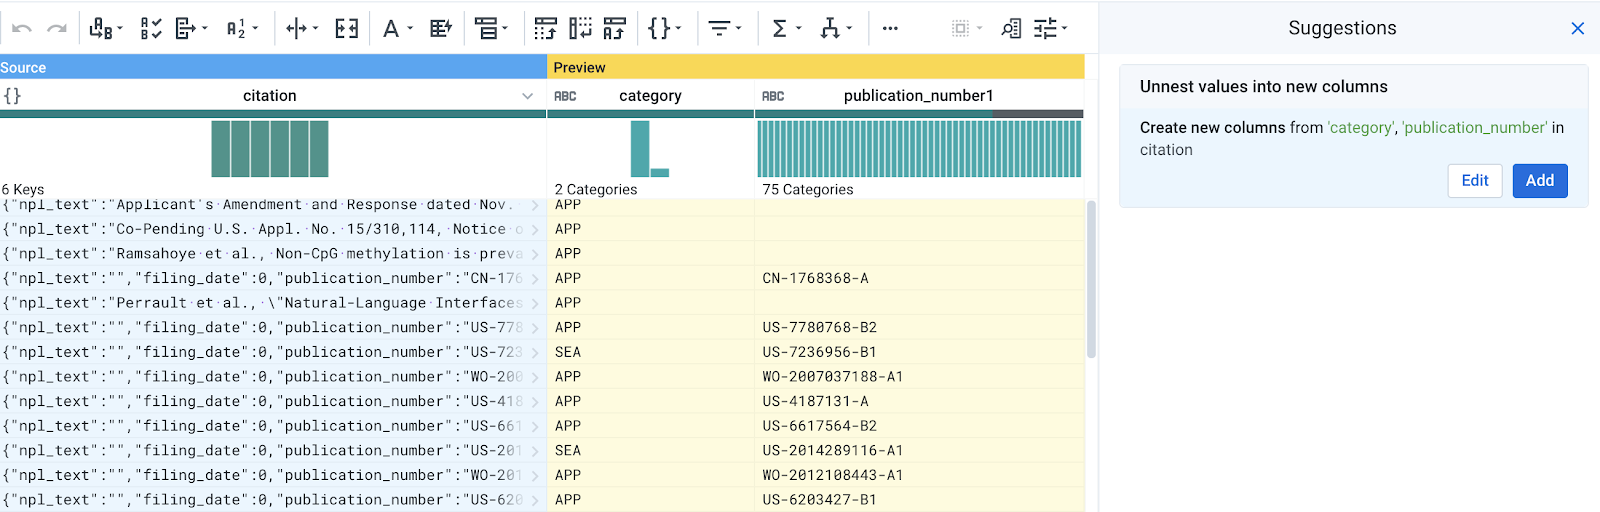
-
Edit the suggestion.
- Check the box to Include original column name. This will prepend the original column name to the new columns and create citation_publication_number and citation_category.
- Click Add to add the step.
Now you will extract the publication ID from the citation_publication_number.
- The publication number follows the syntax
{country}-{publication_id}-{publication_kind}. - The ID is the middle part of the publication number, between the dashes, and represents the unique publication.
- The publication kind is used to distinguish the kind of patent document (e.g., publication of an application for a utility patent) and the level of publication (e.g., first publication, second publication, or corrected publication).
- In the first row, highlight the middle portion of the citation_publication_number. You will see suggestions to extract a digit pattern.
-
To extract everything from between the dashes, scroll down the dataset until you find a value that has a alphabet character in it, i.e. D706211 in the screenshot below.
-
Without canceling your current suggestions, highlight the middle portion of this value. You will see that the suggestions are updated given the additional context of your selections. Now you should see a suggestion to extract values starting after a delimiter and ending before delimiter.
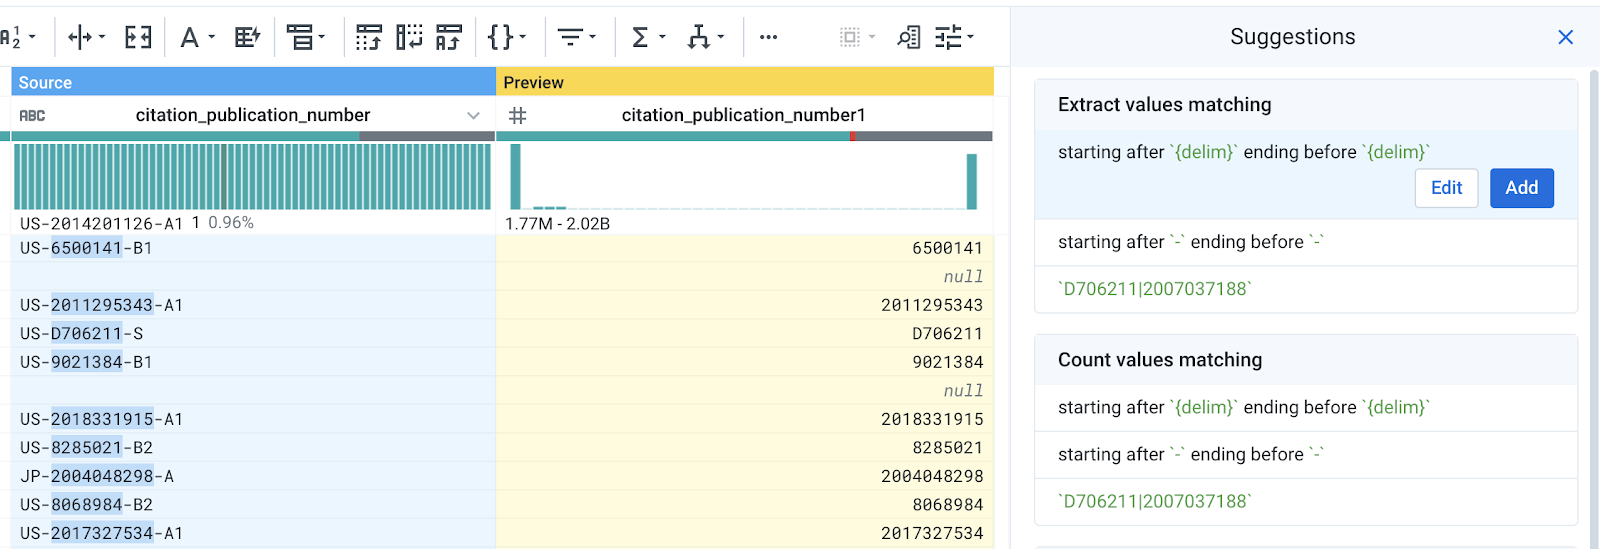
-
Add the suggestion and rename this column (here
citation_publication_number1) tocitation_publication_id. -
Change the data type of citation_publication_id to
string.
Task 7. Targeted/partial deduplication
To find out who the most cited authors were, you'll need to bring in additional information from the other tables.
-
In the recipe pane, click New Step and select Join dataset. Create an inner join with the
patent_inventorsdataset. When selecting the dataset to join, you may have to click on the Datasets in current flow tab to see it. -
Modify the join keys to use
citation_publication_id == patent_idas the join keys.
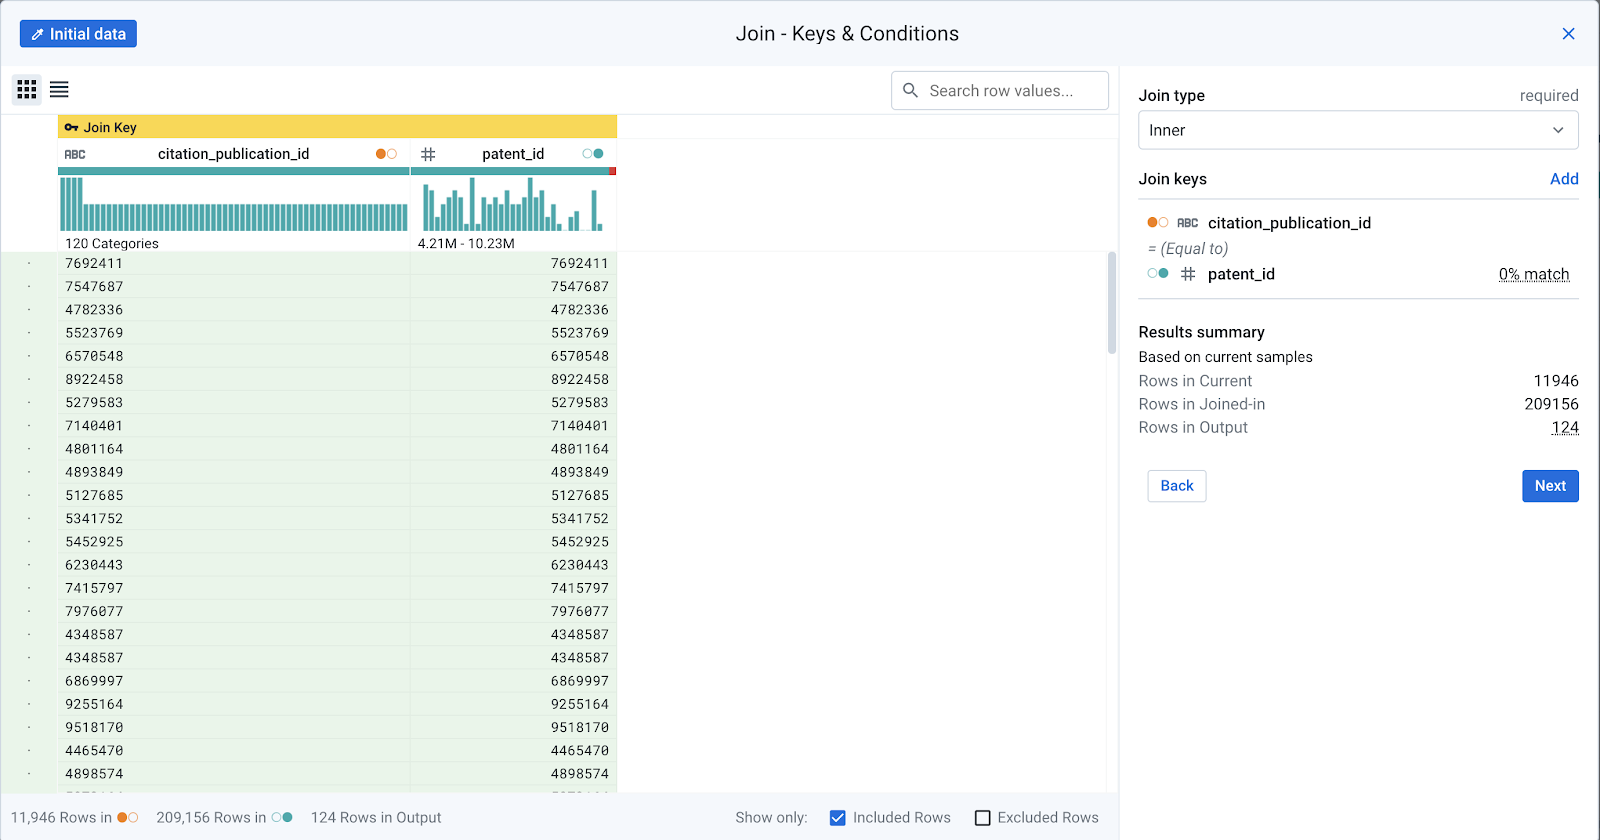
Keep the following columns and save the step:
- citation_publication_Id
- publication_number
- grant_date
- citation_publication_number
- inventor_id
- Once the join is processed, you have brought in the inventor IDs of the cited works. There are a couple of data uniqueness issues that you must resolve:
- Sometimes citations refer to the same publication, but refer to a different kind of publication (e.g. first publication, second publication) - you don't want to tally the same publication multiple times in a citation. In other words, you need to remove rows where a single citation_publication_id has multiple citation_publication_numbers.
- There can be multiple authors/inventors for a given publication. For the sake of this example, you will just keep the first inventor. In other words, you need to remove rows where a single citation_publication_id has multiple inventor_id.
To satisfy these requirements, you'll need to deduplicate some rows.
- Dataprep has a built-in deduplication transformation. From the toolbar, click on the Filter tool and choose Remove duplicate rows.
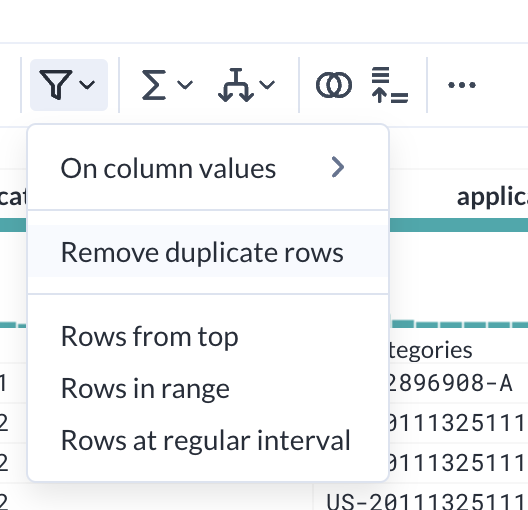
This transform will deduplicate any rows that are 100% the same. If you choose this transform, you will notice that there are no changes in the data, because your data is not exactly the same across all columns. Remove this step if you added it.
-
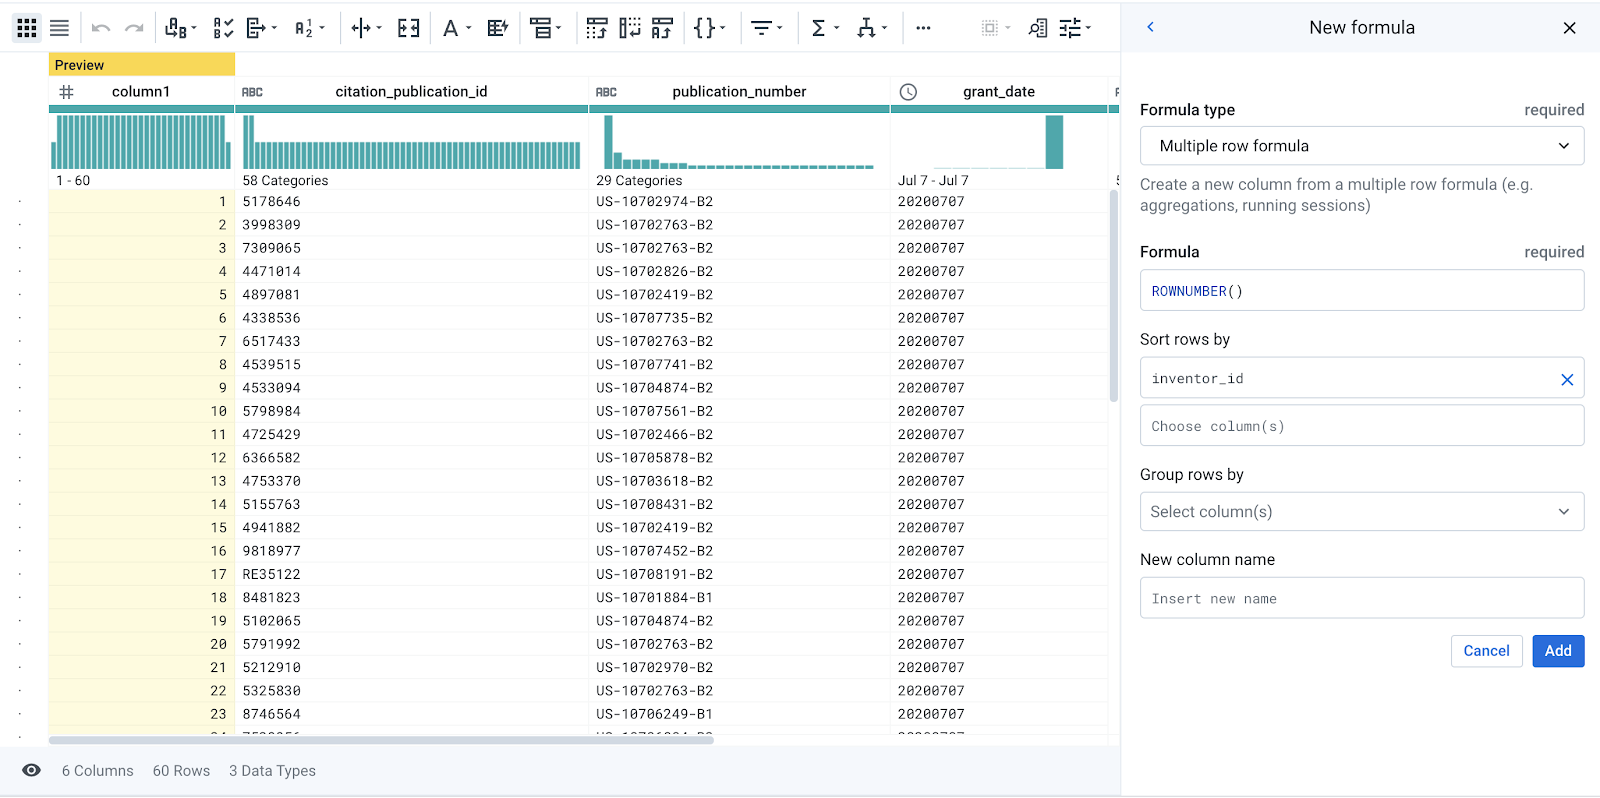
Instead, you need to do a partial deduplication, based on a subset of the columns. In your Recipe, create a New Step, and search for "row number". Select the ROWNUMBER function.
-
Keep the Formula as
ROWNUMBER()and input inventor_id into the Sort row by field. Observe the preview for the generated column. The ROWNUMBER function produces a column with a line number for each row.
- One by one, add the following columns to the ‘Group rows by' field and observe how the preview column updates:
- publication_number
- citation_publication_id
When grouping ROWNUMBER, you are essentially tabulating rows that are unique for the given groups.
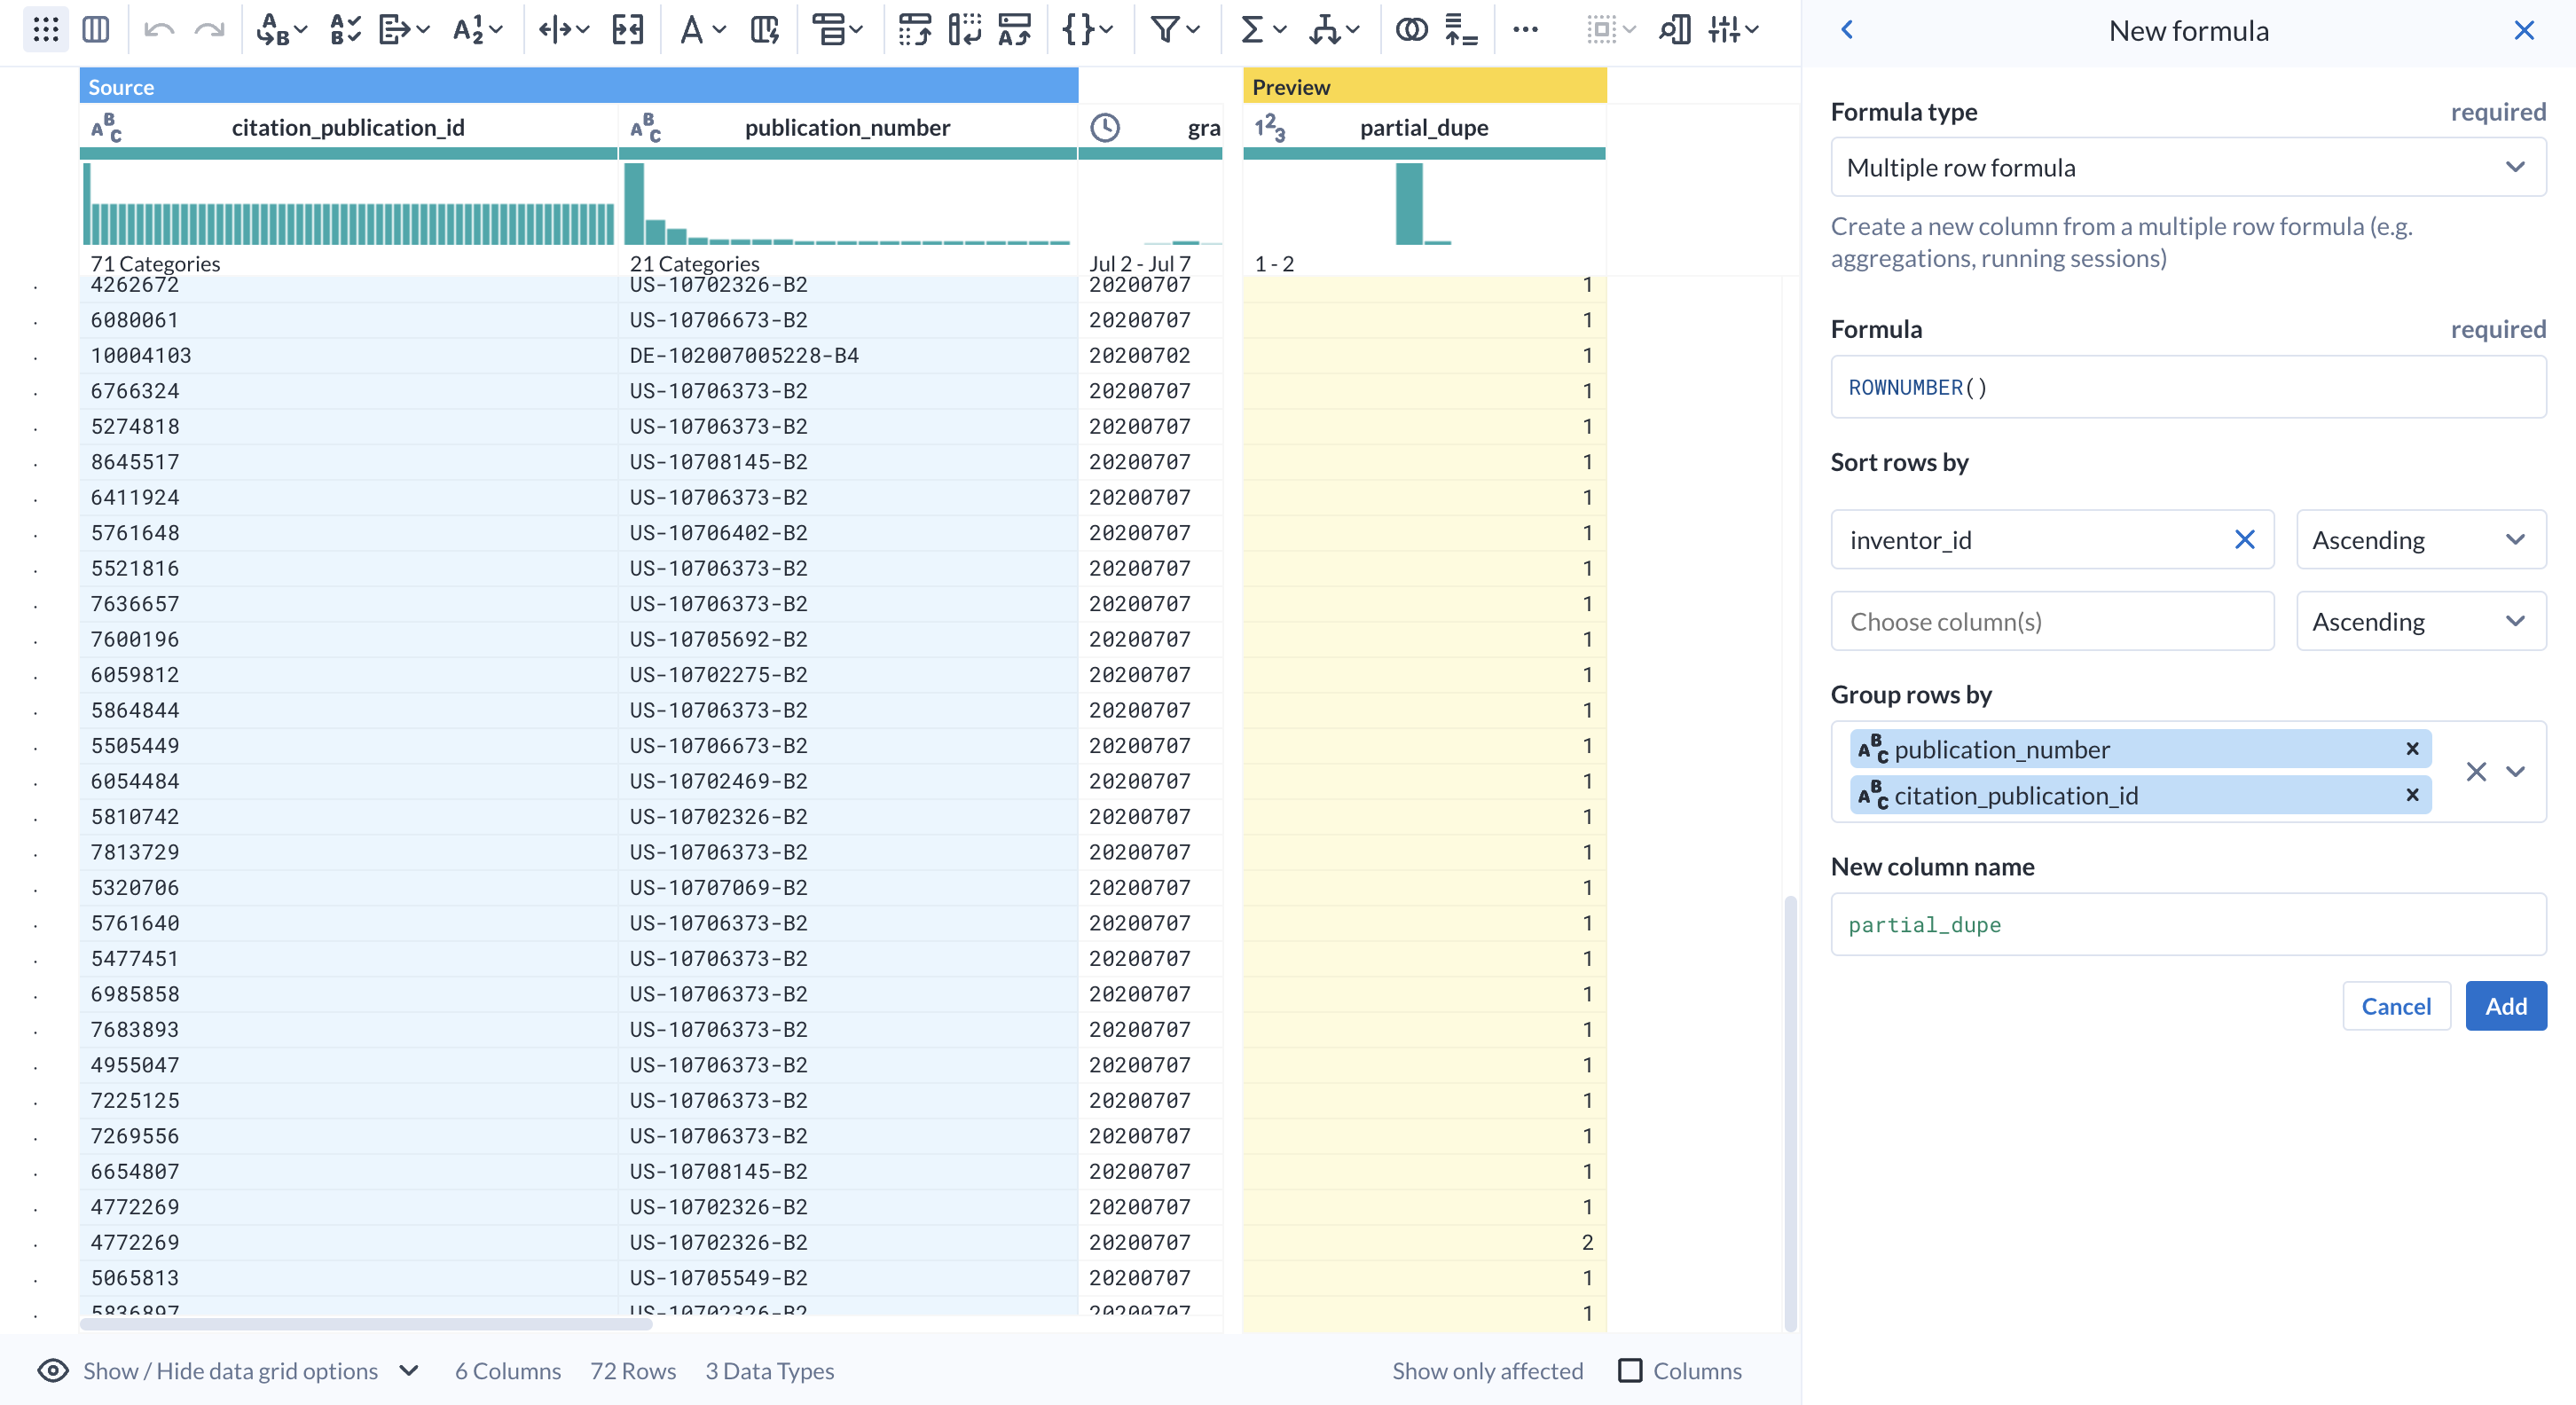
- Name the column
partial_dupeand Add this step.
Now to do the partial deduplication, you will simply need to get rid of any rows where partial_dupe is greater than 1.
- Click on the histogram in the partial_dupe column and Add the suggestion to
Keep rows where (1 <= partial_dupe) && (partial_dupe < 2).
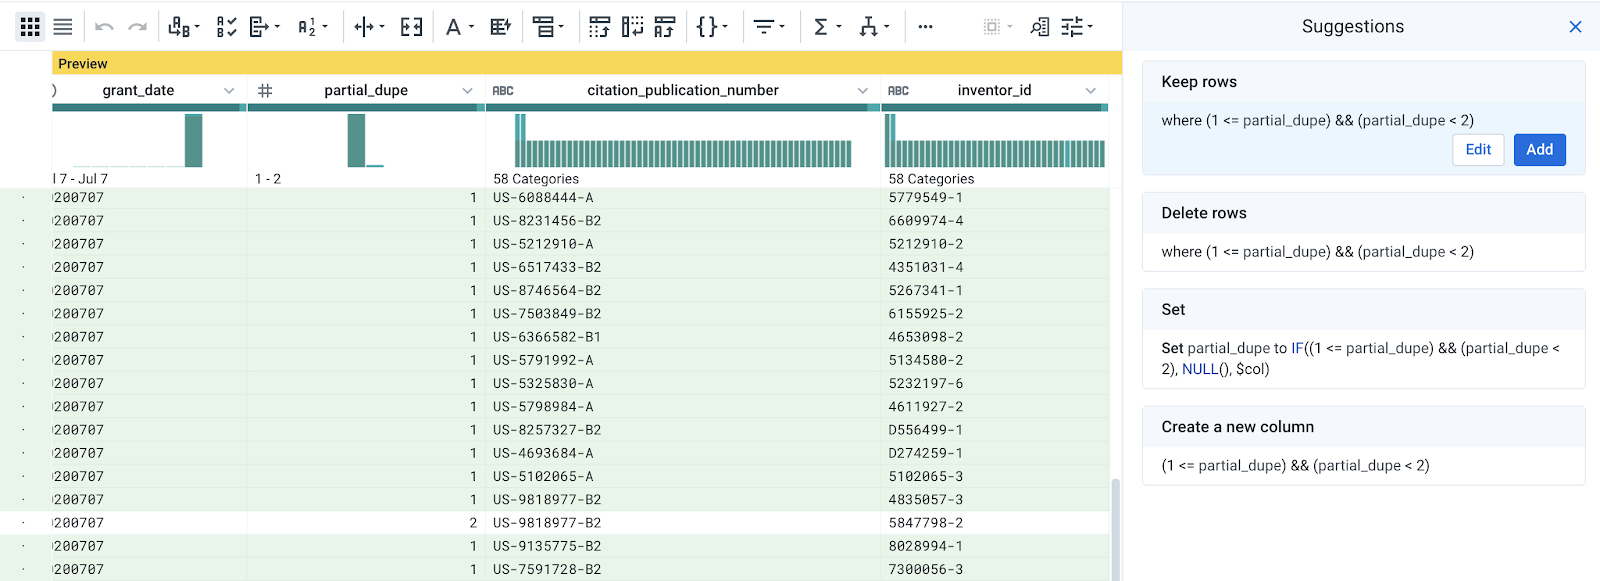
- Delete the partial_dupe column.
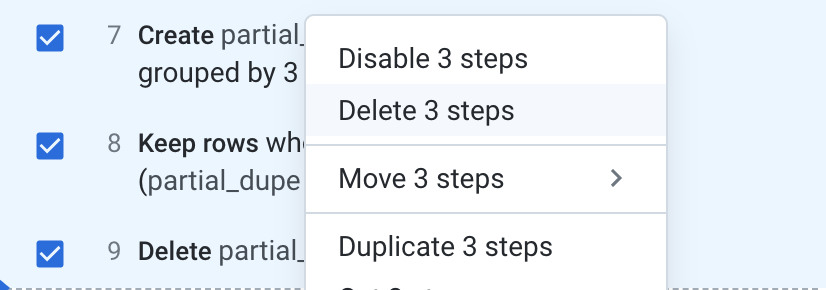
Now you can do the previous deduplication more efficiently. The previous 3 steps (create temporary partial_dupe, filter, drop temporary column) can be done in a single step.
- Delete the last 3 steps.
-
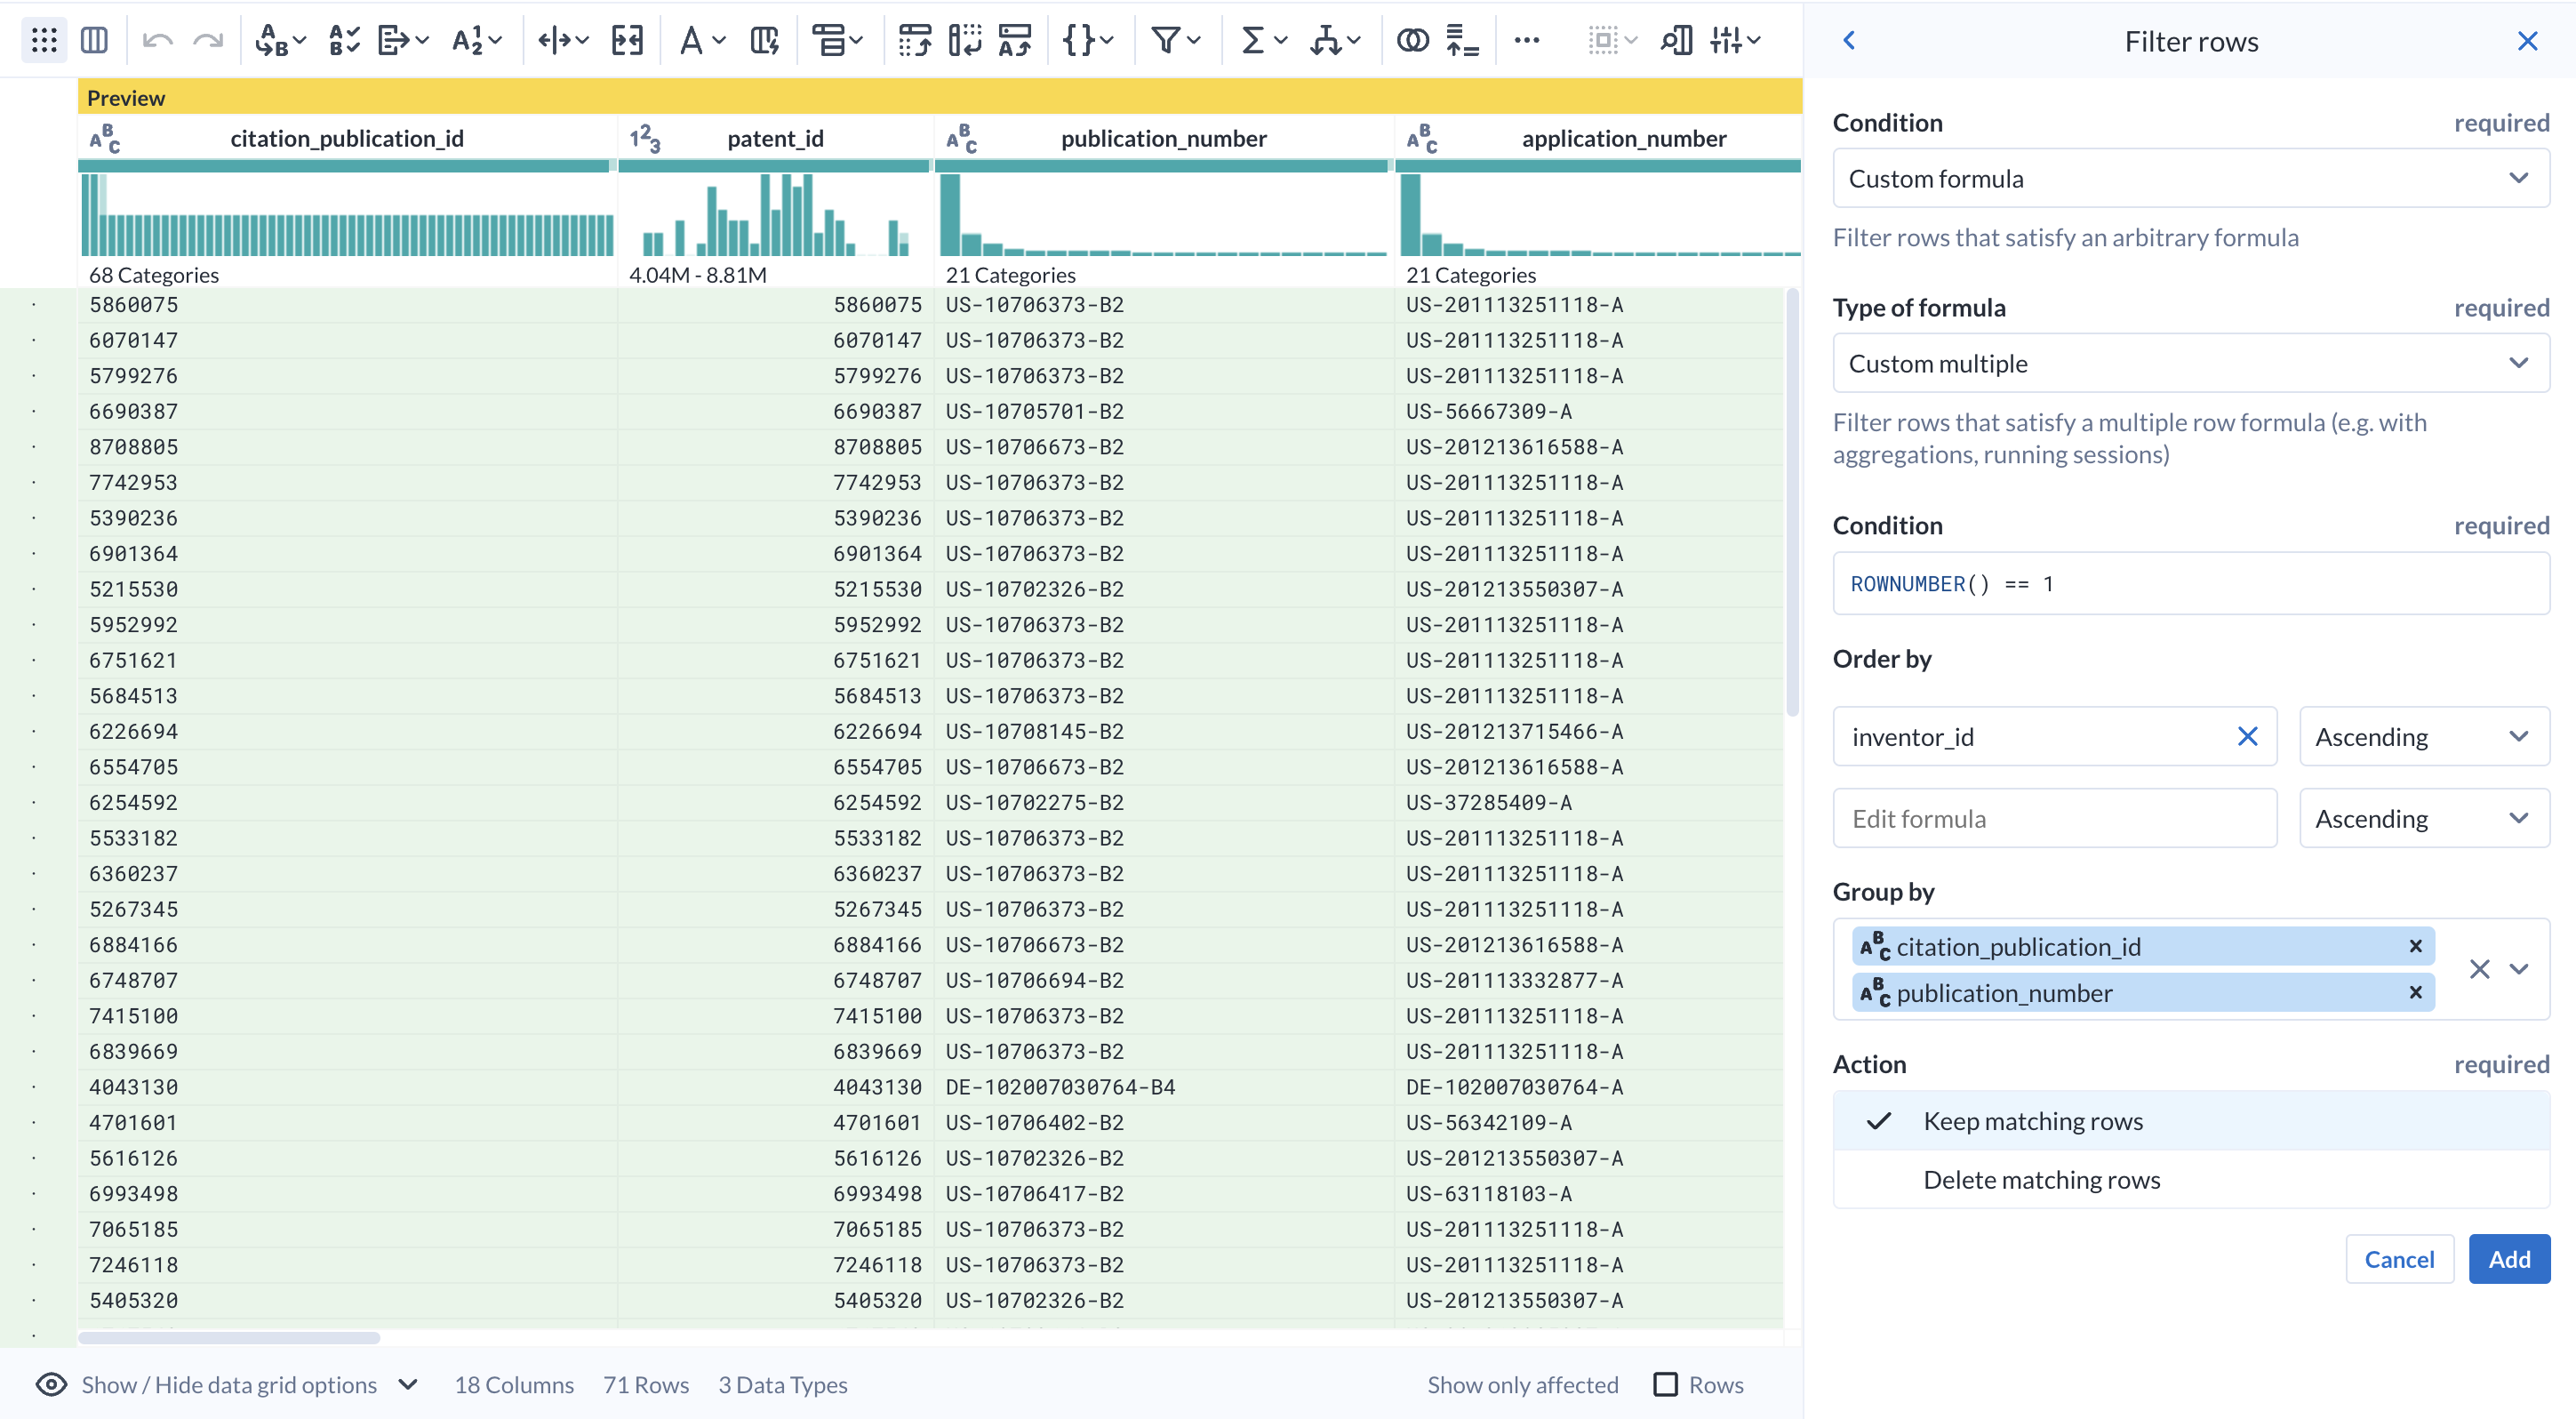
From the Filter rows tool, choose On column values, then Custom filter...
-
In the transform builder for Filter, choose
Custom multiplefor Type of formula. -
In the Group By, enter the same columns as before:
- citation_publication_id
- publication_number
-
Input
inventor_idinto the Order by field. -
In the Condition, enter
ROWNUMBER() == 1. In the Action, choose Keep matching rows.
Observe the preview. You can replicate the previous logic without the need for temporary columns, effectively reducing the number of steps, and the amount of processing required.
- Click Add.
Optimizing your recipe is a great way to improve the performance of your job. When working with data, every optimization could save you a significant amount of time and money.
- Finally, inner join the
inventordataset, usinginventor_id == idas the join keys. Keep the default added columns from both datasets and Add the step.
Task 8. Run job with parameters/overrides
-
Click Run on the top right to pick settings for job execution. Do not launch the job yet.
-
Keep the default settings for the publishing actions.
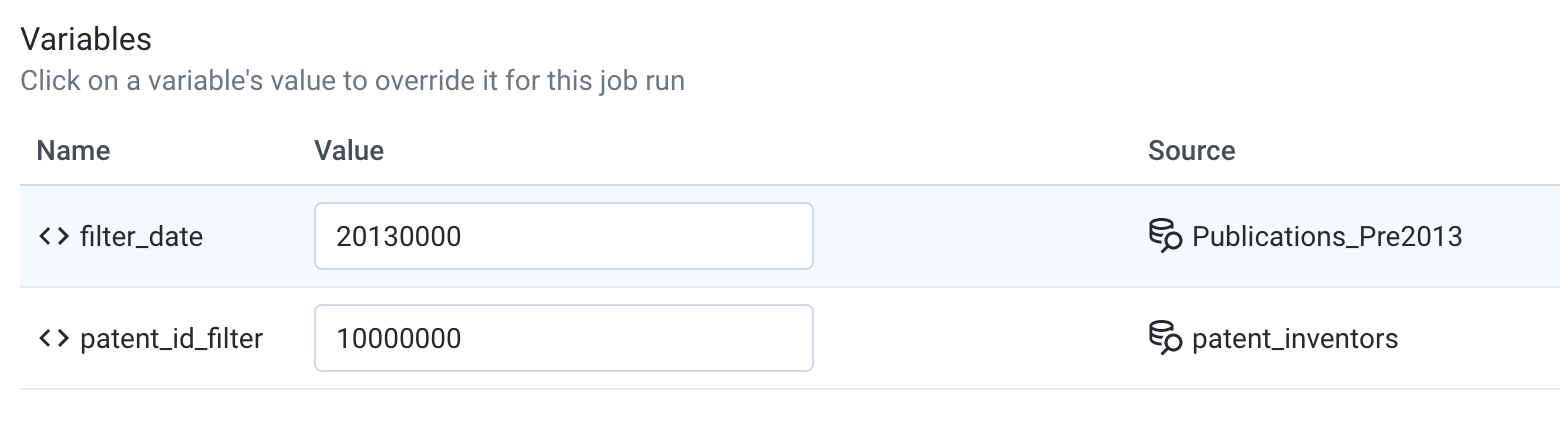
In the Parameters section, you can define override settings for any variables within the flow.
When you originally created the dataset using Custom SQL, a filter_date variable was created to hold the value of the 20130000, and a patent_id_filter variable held the value of 10000000.
Before you kick off the job, you have the option to change this variable. If no changes are made, it will take the default value from time of creation.
-
Change
filter_dateto 20120000. You will limit your scope to patents filed before 2012. -
Change
patent_id_filterto 0.
- You can additionally change the Dataflow Execution Settings when running the job. You can pick from different machine types that have different configurations of hardware.
Choosing the correct Machine Type will help improve the stability and processing time for your jobs. For the purposes of this lab, choose e2-standard-2 as the machine type.
- Launch the job with Run.
Click Check my progress to verify the objective.
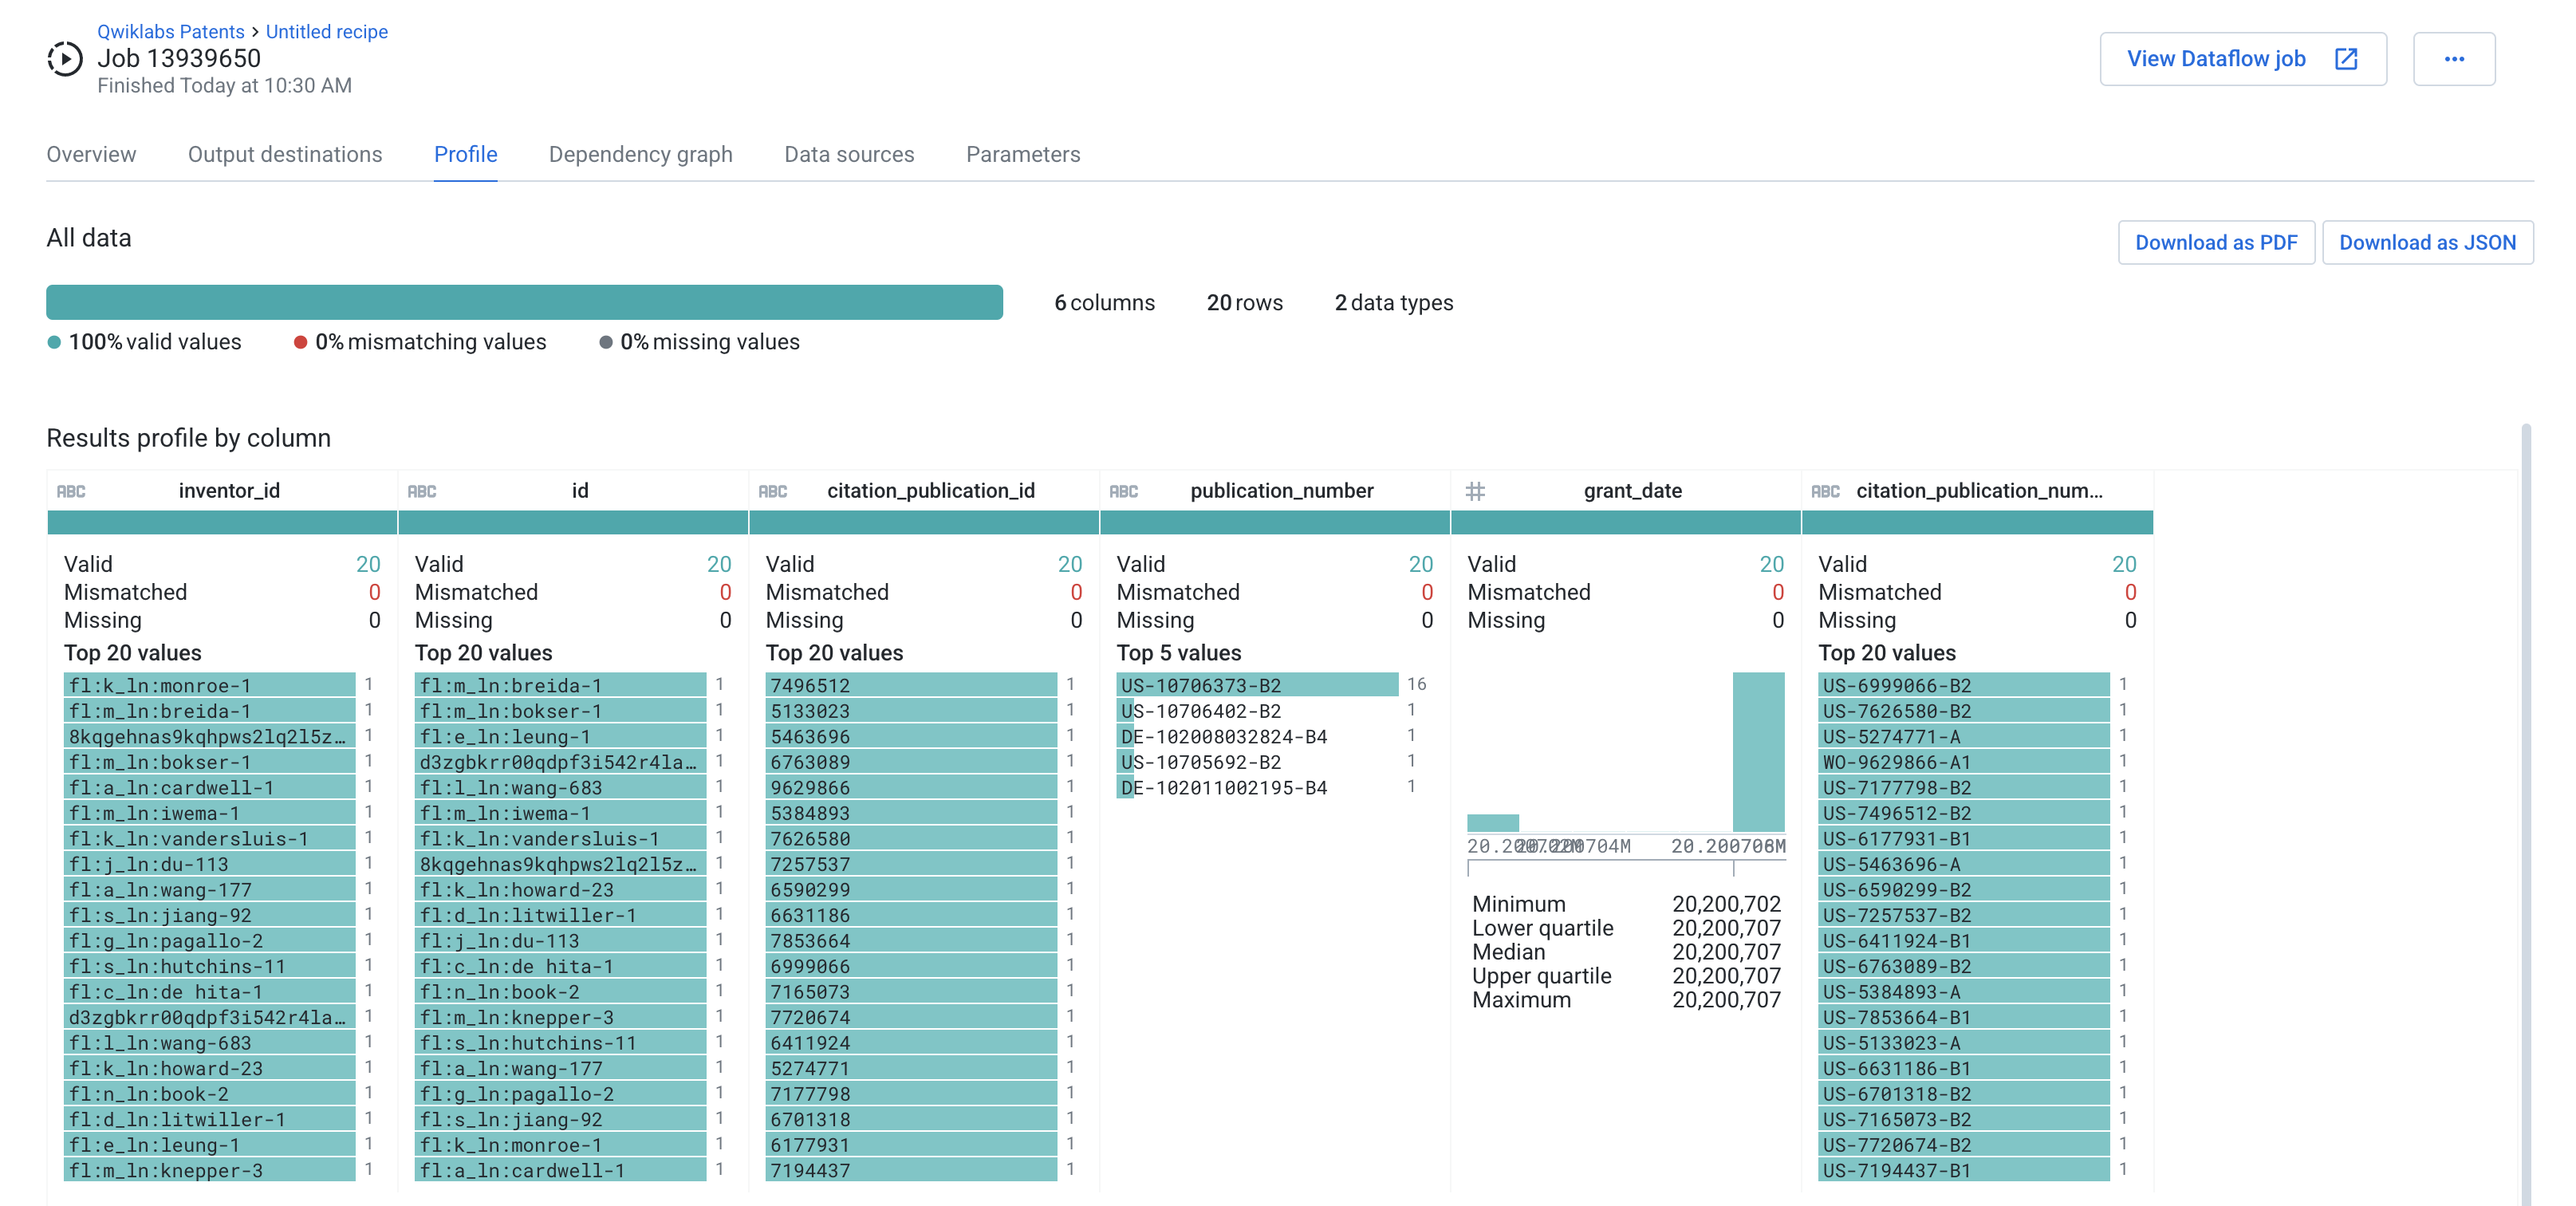
- After the job has completed processing, open the Job Results page and look at the Profile.
Congratulations!
In this lab you learned how Cloud Dataprep can be used on complicated data structures in BigQuery. You first imported data from BigQuery, created and parameterized datasets from custom SQL queries, created objects and nested data structures, and overrode parameters when running a job. Doing all of this, you built out a leaderboard for inventors who were most frequently cited for a particular month of patents publications.
Finish your quest
This self-paced lab is part of the Transform and Clean your Data with Dataprep by Alteryx on Google Cloud quest. A quest is a series of related labs that form a learning path. Completing this quest earns you a badge to recognize your achievement. You can make your badge or badges public and link to them in your online resume or social media account. Enroll in this quest and get immediate completion credit. See the Google Cloud Skills Boost catalog to see all available quests.
Take your next lab
Continue your quest with Self Service ML Pipelines Using Dataprep and AutoML Tables.
Next steps/ learn more
You can continue exploring Dataprep Professional Edition with a free 30-day trial available here. Please make sure to sign out from your temporary lab account and re-sign with your Google Cloud valid email. Advanced features, such as additional connectivity, pipeline orchestration, and adaptive data quality are also available in the Premium edition that you can explore in the Google Cloud Marketplace.
Read the Dataprep how-to guides to learn how to discover, cleanse, and enhance data with Google Dataprep.
Google Cloud training and certification
...helps you make the most of Google Cloud technologies. Our classes include technical skills and best practices to help you get up to speed quickly and continue your learning journey. We offer fundamental to advanced level training, with on-demand, live, and virtual options to suit your busy schedule. Certifications help you validate and prove your skill and expertise in Google Cloud technologies.
Last Updated Date February 14, 2024
Last Tested Date February 14, 2024
Copyright 2024 Google LLC All rights reserved. Google and the Google logo are trademarks of Google LLC. All other company and product names may be trademarks of the respective companies with which they are associated.