检查点
Create a dataset named 'ecommerce'
/ 30
Create a new partitioned table based on date.
/ 35
Your turn: Create a Partitioned Table
/ 35
Creating Date-Partitioned Tables in BigQuery
- GSP414
- Overview
- Setup and requirements
- Task 1. Create a new dataset
- Task 2. Create tables with date partitions
- Task 3. Review results from queries on a partitioned table
- Task 4. Create an auto-expiring partitioned table
- Task 5. Your turn: create a partitioned table
- Task 6. Confirm the oldest partition_age is at or below 60 days
- Congratulations!
GSP414
Overview
BigQuery is Google's fully managed, NoOps, low cost analytics database. With BigQuery you can query terabytes and terabytes of data without having any infrastructure to manage or needing a database administrator. BigQuery uses SQL and can take advantage of the pay-as-you-go model. BigQuery allows you to focus on analyzing data to find meaningful insights.
In this lab, you learn how to query and create partitioned tables in BigQuery to improve query performance and reduce resource usage. The data for this lab is an ecommerce dataset that has millions of Google Analytics records for the Google Merchandise Store loaded into BigQuery.
What you'll do
In this lab, you learn how to:
- Query partitioned tables.
- Create your own partitioned tables.
Setup and requirements
Before you click the Start Lab button
Read these instructions. Labs are timed and you cannot pause them. The timer, which starts when you click Start Lab, shows how long Google Cloud resources will be made available to you.
This hands-on lab lets you do the lab activities yourself in a real cloud environment, not in a simulation or demo environment. It does so by giving you new, temporary credentials that you use to sign in and access Google Cloud for the duration of the lab.
To complete this lab, you need:
- Access to a standard internet browser (Chrome browser recommended).
- Time to complete the lab---remember, once you start, you cannot pause a lab.
How to start your lab and sign in to the Google Cloud console
-
Click the Start Lab button. If you need to pay for the lab, a pop-up opens for you to select your payment method. On the left is the Lab Details panel with the following:
- The Open Google Cloud console button
- Time remaining
- The temporary credentials that you must use for this lab
- Other information, if needed, to step through this lab
-
Click Open Google Cloud console (or right-click and select Open Link in Incognito Window if you are running the Chrome browser).
The lab spins up resources, and then opens another tab that shows the Sign in page.
Tip: Arrange the tabs in separate windows, side-by-side.
Note: If you see the Choose an account dialog, click Use Another Account. -
If necessary, copy the Username below and paste it into the Sign in dialog.
{{{user_0.username | "Username"}}} You can also find the Username in the Lab Details panel.
-
Click Next.
-
Copy the Password below and paste it into the Welcome dialog.
{{{user_0.password | "Password"}}} You can also find the Password in the Lab Details panel.
-
Click Next.
Important: You must use the credentials the lab provides you. Do not use your Google Cloud account credentials. Note: Using your own Google Cloud account for this lab may incur extra charges. -
Click through the subsequent pages:
- Accept the terms and conditions.
- Do not add recovery options or two-factor authentication (because this is a temporary account).
- Do not sign up for free trials.
After a few moments, the Google Cloud console opens in this tab.

Open the BigQuery console
- In the Google Cloud Console, select Navigation menu > BigQuery.
The Welcome to BigQuery in the Cloud Console message box opens. This message box provides a link to the quickstart guide and the release notes.
- Click Done.
The BigQuery console opens.
Task 1. Create a new dataset
-
First, you will create a dataset to store your tables.
-
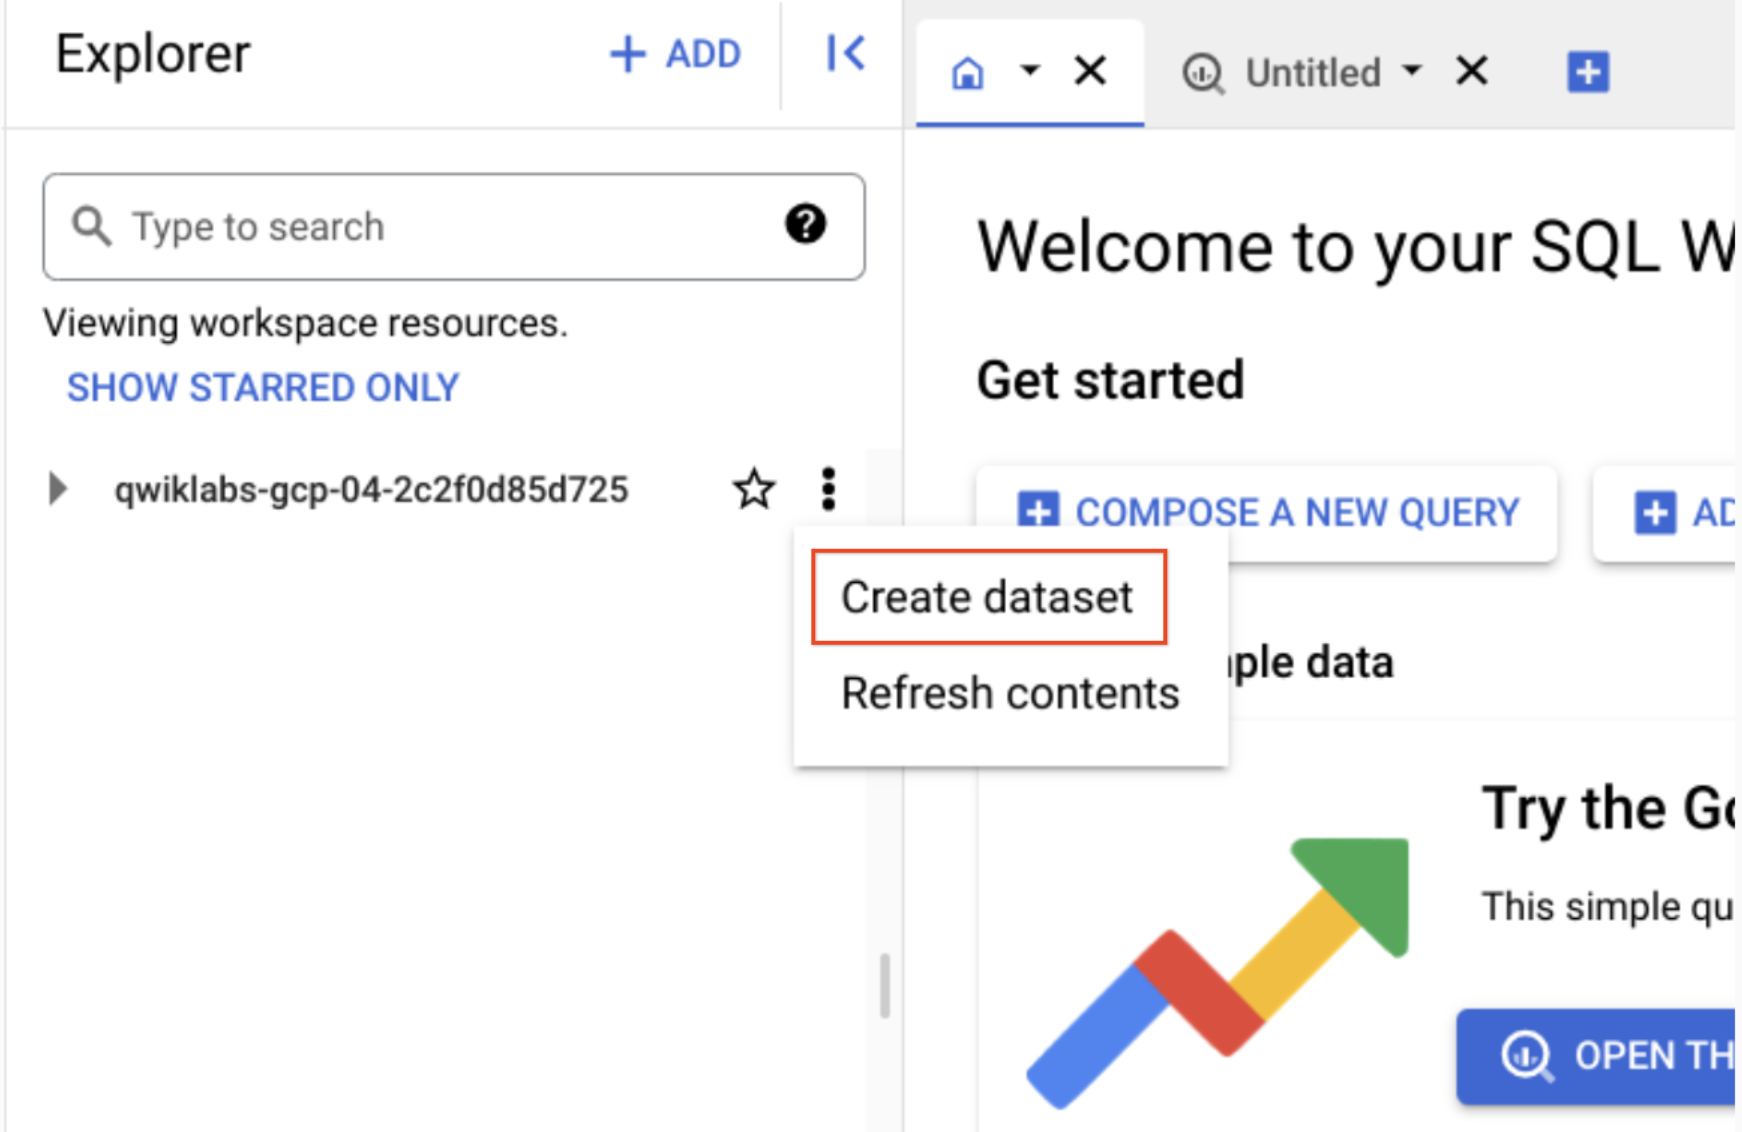
In the Explorer pane, near your project id, click on View actions then click Create dataset.
- Set Dataset ID to ecommerce.
Leave the other options at their default values (Data Location, Default table Expiration).
- Click Create dataset.
Click Check my progress to verify the objective.
Task 2. Create tables with date partitions
A partitioned table is a table that is divided into segments, called partitions, that make it easier to manage and query your data. By dividing a large table into smaller partitions, you can improve query performance, and control costs by reducing the number of bytes read by a query.
Now create a new table and bind a date or timestamp column as a partition. Before we do that, let's explore the data in the non-partitioned table first.
Query web page analytics for a sample of visitors in 2017
- Click on + Compose new query and add the below query:
Before running, note the total amount of data it will process as indicated next to the query validator icon: "This query will process 1.74 GB when run".
- Click Run.
The query returns 5 results.
Query web page analytics for a sample of visitors in 2018
Let's modify the query to look at visitors for 2018 now.
- Click COMPOSE NEW QUERY to clear the Query Editor, then add this new query. Note the
WHERE dateparameter is changed to20180708:
The Query Validator tells you how much data this query will process.
- Click Run.
Notice that the query still processes 1.74 GB even though it returns 0 results. Why? The query engine needs to scan all records in the dataset to see if they satisfy the date matching condition in the WHERE clause. It must look at each record to compare the date against the condition of ‘20180708'.
Additionally, the LIMIT 5 does not reduce the total amount of data processed, which is a common misconception.
Common use-cases for date-partitioned tables
Scanning through the entire dataset everytime to compare rows against a WHERE condition is wasteful. This is especially true if you only really care about records for a specific period of time like:
- All transactions for the last year
- All visitor interactions within the last 7 days
- All products sold in the last month
Instead of scanning the entire dataset and filtering on a date field like we did in the earlier queries, Now set up a date-partitioned table. This allows you to completely ignore scanning records in certain partitions if they are irrelevant to our query.
Create a new partitioned table based on date
- Click COMPOSE NEW QUERY , add the below query, then click Run:
In this query, note the new option - PARTITION BY a field. The two options available to partition are DATE and TIMESTAMP. The PARSE_DATE function is used on the date field (stored as a string) to get it into the proper DATE type for partitioning.
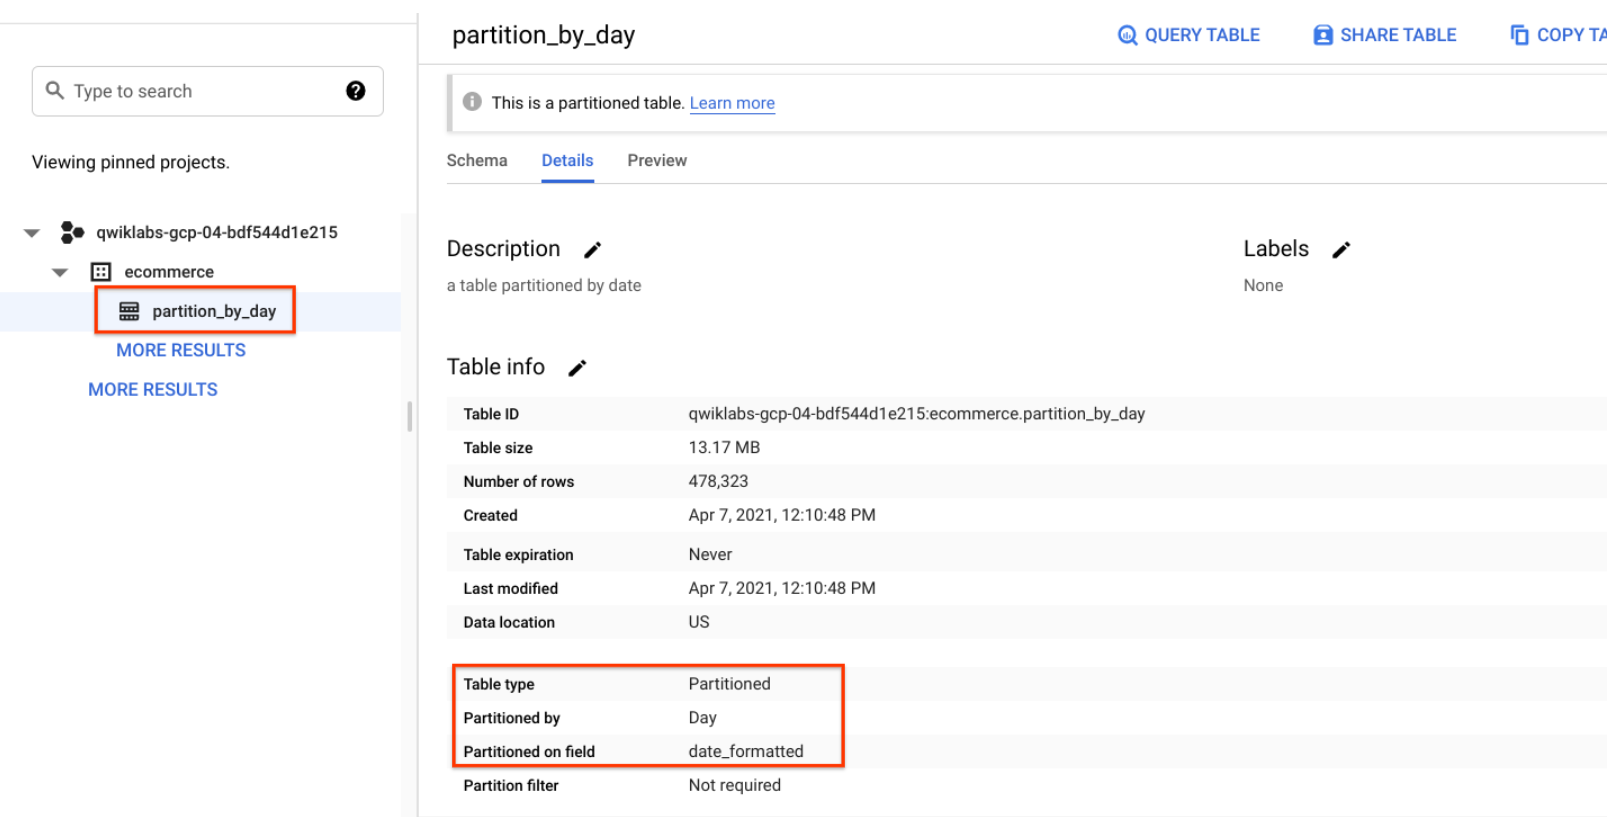
- Click on the ecommerce dataset, then select the new partiton_by_day table:
- Click on the Details tab.
Confirm that you see:
- Partitioned by: Day
- Partitioning on: date_formatted
Click Check my progress to verify the objective.
Task 3. Review results from queries on a partitioned table
- Run the below query, and note the total bytes to be processed:
This time 25 KB or 0.025MB is processed, which is a fraction of what you queried.
- Now run the below query, and note the total bytes to be processed:
You should see This query will process 0 B when run.
Task 4. Create an auto-expiring partitioned table
Auto-expiring partitioned tables are used to comply with data privacy statutes, and can be used to avoid unnecessary storage (which you'll be charged for in a production environment). If you want to create a rolling window of data, add an expiration date so the partition disappears after you're finished using it.
Explore the available NOAA weather data tables
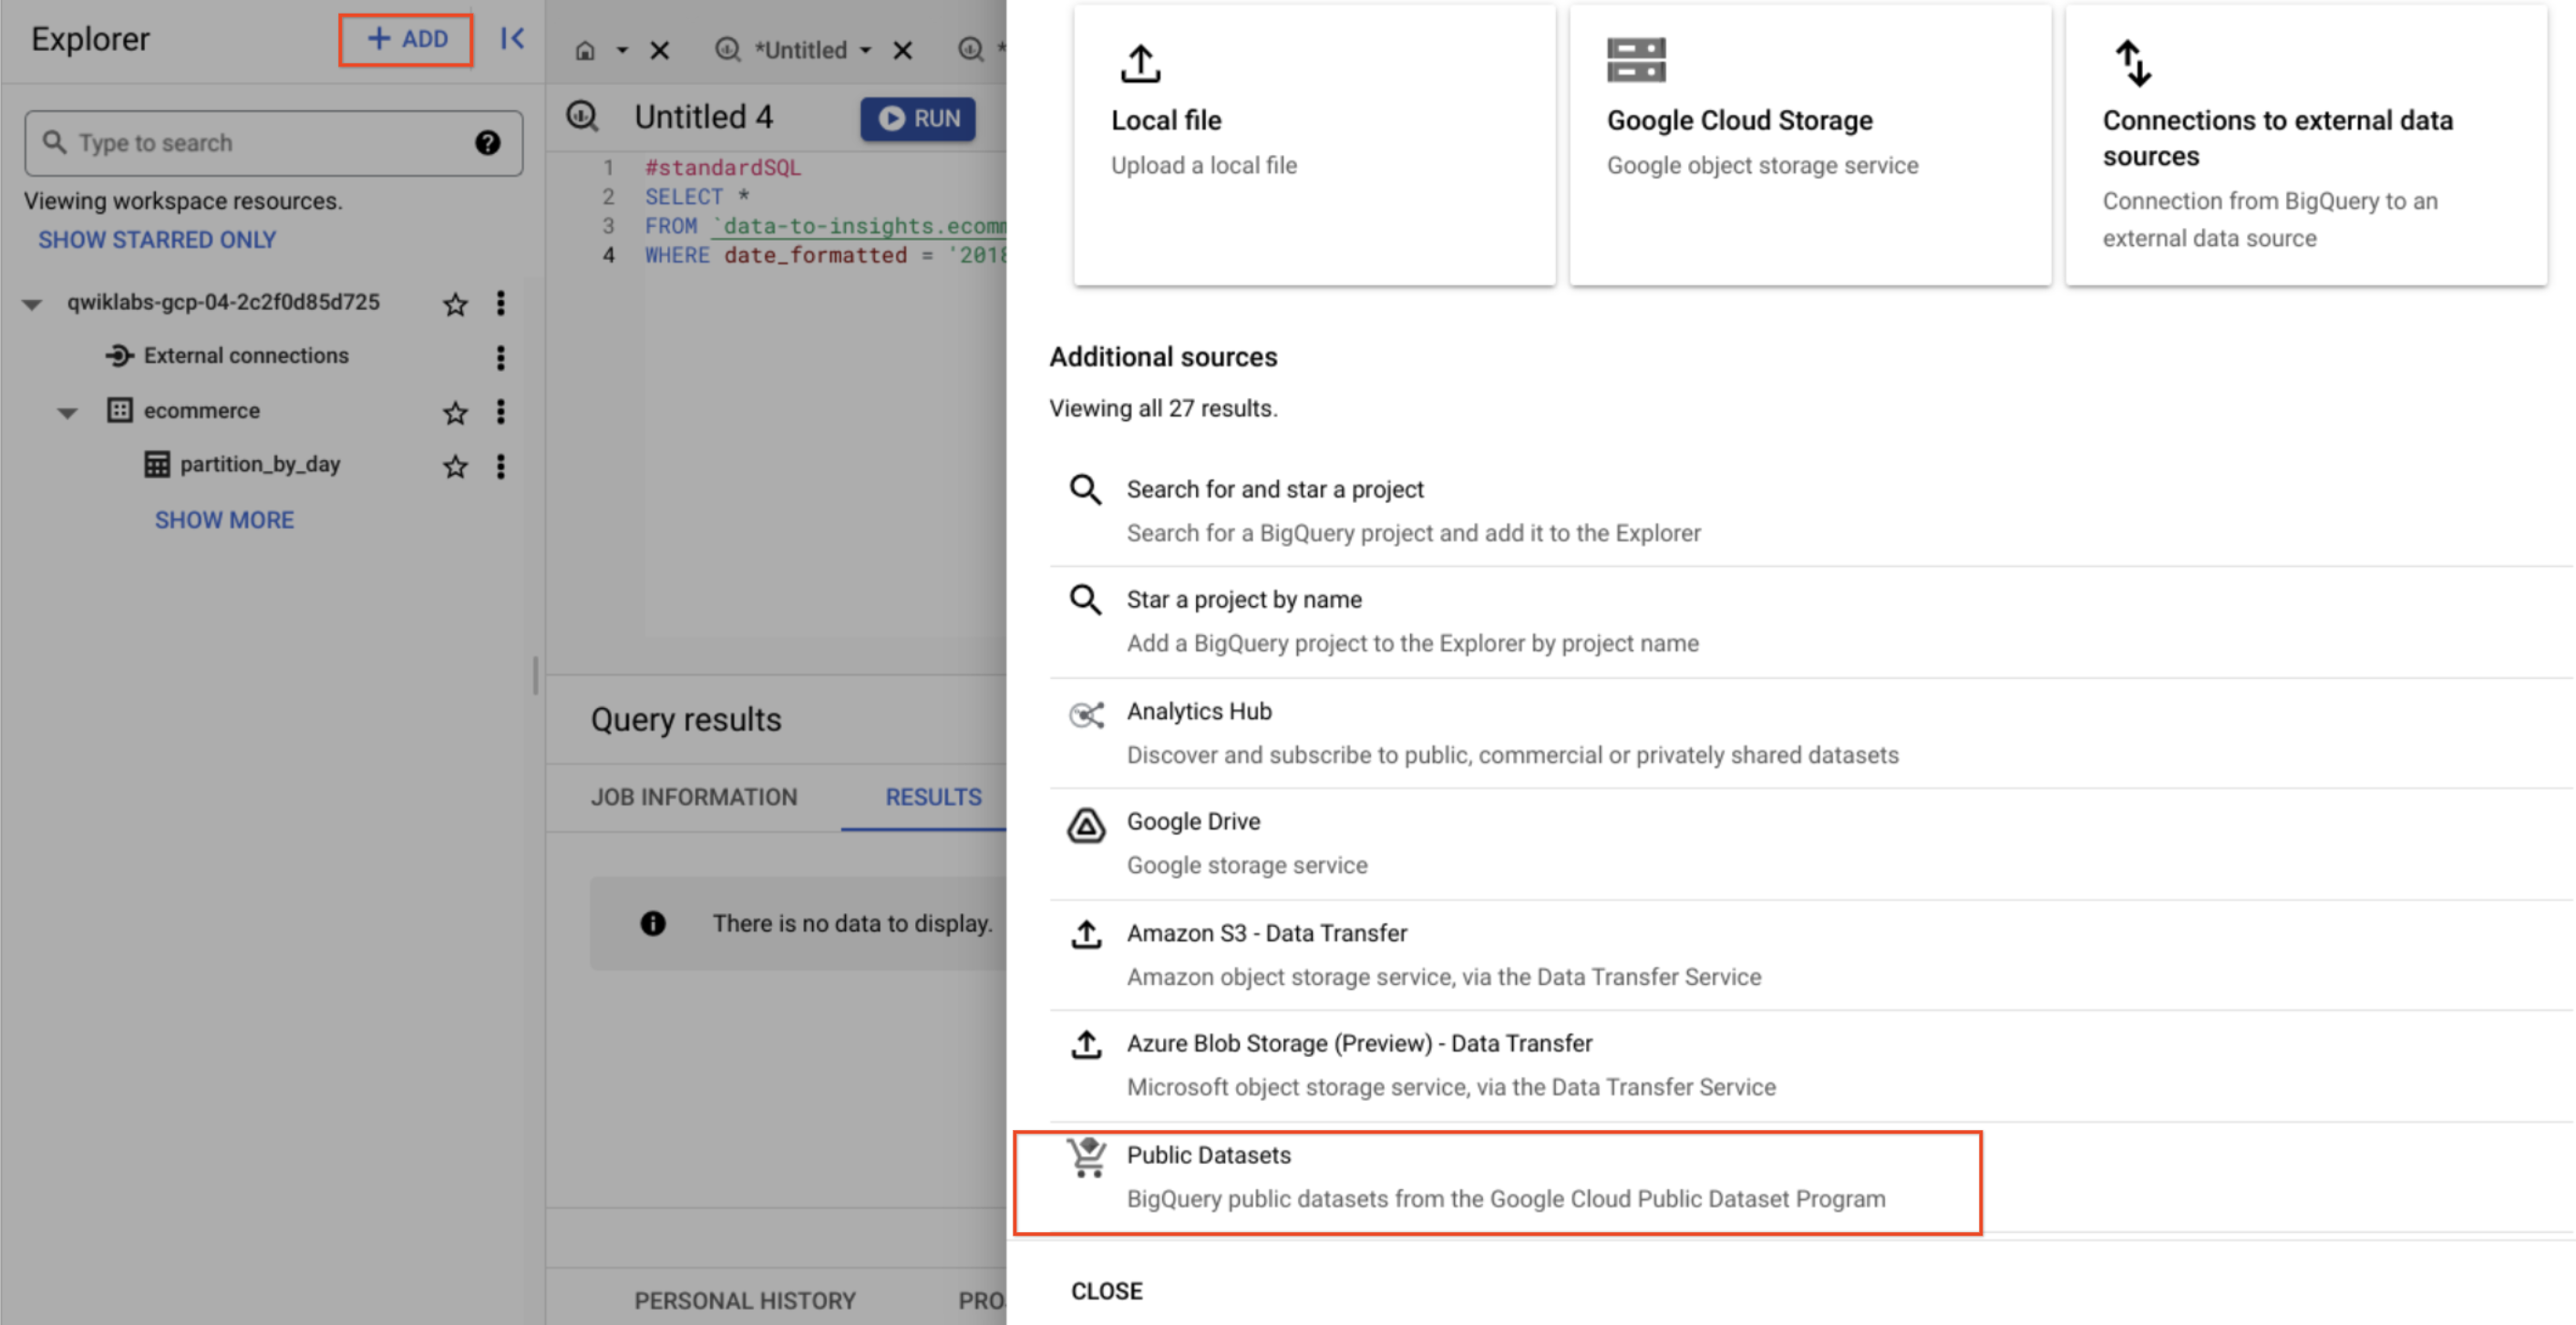
- In the left menu, in Explorer, click on + Add and select Public datasets.
-
Search for GSOD NOAA then select the dataset.
-
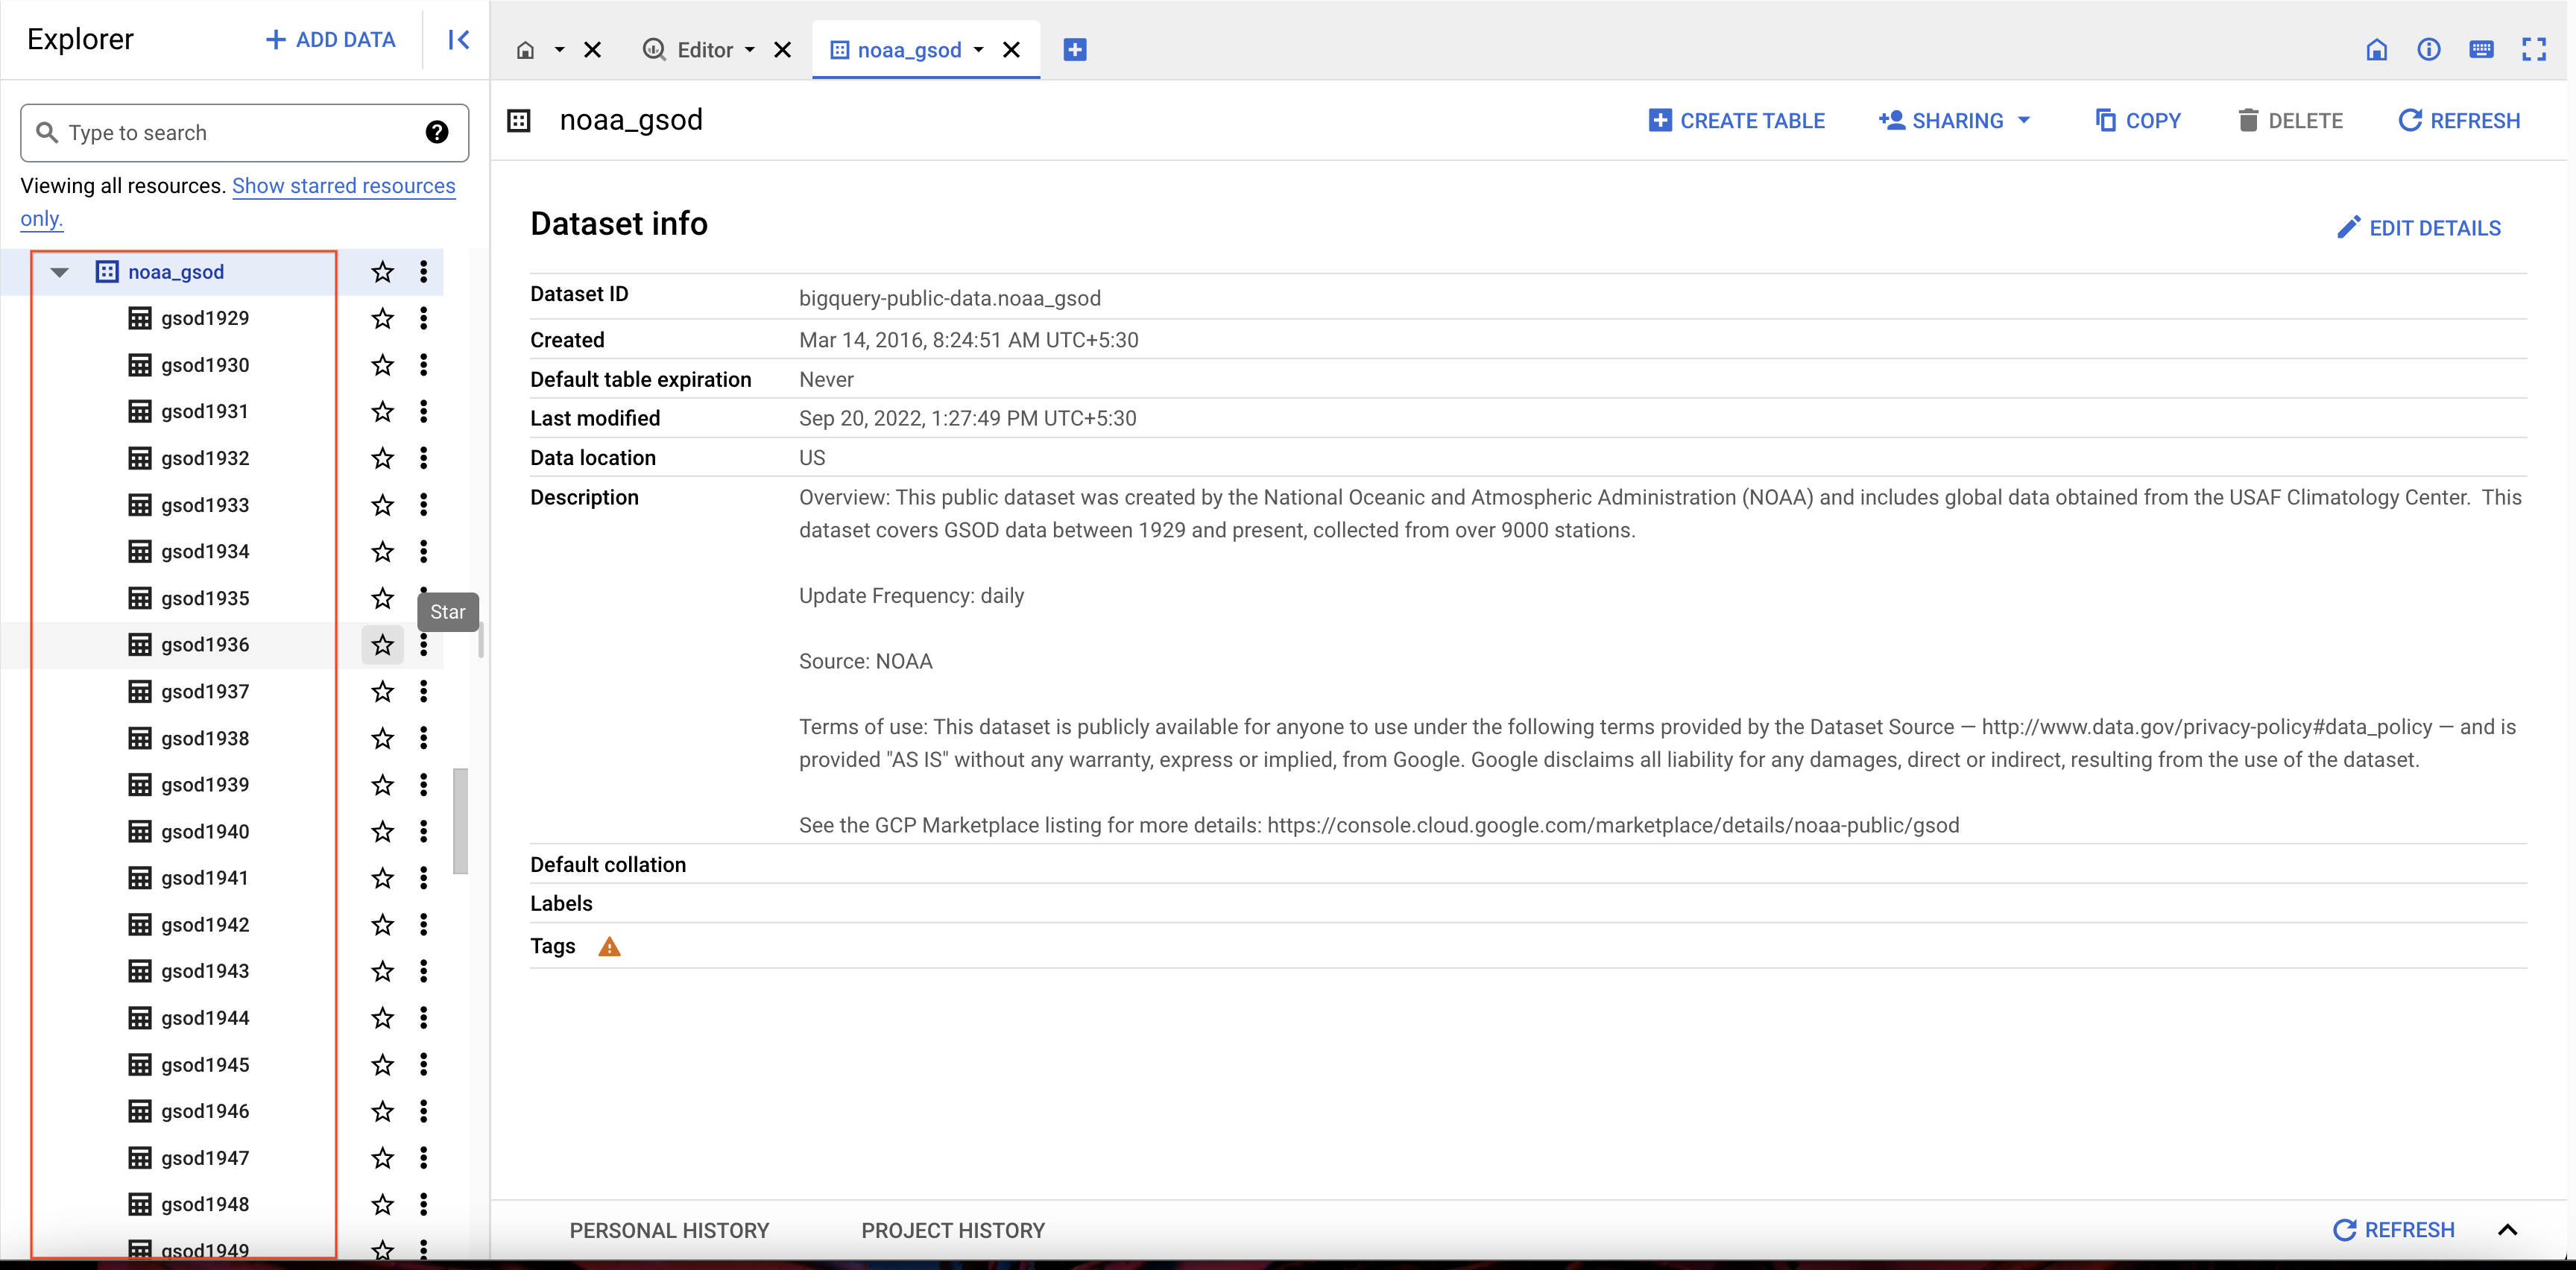
Click on View Dataset.
-
Scroll through the tables in the noaa_gsod dataset (which are manually sharded and not partitioned):
Your goal is to create a table that:
- Queries on weather data from 2018 onward
- Filters to only include days that have had some precipitation (rain, snow, etc.)
- Only stores each partition of data for 90 days from that partition's date (rolling window)
- First, copy and paste this below query:
-
Click Run.
-
Confirm the date is properly formatted and the precipitation field is showing non-zero values.
Task 5. Your turn: create a partitioned table
-
Modify the previous query to create a table with the below specifications:
- Table name: ecommerce.days_with_rain
- Use the date field as your PARTITION BY
- For OPTIONS, specify partition_expiration_days = 60
- Add the table description = "weather stations with precipitation, partitioned by day"
Your query should look like this:
Click Check my progress to verify the objective.
Confirm data partition expiration is working
To confirm you are only storing data from 60 days in the past up until today, run the DATE_DIFF query to get the age of your partitions, which are set to expire after 60 days.
Below is a query which tracks the average rainfall for the NOAA weather station in Wakayama, Japan which has significant precipitation.
- Add this query and run it:
Task 6. Confirm the oldest partition_age is at or below 60 days
Update the ORDER BY clause to show the oldest partitions first.
- Add this query and run it:
Congratulations!
You've successfully created and queried partitioned tables in BigQuery.
Next steps / Learn more
- If you are curious about how to create ingestion-time partitioned tables that are not bound to a specific date or timestamp column, refer to the BigQuery Partition documentation and examples.
- Have a Google Analytics account and want to query your own datasets in BigQuery? Follow this export guide.
- Check out these other BigQuery labs:
Google Cloud training and certification
...helps you make the most of Google Cloud technologies. Our classes include technical skills and best practices to help you get up to speed quickly and continue your learning journey. We offer fundamental to advanced level training, with on-demand, live, and virtual options to suit your busy schedule. Certifications help you validate and prove your skill and expertise in Google Cloud technologies.
Manual Last Updated: February 03, 2024
Lab Last Tested: January 01, 2024
Copyright 2024 Google LLC All rights reserved. Google and the Google logo are trademarks of Google LLC. All other company and product names may be trademarks of the respective companies with which they are associated.


