Checkpoints
Create a Kubernetes Cluster
/ 5
Build and Deploy Nodejs App (hello-node)
/ 5
Allow external traffic to hello-node deployment
/ 5
Running a Containerized App on Google Kubernetes Engine
GSP015

Overview
Google Kubernetes Engine makes it easy to run Docker containers in the cloud. Google Kubernetes Engine uses Kubernetes, an open source container scheduler, to ensure that your cluster is running exactly the way you want it to at all times.
In this lab you will learn how to launch a container and how to launch replicas of that container on Google Kubernetes Engine.
Setup and requirements
Before you click the Start Lab button
Read these instructions. Labs are timed and you cannot pause them. The timer, which starts when you click Start Lab, shows how long Google Cloud resources will be made available to you.
This hands-on lab lets you do the lab activities yourself in a real cloud environment, not in a simulation or demo environment. It does so by giving you new, temporary credentials that you use to sign in and access Google Cloud for the duration of the lab.
To complete this lab, you need:
- Access to a standard internet browser (Chrome browser recommended).
- Time to complete the lab---remember, once you start, you cannot pause a lab.
How to start your lab and sign in to the Google Cloud console
-
Click the Start Lab button. If you need to pay for the lab, a pop-up opens for you to select your payment method. On the left is the Lab Details panel with the following:
- The Open Google Cloud console button
- Time remaining
- The temporary credentials that you must use for this lab
- Other information, if needed, to step through this lab
-
Click Open Google Cloud console (or right-click and select Open Link in Incognito Window if you are running the Chrome browser).
The lab spins up resources, and then opens another tab that shows the Sign in page.
Tip: Arrange the tabs in separate windows, side-by-side.
Note: If you see the Choose an account dialog, click Use Another Account. -
If necessary, copy the Username below and paste it into the Sign in dialog.
{{{user_0.username | "Username"}}} You can also find the Username in the Lab Details panel.
-
Click Next.
-
Copy the Password below and paste it into the Welcome dialog.
{{{user_0.password | "Password"}}} You can also find the Password in the Lab Details panel.
-
Click Next.
Important: You must use the credentials the lab provides you. Do not use your Google Cloud account credentials. Note: Using your own Google Cloud account for this lab may incur extra charges. -
Click through the subsequent pages:
- Accept the terms and conditions.
- Do not add recovery options or two-factor authentication (because this is a temporary account).
- Do not sign up for free trials.
After a few moments, the Google Cloud console opens in this tab.

Activate Cloud Shell
Cloud Shell is a virtual machine that is loaded with development tools. It offers a persistent 5GB home directory and runs on the Google Cloud. Cloud Shell provides command-line access to your Google Cloud resources.
- Click Activate Cloud Shell
at the top of the Google Cloud console.
When you are connected, you are already authenticated, and the project is set to your Project_ID,
gcloud is the command-line tool for Google Cloud. It comes pre-installed on Cloud Shell and supports tab-completion.
- (Optional) You can list the active account name with this command:
- Click Authorize.
Output:
- (Optional) You can list the project ID with this command:
Output:
gcloud, in Google Cloud, refer to the gcloud CLI overview guide.
Task 1. Creating a cluster
In this section you'll create a Google Kubernetes Engine cluster.
Set compute zone
Cloud Shell is a browser based terminal to a virtual machine that has the Google Cloud tools installed on it and some additional tools (like editors and compilers) that are handy when you are developing or debugging your cloud application.
You'll be using the gcloud command to create the cluster. First, set the compute zone so that the virtual machines in your cluster are created in the correct region. Do this using gcloud config set compute/zone.
- Enter the following in Cloud Shell:
Understanding Regions and Zones
Certain Compute Engine resources live in regions or zones. A region is a specific geographical location where you can run your resources. Each region has one or more zones. For example, the us-central1 region denotes a region in the Central United States that has zones us-central1-a, us-central1-b, us-central1-c, and us-central1-f.
| Regions | Zones |
|---|---|
| Western US | us-west1-a, us-west1-b |
| Central US | us-central1-a, us-central1-b, us-central1-d, us-central1-f |
| Eastern US | us-east1-b, us-east1-c, us-east1-d |
| Western Europe | europe-west1-b, europe-west1-c, europe-west1-d |
| Eastern Asia | asia-east1-a, asia-east1-b, asia-east1-c |
Resources that live in a zone are referred to as zonal resources. Virtual machine Instances and persistent disks live in a zone. To attach a persistent disk to a virtual machine instance, both resources must be in the same zone. Similarly, if you want to assign a static IP address to an instance, the instance must be in the same region as the static IP.
Create a new cluster
- Create a new container cluster with the
gcloudcommand like this:
This command creates a new cluster called hello-world with three nodes (VMs). You can configure this command with additional flags to change the number of nodes, the default permissions, and other variables. Refer to the gcloud container clusters create reference for more details.
Launching the cluster may take a few minutes. Once it is up you should see output in Cloud Shell that looks like this:
Test completed task
Click Check my progress to verify your performed task. If you have completed the task successfully you will be granted with an assessment score.
Task 2. Building and publishing the Hello World app
Next, build and publish a container that contains your code. You will use Docker to build the container, and Google Container Registry to securely publish it.
Set your project ID
You will use Project ID in many of the commands in this lab. The Project ID is conveniently stored in an environment variable in Cloud Shell. You can see it here:
Task 3. Get the sample code
- Run the following to clone the samples:
- Change directories:
Build the container
Docker containers are built using a Dockerfile. The sample code provides a basic Dockerfile that we can use.
Here is the contents of the file:
- To build the container, run the following command:
This will build a Docker container image stored locally.
Publish the container
In order for Kubernetes to access your image, you need to store it in a container registry.
- Run the following command to publish your container image:
Task 4. Deploying the Hello World app
Now that we have a cluster running and our application built, it is time to deploy it.
Create your deployment
A deployment is a core component of Kubernetes that makes sure your application is always running. A deployment schedules and manages a set of pods on the cluster. A pod is one or more containers that "travel together". That might mean they are administered together or they have the same network requirements. For this lab there is only one container in your pod.
Typically you would create a yaml file with the configuration for the deployment. For this lab will skip this step and instead directly create the deployment on the command line.
- Create the pod using
kubectl:
This command starts up one copy of the Docker image on one of the nodes in the cluster.
Test completed task
Click Check my progress to verify your performed task. If you have completed the task successfully you will be granted with an assessment score.
- Run the following to see the deployment you created using
kubectl:
You should get back a result that looks something like:
- You can see the pod running using
kubectlas well:
You should get back a result that looks something like:
Allow external traffic
By default, a pod is only accessible to other machines inside the cluster. In order to use the app container that was created, it needs to be exposed as a service.
Typically, you would create a yaml file with the configuration for the service. For this lab will skip this step and instead directly create the deployment on the command line.
- Run the following to expose the deployment with the
kubectl exposecommand:
kubectl expose creates a service, the forwarding rules for the load balancer, and the firewall rules that allow external traffic to be sent to the pod. The --type=LoadBalancer flag creates a Google Cloud Network Load Balancer that will accept external traffic.
- To get the IP address for your service, run the following command:
You should get back a result that looks something like:
External-IP to populate. If you see <pending> for the External-IP, wait 30 seconds and try again.Test completed task
Click Check my progress to verify your performed task. If you have completed the task successfully you will be granted with an assessment score.
Verify the deployment
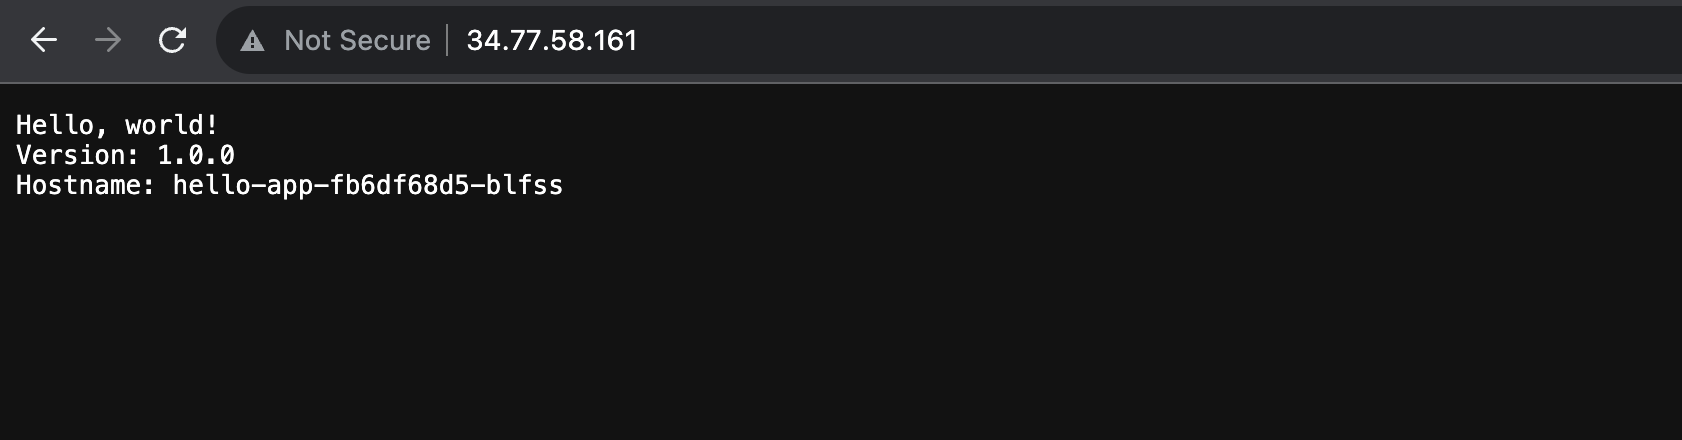
Open a new browser window or tab and navigate to the external IP address from the previous step. You should see the sample code up and running!
Task 5. Test your understanding
Below are multiple-choice questions to reinforce your understanding of this lab's concepts. Answer them to the best of your abilities.
Congratulations!
Google Kubernetes Engine provides a powerful and flexible way to run containers on Google Cloud. Kubernetes can also be used on your own hardware or on other Cloud Providers.
This lab only used a single container, but it is simple to set up multiple container environments, or multiple instances of a single container.
What was covered
- Google Kubernetes Engine
- How to build and launch a simple containerized app on Google Kubernetes Engine
Take your next lab
Try out another lab, like:
Next steps / Learn more
- Learn more about Google Kubernetes Engine.
- Try out the more complicated Guestbook example.
- Wondering how much it'll cost to run your workloads? Check the Pricing Calculator - you can enter the number of instances, vCPU, and memory needs.
Google Cloud training and certification
...helps you make the most of Google Cloud technologies. Our classes include technical skills and best practices to help you get up to speed quickly and continue your learning journey. We offer fundamental to advanced level training, with on-demand, live, and virtual options to suit your busy schedule. Certifications help you validate and prove your skill and expertise in Google Cloud technologies.
Manual Last Updated November 20, 2023
Lab Last Tested November 20, 2023
Copyright 2024 Google LLC All rights reserved. Google and the Google logo are trademarks of Google LLC. All other company and product names may be trademarks of the respective companies with which they are associated.