Checkpoints
Create Bigtable instance
/ 10
Create Kubernetes Engine cluster
/ 10
Create ConfigMap
/ 20
Create OpenTSDB tables in Bigtable
/ 20
Deploy OpenTSDB
/ 10
Create OpenTSDB services
/ 10
Examining time-series data with OpenTSDB
/ 20
Using OpenTSDB to Monitor Time-Series Data on Cloud Platform
- GSP142
- Overview
- Setup and requirements
- Task 1. Preparing your environment
- Task 2. Creating a Bigtable instance
- Task 3. Creating a Kubernetes Engine cluster
- Task 4. Create the images used to deploy and test OpenTSDB
- Task 5. Create and manage the images used to deploy and demonstrate OpenTSDB
- Task 6. Create a ConfigMap with configuration details
- Task 7. Create OpenTSDB tables in Bigtable
- Task 8. Deploying OpenTSDB
- Task 9. Create the OpenTSDB services
- Task 10. Writing time-series data to OpenTSDB
- Task 11. Examine the example time-series data with OpenTSDB
- Congratulations!
GSP142

Overview
In this lab you will learn how to collect, record, and monitor time-series data on Google Cloud using OpenTSDB running on Google Kubernetes Engine and Cloud Bigtable.
Time-series data is a highly valuable asset that you can use for several applications, including trending, monitoring, and machine learning. You can generate time-series data from server infrastructure, application code, and other sources. OpenTSDB can collect and retain large amounts of time-series data with a high degree of granularity.
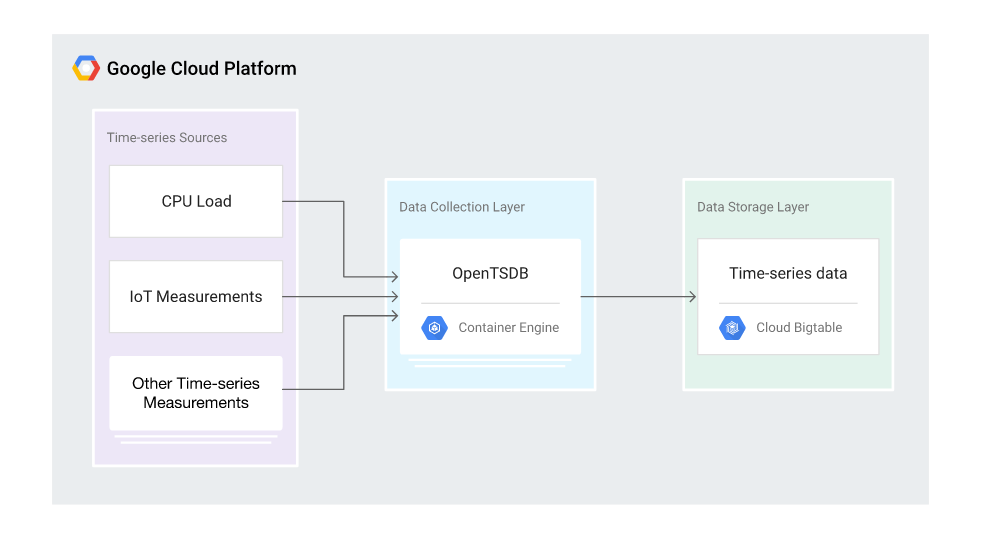
In this hands-on lab you will create a scalable data collection layer using Kubernetes Engine and work with the collected data using Bigtable. The following diagram illustrates the high-level architecture of the solution:
Objectives
- Create a new Bigtable instance.
- Create a new Kubernetes Engine cluster.
- Deploy OpenTSDB to your Kubernetes Engine cluster.
- Send time-series metrics to OpenTSDB.
- Visualize metrics using OpenTSDB and Grafana.
Setup and requirements
Before you click the Start Lab button
Read these instructions. Labs are timed and you cannot pause them. The timer, which starts when you click Start Lab, shows how long Google Cloud resources will be made available to you.
This hands-on lab lets you do the lab activities yourself in a real cloud environment, not in a simulation or demo environment. It does so by giving you new, temporary credentials that you use to sign in and access Google Cloud for the duration of the lab.
To complete this lab, you need:
- Access to a standard internet browser (Chrome browser recommended).
- Time to complete the lab---remember, once you start, you cannot pause a lab.
How to start your lab and sign in to the Google Cloud console
-
Click the Start Lab button. If you need to pay for the lab, a pop-up opens for you to select your payment method. On the left is the Lab Details panel with the following:
- The Open Google Cloud console button
- Time remaining
- The temporary credentials that you must use for this lab
- Other information, if needed, to step through this lab
-
Click Open Google Cloud console (or right-click and select Open Link in Incognito Window if you are running the Chrome browser).
The lab spins up resources, and then opens another tab that shows the Sign in page.
Tip: Arrange the tabs in separate windows, side-by-side.
Note: If you see the Choose an account dialog, click Use Another Account. -
If necessary, copy the Username below and paste it into the Sign in dialog.
{{{user_0.username | "Username"}}} You can also find the Username in the Lab Details panel.
-
Click Next.
-
Copy the Password below and paste it into the Welcome dialog.
{{{user_0.password | "Password"}}} You can also find the Password in the Lab Details panel.
-
Click Next.
Important: You must use the credentials the lab provides you. Do not use your Google Cloud account credentials. Note: Using your own Google Cloud account for this lab may incur extra charges. -
Click through the subsequent pages:
- Accept the terms and conditions.
- Do not add recovery options or two-factor authentication (because this is a temporary account).
- Do not sign up for free trials.
After a few moments, the Google Cloud console opens in this tab.

Activate Cloud Shell
Cloud Shell is a virtual machine that is loaded with development tools. It offers a persistent 5GB home directory and runs on the Google Cloud. Cloud Shell provides command-line access to your Google Cloud resources.
- Click Activate Cloud Shell
at the top of the Google Cloud console.
When you are connected, you are already authenticated, and the project is set to your Project_ID,
gcloud is the command-line tool for Google Cloud. It comes pre-installed on Cloud Shell and supports tab-completion.
- (Optional) You can list the active account name with this command:
- Click Authorize.
Output:
- (Optional) You can list the project ID with this command:
Output:
gcloud, in Google Cloud, refer to the gcloud CLI overview guide.
Task 1. Preparing your environment
-
Enter the following commands in Cloud Shell to prepare your environment.
-
Set the default Compute Engine zone to
to create your Bigtable cluster:
- Clone the git repository containing the sample code:
- Change to the sample code directory:
Task 2. Creating a Bigtable instance
You will be using Cloud Bigtable to store the time-series data that you collect. You must create a Bigtable instance to do that work.
Bigtable is a key/wide-column store that works especially well for time-series data, explained in Bigtable Schema Design for Time Series Data. Bigtable supports the HBase API, which makes it easy for you to use software designed to work with Apache HBase, such as OpenTSDB. You can learn about the HBase schema used by OpenTSDB in the OpenTSDB documentation.
A key component of OpenTSDB is the AsyncHBase client, which enables it to bulk-write to HBase in a fully asynchronous, non-blocking, thread-safe manner. When you use OpenTSDB with Bigtable, AsyncHBase is implemented as the AsyncBigtable client.
The ability to easily scale to meet your needs is a key feature of Bigtable. This lab uses a single-node development cluster because it is sufficient for the task and is economical. You should start your projects in a development cluster, moving to a larger production cluster when you are ready to work with production data. The Bigtable documentation includes detailed discussion about performance and scaling to help you pick a cluster size for your own work.
Now you will create your Bigtable instance.
- In Cloud Shell, set the environment variables for your Google Cloud zone where you will create your Bigtable cluster and GKE cluster and the instance identifier for your Bigtable cluster:
- Create the Bigtable instance:
Click Check my progress to verify the objective.
Task 3. Creating a Kubernetes Engine cluster
Kubernetes Engine provides a managed Kubernetes environment. After you create a Kubernetes Engine cluster, you can deploy Kubernetes pods to it. This Qwiklab uses Kubernetes Engine and Kubernetes pods to run OpenTSDB.
OpenTSDB separates its storage from its application layer, which enables it to be deployed across multiple instances simultaneously. By running in parallel, it can handle a large amount of time-series data. Packaging OpenTSDB into a Docker container enables easy deployment at scale using Kubernetes Engine.
- In Cloud Shell create a Kubernetes cluster by running the following command:
Adding the two extra scopes to your Kubernetes cluster allows your OpenTSDB container to interact with Bigtable. You can pull images from Google Container Registry without adding a scope for Cloud Storage, because the cluster can read from Cloud Storage by default. You might need additional scopes in other deployments.
Click Check my progress to verify the objective.
Task 4. Create the images used to deploy and test OpenTSDB
To deploy and demonstrate OpenTSDB with a Bigtable storage backend, this guide uses a series of Docker container images that are deployed to GKE. You build several of these images using code from an accompanying GitHub repository with Cloud Build. When deploying infrastructure to GKE, a container repository is used. In this guide, you use Artifact Registry to manage these container images.
- In Cloud Shell, set the environment variables for your Google Cloud zone where you will create your Artifact Registry repository:
- Create an Artifact Registry repository:
Task 5. Create and manage the images used to deploy and demonstrate OpenTSDB
Two Docker container images are used in this lab. The first image is used for two purposes: to perform the one-time Bigtable database setup for OpenTSDB, and to deploy the read and write service containers for the OpenTSDB deployment. The second image is used to generate sample metric data to demonstrate your OpenTSDB deployment.
When you submit the container image build job to Cloud Build, you tag the images so that they are stored in the Artifact Registry after they are built.
- Set the environment variables for the OpenTSDB server image that uses Bigtable as the storage backend:
- Build the image using Cloud Build:
Because you tagged the image appropriately, when the build is complete, the image will be managed by your Artifact Registry repository.
- Set the environment variables for the demonstration time series data generation image:
- Build the image using Cloud Build:
Task 6. Create a ConfigMap with configuration details
Kubernetes uses the ConfigMap to decouple configuration details from the container image in order to make applications more portable. The configuration for OpenTSDB is specified in the opentsdb.conf file. A ConfigMap containing the opentsdb.conf file is included with the sample code.
In this and following steps, you use the GNU envsubst utility to replace environment variable placeholders in the YAML template files will the respective values for your deployment.
- Create a ConfigMap from the updated
opentsdb-config.yamlfile:
opentsdb.conf ConfigMap and apply it to push the changes to the cluster. Some changes require you to restart processes.Click Check my progress to verify the objective.
Task 7. Create OpenTSDB tables in Bigtable
Before you can read or write data using OpenTSDB, you need to create the necessary tables in Bigtable to store that data. Follow these steps to create a Kubernetes job that creates the tables.
- In Cloud Shell, launch the job:
The job can take up to a minute or more to complete.
- Verify that the job has completed successfully:
The output should indicate 1 SUCCEEDED under the heading, Pods Statuses. Do not proceed until you see this status.
Click Check my progress to verify the objective.
- Examine the table creation job logs:
The output is similar to the following:
The output lists each table that was created. This job runs several table creation commands, each using the format of create TABLE_NAME. The tables are successfully created when you have output in the form of 0 row(s) in TIME seconds.
- TABLE_NAME: The name of the table that the job creates
- TIME: The amount of time it took to create the table
Data model
The tables you just created will store data points from OpenTSDB. In a later step, you will configure a test service to write time-series data into these tables. Time-series data points are organized and stored as follows:
|
Field |
Required |
Description |
Example |
|
|
Required |
Item that is being measured - the default key |
|
|
|
Required |
Epoch time of the measurement |
|
|
|
Required |
Measurement value |
|
|
|
At least one tag is required |
Qualifies the measurement for querying purposes |
|
The metric, timestamp, and tags (tag key and tag value) form the row key. The timestamp is normalized to one hour, to ensure that a row does not contain too many data points. For more information, see HBase Schema.
Task 8. Deploying OpenTSDB
The rest of this Qwiklab provides instructions for making the sample scenario work. The following diagram shows the architecture you will use:

This Qwiklab uses two OpenTSDB Kubernetes deployments: one deployment sends metrics to Bigtable and the other deployment reads from it. Using two deployments prevents long-running reads and writes from blocking each other. The Pods in each deployment use the same container image. OpenTSDB provides a daemon called tsd that runs in each container.
A single tsd process can handle a high throughput of events per second. To distribute load, each deployment in this guide creates three replicas of the read and write Pods.
- In Cloud Shell, create a deployment for writing metrics:
The configuration information for the write deployment is in the opentsdb-write.yaml.tpl file in the deployments folder of the guide repository.
- Create a deployment for reading metrics:
The configuration information for the reader deployment is in the opentsdb-read.yaml.tpl file in the deployments folder of the guide repository.
- Check that the deployment for reading and writing metrics is running:
- Repeat the last command until you see that the
opentsdb-readandopentsdb-writepods all have a status ofRunning:
In a production deployment, you can increase the number of tsd Pods that are running, either manually or by using autoscaling in Kubernetes. Similarly, you can increase the number of instances in your GKE cluster manually or by using cluster autoscaler.
Click Check my progress to verify the objective.
Task 9. Create the OpenTSDB services
In order to provide consistent network connectivity to the deployments, you will create two Kubernetes services. One service writes metrics into OpenTSDB and the other reads.
- In Cloud Shell, create the service for writing metrics:
The configuration information for the metrics reading service is contained in opentsdb-write.yaml in the services folder of the example repository. This service is created inside your Kubernetes cluster and is reachable by other services running in your cluster.
- Create the service for reading metrics:
This service is created inside your Kubernetes cluster and is accessible to other services running in your cluster. In the next section of this lab you write metrics to this service.
- Check that the
opentsdb-writeandopentsdb-readservices are running:
You should see the opentsdb-write and opentsdb-read services listed:
Click Check my progress to verify the objective.
Task 10. Writing time-series data to OpenTSDB
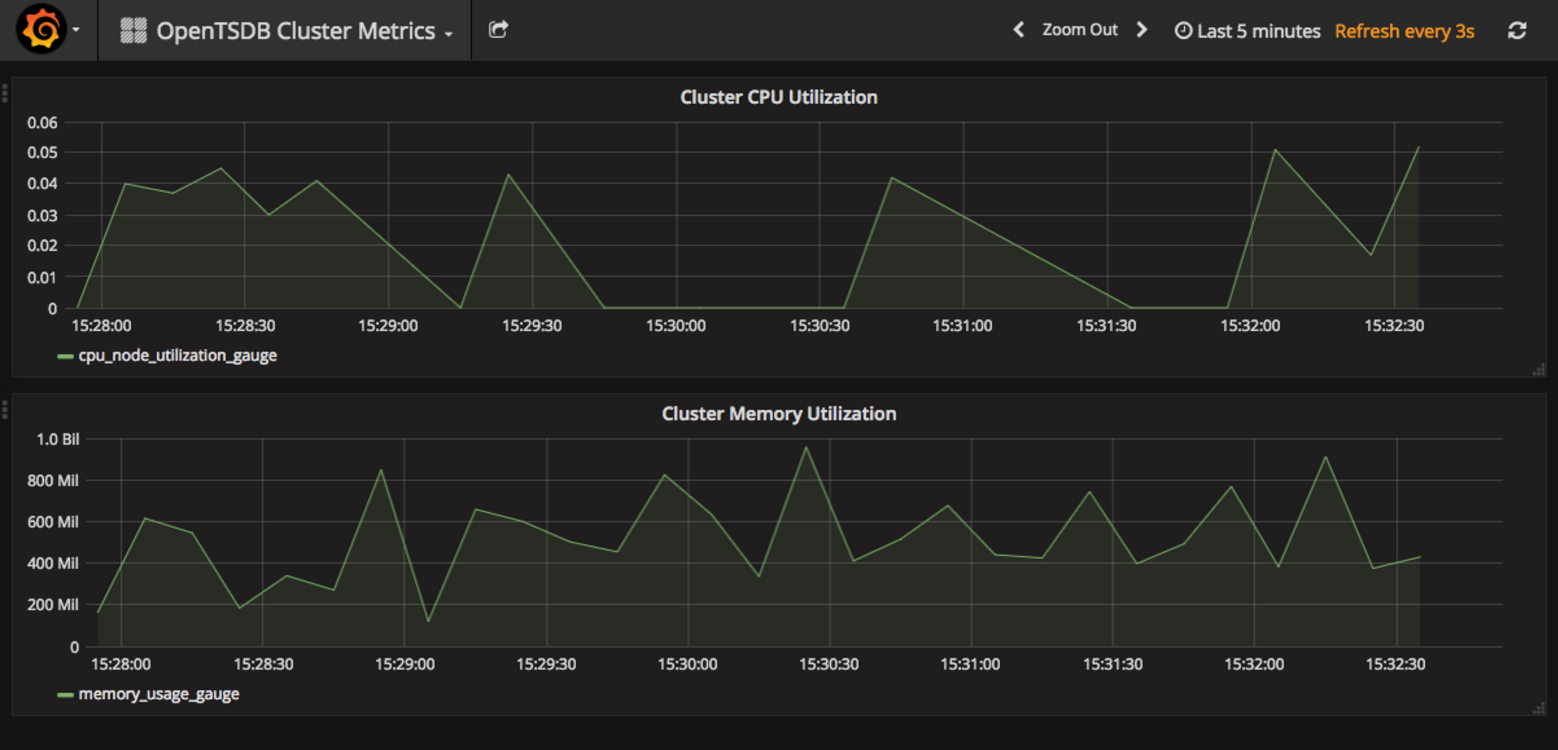
There are several mechanisms to write data into OpenTSDB. After you define service endpoints, you can direct processes to begin writing data to them. This guide deploys a Python service that emits demonstrative time-series data for two metrics: Cluster Memory Utilization (memory_usage_gauge) and Cluster CPU Utilization (cpu_node_utilization_gauge).
- In Cloud Shell, deploy the time series metric generator to your cluster:
Task 11. Examine the example time-series data with OpenTSDB
You can query time-series metrics by using the opentsdb-read service endpoint that you deployed earlier. You can use the data in a variety of ways. One common option is to visualize it. OpenTSDB includes a basic interface to visualize metrics that it collects. This lab uses Grafana, a popular alternative for visualizing metrics that provides additional functionality.
Running Grafana in your cluster requires a similar process that you used to set up OpenTSDB. In addition to creating a ConfigMap and a deployment, you need to configure port forwarding so that you can access Grafana while it is running in your Kubernetes cluster.
- In Cloud Shell, create the Grafana ConfigMap using the configuration information in the
grafana.yamlfile in theconfigmapsfolder of the guide repository:
- Check that the Grafana configmap has been created:
You should now see grafana-config in the list of configmaps:
- Create the Grafana deployment using the configuration information in
grafana.yamlin thedeploymentsfolder of the example repository:
- Check that the Grafana deployment is available:
- Repeat the last command until you see the
AVAILABLEvalue for thegrafanadeployment report as1:
Click Check my progress to verify the objective.
- Get the name of the Grafana pod in the cluster and use it to set up port forwarding:
- Verify that forwarding was successful. The output is similar to the following:
- To connect to the Grafana web interface, in Cloud Shell, click Web Preview and then select Preview on port 8080.
A new browser tab opens and connects to the Grafana web interface. After a few moments, the browser displays graphs like this:
This deployment of Grafana has been customized for this lab. The files configmaps/grafana.yaml and deployments/grafana.yaml configure Grafana to:
- Connect to the
opentsdb-readservice - Allow anonymous authentication
- Display some basic cluster metrics
A deployment of Grafana in a production environment would implement the proper authentication mechanisms and use richer time-series graphs.
Congratulations!
You have now successfully completed the Using OpenTSDB to Monitor Time-Series Data on Cloud Platform.
Take your next lab
Continue your quest, check out these suggestions:
- Scanning User-generated Content Using the Cloud Video Intelligence and Cloud Vision APIs
- Running Distributed TensorFlow on Compute Engine
Next steps / Learn more
- To learn how to improve the performance of your uses of OpenTSDB, consult Bigtable Schema Design for Time Series Data.
- The video Bigtable in Action, in Google Cloud Next 17, describes field promotion and other performance considerations.
- The documentation on cluster scopes for Kubernetes Engine Clusters describes default scopes, such as Cloud Storage, and scopes you can add for other Google services.
Google Cloud training and certification
...helps you make the most of Google Cloud technologies. Our classes include technical skills and best practices to help you get up to speed quickly and continue your learning journey. We offer fundamental to advanced level training, with on-demand, live, and virtual options to suit your busy schedule. Certifications help you validate and prove your skill and expertise in Google Cloud technologies.
Manual Last Updated April 15, 2024
Lab Last Tested April 15, 2024
Copyright 2024 Google LLC All rights reserved. Google and the Google logo are trademarks of Google LLC. All other company and product names may be trademarks of the respective companies with which they are associated.