체크포인트
Create a custom network in project A
/ 20
Create a custom network in project B
/ 20
Peer network-a with network-b
/ 30
Peer network-b with network-a
/ 30
VPC Network Peering
GSP193

Overview
Google Cloud Virtual Private Cloud (VPC) Network Peering allows private connectivity across two VPC networks regardless of whether or not they belong to the same project or the same organization.
VPC Network Peering allows you to build SaaS (Software-as-a-Service) ecosystems in Google Cloud, making services available privately across different VPC networks within and across organizations, allowing workloads to communicate in private space.
VPC Network Peering is useful for:
- Organizations with several network administrative domains.
- Organizations that want to peer with other organizations.
If you have multiple network administrative domains within your organization, VPC Network Peering allows you to make services available across VPC networks in private space. If you offer services to other organizations, VPC Network Peering allows you to make those services available in private space to those organizations.
The ability to offer services across organizations is useful if you want to offer services to other enterprises, and it is useful within your own enterprise if you have several distinct organization nodes due to your own structure or as a result of mergers or acquisitions.
VPC Network Peering gives you several advantages over using external IP addresses or VPNs to connect networks, including:
- Network Latency: Private networking offers lower latency than public IP networking.
- Network Security: Service owners do not need to have their services exposed to the public Internet and deal with its associated risks.
- Network Cost: Networks that are peered can use internal IPs to communicate and save Google Cloud egress bandwidth costs. Regular network pricing still applies to all traffic.
What you'll do
- Create a custom network in two projects
- Set up a VPC network peering session
Setup and requirements
Before you click the Start Lab button
Read these instructions. Labs are timed and you cannot pause them. The timer, which starts when you click Start Lab, shows how long Google Cloud resources will be made available to you.
This hands-on lab lets you do the lab activities yourself in a real cloud environment, not in a simulation or demo environment. It does so by giving you new, temporary credentials that you use to sign in and access Google Cloud for the duration of the lab.
To complete this lab, you need:
- Access to a standard internet browser (Chrome browser recommended).
- Time to complete the lab---remember, once you start, you cannot pause a lab.
How to start your lab and sign in to the Google Cloud console
-
Click the Start Lab button. If you need to pay for the lab, a pop-up opens for you to select your payment method. On the left is the Lab Details panel with the following:
- The Open Google Cloud console button
- Time remaining
- The temporary credentials that you must use for this lab
- Other information, if needed, to step through this lab
-
Click Open Google Cloud console (or right-click and select Open Link in Incognito Window if you are running the Chrome browser).
The lab spins up resources, and then opens another tab that shows the Sign in page.
Tip: Arrange the tabs in separate windows, side-by-side.
Note: If you see the Choose an account dialog, click Use Another Account. -
If necessary, copy the Username below and paste it into the Sign in dialog.
{{{user_0.username | "Username"}}} You can also find the Username in the Lab Details panel.
-
Click Next.
-
Copy the Password below and paste it into the Welcome dialog.
{{{user_0.password | "Password"}}} You can also find the Password in the Lab Details panel.
-
Click Next.
Important: You must use the credentials the lab provides you. Do not use your Google Cloud account credentials. Note: Using your own Google Cloud account for this lab may incur extra charges. -
Click through the subsequent pages:
- Accept the terms and conditions.
- Do not add recovery options or two-factor authentication (because this is a temporary account).
- Do not sign up for free trials.
After a few moments, the Google Cloud console opens in this tab.

Activate Cloud Shell
Cloud Shell is a virtual machine that is loaded with development tools. It offers a persistent 5GB home directory and runs on the Google Cloud. Cloud Shell provides command-line access to your Google Cloud resources.
- Click Activate Cloud Shell
at the top of the Google Cloud console.
When you are connected, you are already authenticated, and the project is set to your Project_ID,
gcloud is the command-line tool for Google Cloud. It comes pre-installed on Cloud Shell and supports tab-completion.
- (Optional) You can list the active account name with this command:
- Click Authorize.
Output:
- (Optional) You can list the project ID with this command:
Output:
gcloud, in Google Cloud, refer to the gcloud CLI overview guide.
Task 1. Create a custom network in both projects
Within the same organization node, a network could be hosting services that need to be accessible from other VPC networks in the same or different projects.
Alternatively, one organization may want to access services a third-party service is offering.
Project names are unique across all of Google Cloud, so you do not need to specify the organization when setting up peering. Google Cloud knows the organization based on the project name.
In this lab, you have been provisioned 2 projects, the first project is project-A and second is project-B.
-
In each project, start a new Cloud Shell by click + icon.
-
In the Cloud Shell for project-A, set the project ID for the project-A:
- In the Cloud Shell for project-B, set the project ID for the project-B:
project-A:
- Go back to first Cloud Shell and run the following to create a custom network:
- Create a subnet within this VPC and specify a region and IP range by running:
- Create a VM instance:
- Run the following to enable SSH and
icmp, because you'll need a secure shell to communicate with VMs during connectivity testing:
Next you set up Project-B in the same way.
Click Check my progress to verify the objective.
project-B:
- Switch to the second Cloud Shell and create a custom network:
- Create a subnet within this VPC and specify a region and IP range by running:
- Create a VM instance:
- Run the following to enable SSH and
icmp, because you'll need a secure shell to communicate with VMs during connectivity testing:
Click Check my progress to verify the objective.
Task 2. Set up a VPC network peering session
Consider an organization which needs VPC Network Peering to be established between network-A in project-A, and network-B in project-B. In order for VPC Network Peering to be established successfully, administrators of network-A and network-B must separately configure the peering association.
Peer network-A with network-B:
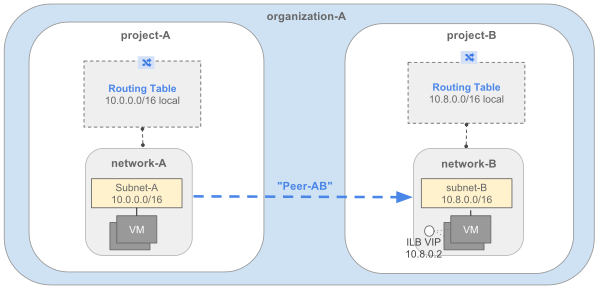
Select the correct project in the console before you apply the setting by clicking the down arrow next to the Project ID at the top of the screen, then select which project ID you need.

project-A
Go to the VPC Network Peering in the Cloud Console by navigating to the Networking section and clicking VPC Network > VPC network peering in the left menu. Once you're there:
- Click Create connection.
- Click Continue.
- Type "peer-ab" as the Name for this side of the connection.
- Under Your VPC network, select the network you want to peer (network-a).
- Set the Peered VPC network radio buttons to In another project.
- Paste in the Project ID of the second project.
- Type in the VPC network name of the other network (network-b).
- Click Create.
At this point, the peering state remains INACTIVE because there is no matching configuration in network-b in project-B. You should see the Status message, Waiting for peer network to connect.
Click Check my progress to verify the objective.
Peer network-b with network-a
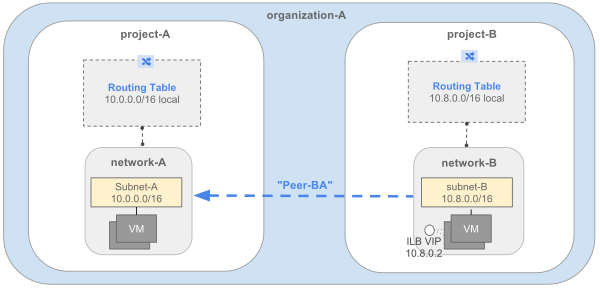
Note: Switch to the second project in the console.
project-B
- Click Create connection.
- Click Continue.
- Type "peer-ba" as the Name for this side of the connection.
- Under Your VPC network, select the network you want to peer (network-b).
- Set the Peering VPC network radio buttons to In another project, unless you wish to peer within the same project.
- Specify the Project ID of the first project.
- Specify VPC network name of the other network (network-a).
- Click Create.
In the VPC network peering, you should now see peer-ba listed in the property list.
VPC Network Peering becomes ACTIVE and routes are exchanged As soon as the peering moves to an ACTIVE state, traffic flows are set up:
- Between VM instances in the peered networks: Full mesh connectivity.
- From VM instances in one network to Internal Load Balancing endpoints in the peered network.
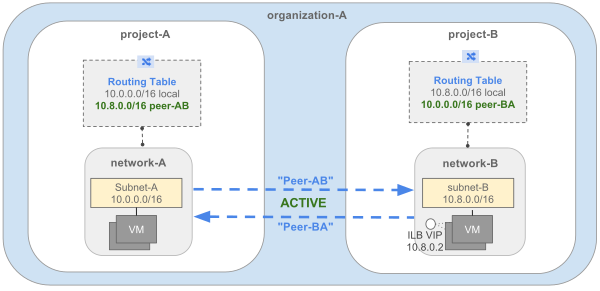
The routes to peered network CIDR prefixes are now visible across the VPC network peers. These routes are implicit routes generated for active peerings. They don't have corresponding route resources. The following command lists routes for all VPC networks for project-A.
Example output:
Click Check my progress to verify the objective.
Task 3. Test connectivity
In this task, you perform a connectivity test.
project-A
-
Navigate to VM instances console by clicking Navigation Menu > Compute Engine > VM instances.
-
Copy the INTERNAL_IP for
vm-a.
project-B
- Click Navigation Menu > Compute Engine > VM instances.
SSH into vm-b instance.
- In the SSH shell of
vm-b, run the following command replacing<INTERNAL_IP_OF_VM_A>with the vm-a instance INTERNAL_IP:
Example output:
Congratulations!
You learned how to set up VPC peering across projects in Google Cloud.
Next steps / Learn more
- Read more about VPC networks.
- Read more about VPC network peering.
Google Cloud training and certification
...helps you make the most of Google Cloud technologies. Our classes include technical skills and best practices to help you get up to speed quickly and continue your learning journey. We offer fundamental to advanced level training, with on-demand, live, and virtual options to suit your busy schedule. Certifications help you validate and prove your skill and expertise in Google Cloud technologies.
Manual Last Updated April 15, 2024
Lab Last Tested September 25, 2023
Copyright 2024 Google LLC All rights reserved. Google and the Google logo are trademarks of Google LLC. All other company and product names may be trademarks of the respective companies with which they are associated.